Something Saturday - One Sheet Wonder

 Hi there Creators,

Well today I was showing how to make a One Sheet Wonder (for those uninitiated) it's where you stamp up a sheet of paper or take a piece of Designer Paper, cut it several ways and make a heap of cards up from it.

I've used an A4 Sheet of paper and stamped the gorgeous new Flowing Flowers 157880 $44, using my 2021-2023 In Colour Stampin' Write Markers. (you can get all 5 of them for $26.25)

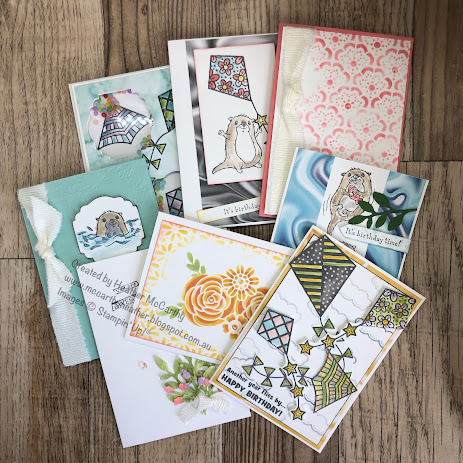
Anyway onto the photos.....

Here are the first set of cards I made before the video I've used some of the Brights colours with a white background for these ones:

 In the video I mention that I plan to dress up the cards a bit more, I've used the cute Brushed Brass Butterflies 158136 $ 17.50 for these cards:
Flowing Flowers, Stampin' Up!, One Sheet Wonder
 
The cards I made in the video have use the In Colours on a Vanilla Background:
 
Flowing Flowers, Stampin' Up!, One Sheet Wonder
And I've used the 2021 - 2023 In Colour Jewels (they're so pretty) and of course go beautifully with the ink colours!
Flowing Flowers, Stampin' Up!, One Sheet Wonder

Instructions.....

  • First up take your piece of A4 White or Vanilla card, and stamp it up, I go with stamping the largest stamp randomly first, then moving down to the smallest stamp (make sure you leave room for the different stamps, but working this way, you should be able to fill in the small gaps with the smallest stamps) 
Stampin' Up!, Flowing Flowers, One Sheet Wonder

 
  • Once you're happy with the way the whole sheet looks you can start cutting, here is my (rough) cutting guide for A4 sheet:   Cut the whole sheet in1/2 so you have 2 A5 sheets, fold one of these in 1/2 to make one card, then cut the other sheet, as shown:
    One Sheet Wonder

  •  then you can decide on colours to go under each piece, I used a 2.5cm piece under all the 2cm strips, then found some random scraps for the other 2 cards
  • The first card has the 3 strips mounted on coloured card strips and attached to the card, with a saying at the bottom
  • 2nd card has the 2 strips, again mounted onto coloured card, and attached in a cross shape to your card.
  • Cards 3 & 4 just use the stamped piece as the focal point of each card.
  • Card 5 is stamped on both the front and the back, just for something different!, but if you didn't want that, you could use the A5 sheet to make 4 more cards like the first 4 or just cut it in 1/2 and stick on the front of a card!

 As you can see really quite simple 😊

To see what I used click here:  What Heather Used

I hope this inspires you to have a go too, you could use Designer Paper to create the same cards, if you didn't want to stamp.

God Bless love 

Heather xox

Something Saturday - Let's get Masking

Hi there Creators,

This Something Saturday I couldn't resist using the fabulous Butterflies & Flowers Layering Decorative Masks (158142 $17.50).  I've been using them a heap as I've been prepping for my Mega Class on 29th January.  They're so cool!! Lol

Anyway this time I figured I'd show how to make a single layer card, I think I used all but one of the masks.

Here is the initial card I had made up before the video I'd used the Regals colour palette for this card: Real Red for the butterfly, Rich Razzleberry and Blackberry Bliss for the central flowers, Cherry Cobbler for the single flower, and Shaded Spruce for the leaves,  Oh and Crushed Curry on the background


Butterflies & Flowers Layering Decorative Masks, Stampin' Up!

Then this card I made in the video using Brights colours palette, (and a sneaky subtle...)

I've used Flirty Flamingo for the butterfly, Bermuda Bay and Pacific Point for the central flowers, Mango Melody for the single flower, with Granny Apple Green for the leaves, then Soft Sea Foam for the background.  I personally prefer this one, where I swapped the background and inside butterfly masks over.  As you can see there is something extra on there!  It's the gorgeous Gilded Leafing 😊


Butterflies & Flowers Layering Decorative Masks, Stampin' Up!

It's pretty simple to create this card (and cheap! - gotta like that!)

Lay down the butterfly outer mask then pop whichever mask you want showing inside it over top, and hold it firmly in place (if any of it is really close to the edge, add a bit of scrap paper under the edge of the mask, so you don't accidentally colour anywhere extra on your card) then daub or brush over top  the colour of your choice.  When this is covered, remove the top mask and keep the bottom mask still there, then daub from the outside of the mask, allowing the middle to stay light.

The middle flowers use 2 masks on one, start with what I consider to be the one on the bottom of the sheet.  It's the more filled in mask, if you do that one first then the more delicate one lines up a lot easier, with the top and bottom flowers (don't try and line it up with the 2 side flowers as it doesn't make sense that way)

The single flower can be done so you do one part then the other and it can either sit directly on top of each other or you can offset it as I've done on this card., then of course add the leaves!

The Gilded Leafing is added by drawing on fine lines of glue - I use the Tombow thin end (Multipurpose Liquid Glue), allow it to dry slightly, then dunk in the gilded leafing, and brush off the excess (I use a sponge for this)

Want to see what I used, click here: What Heather used

and that's it!  check out the video here:


 I hope this inspires you to create.

God Bless love

Heather xox


Something Saturday - Colouring in your stamps a different way

 Hi there Creators, 

Today I'm showing you how to use daubers to colour in your block image stamps, you can get the prettiest combinations of colour onto one stamp this way.

I've used the Boughs & Blossoms Bundle (157712, $59.25)  (from the new Mini Catalogue) made up of the Bough Punch (157711, $31) and the Boughs & Blossoms Stamp set ($35, 157703)  I'd already decided I had to have the punch, and as it turns out we're using it in the Mega class on 29th January.  But when I see bundles I usually have to get both sections of it!  However the punch doesn't actually cut any of the stamped images out.

Anyway on to photos.....

this is the first card I had made up already to show, I've used my Brights colours on this, Daffodil Delight, Mango Melody and Poppy Parade for the flowers, then Granny Apple Green and Garden Green for the leaves (admittedly Garden Green isn't in the Brights colour range but it goes well!)

 
Then in the video I made up this card, using some more of the Brights colour range: Coastal Cabana, Bermuda Bay and Pacific Point for the flowers then the same combination for leaves, I'm not sure the photos give them as much justice.  The colours are so vibrant in the flesh!
Boughs & Blossoms, Stampin' Up!, Being CreateAble with Heathe
 
Then because I'd done a "Blue Peter" and stamped and cut out the flowers earlier for the main card I also stamped the flower on this one during the video, then made it up into the tag afterwards

Boughs & Blossoms, Stampin' Up!, Being CreateAble with Heathe
So, how do you do this?  it's actually really simple, you do need block image stamps, like these, then you ink up daubers (I always start with the lightest colour first) and daub the colour directly onto the stamp, when you get to the end of colouring your stamp in, chances are the colour will have dried off in patches, so to make it "inky" again, just huff on it, this will re-moisturize the colour and stamp!   I love using this technique and the colour really is so vibrant.  In fact so much so, that I've just realised there's no bling.... 🤣  Might have to go and add some.....

I hope this inspires you to have a go too!

God Bless love

Heather xox

Click here for products:  What Heather used


January Mega Class

 Hi there Creators, 

this post is a combined "Something Saturday" and Mega Class info.

It's that time of year again, when I do one of my mega classes😃

Details are:  
  • Either by mail, or in person at Laanecoorie Town Hall,  
  • Saturday 29th January from 10.30am till 3pm,  
  • We'll be making 12 cards, and included in the cost are brand new products: 2 stamp sets, 1 punch, 1 set of stencils, 1/2 pack of bling, 1/4 reel of ribbon and more (and lunch).  Cost $130 for In Person, $120 for "by mail"  
  • I do need to have your place booked and paid for by 11th January, so I can order the products, and make sure it's all arrived in time and prepped ready for each one of you. 
You will need to bring:
  • Glues (I will provide a sheet of Dimensionals for each person)
  • scissors (for intricate cutting)
  • Pin tool or tweezers (if you like to use them)
  • A Clear Block, "D" size is the best size, and will fit all the stamps
Also if you have them please bring:
  • Aqua Painter
  • Basic Gray or Black Stazon Ink pad
  • Stampin' Pad (firm spongy pad you put under your work when using photopolymer stamps)
  • A Stampin' Cleaner.
I will have spares of things, but do let me know what you'll need!  If you are doing this "by Mail" you'll also need some ink colours (I've used Flirty Flamingo, Bumblebee, Pear Pizzazz, Balmy Blue, Highland Heather, Crumb Cake & Smoky Slate, but they can be interchanged for other colours)
 
 Anyway on to the photos, there are a couple of "special cards" in the group, and not all of them made it into this photo, but it's a pretty good representation of the cards.
On to Something Saturday, and one of the cards that didn't make it into the above photo!
It's called a clear envelope shaker card.
 It uses (funnily enough) clear medium envelopes, which you can buy as a pack of 50 for only $10.50! (should keep you going for a while lol)
you'll also need a base card, but cut so it's A4 in 1/2 lengthways then folded at 14.8cm, and trimmed down to 14cm. A piece of window sheeting 14cm x 11cm.  You'll need something to decorate the base card, some shaker'y  bits and I've punched out some small dragonflies as it fits with my theme.
 
Decorate the front of your base card I used the new Butterflies & Flowers layering decorative masks (so pretty!), NB: make sure your card is upside down - might seem weird but, really important!
If you plan to add punched shapes to the front of your card, attach them to the window sheeting then slide this inside the clear envelope.
Add your shaker'y bits (in my case I used some old dazzling diamonds glitter and new frosted bead assortment)  I love the way the glitter coats the beads and makes them look pearly.
then seal it NB not with the envelope seal!  Just use some clear plastic cellotape to make sure the glitter and beads won't come out.
Now use the envelope seal inside the top of your base card, then seal the whole of the base card together (see the video) this becomes the back of your card, and the clear envelope stiffened with the window sheeting is the front of your card.
 
Here's the video for you to check out:

 Don't forget if you're interested in the class either in person or by mail. Book your place before 11th January!
 
I hope this inspires you to create
God Bless love
Heather.  

Blender Pens and how to use them

 Hi there Creators,

For my Something Saturday this week, I'm showing off Stampin' Up!'s blender pens (to view them click the link), they're really cool!  they have no colour at all, but you can pick up colour and then colour in your stamped images with them!

These are the cards I made after the video with the bits I made in the video☺

There are different ways to pick up the colour with the blender pens.  I show 5 in the video

The first I show, is to stamp in the colour you want to use, and use the blender pen to "pull" the colour from the edges into the image, the mouse in this card uses this technique.  

the second technique is on the pencil which is coloured using blender pen to pick up colour from the pastels, literally just wiping the blender pen across the pastel and colouring with it.

Both of these techniques give quite a nice soft look.

Next is picking up colour by squeezing my ink pad (while it's still closed) this gives you ink on the inside of the lid, and you can pick up the colour from this pool of ink , which is how I coloured in this card.  If you want the colour lighter, spread the ink around a little on the lid, and use that to colour in which is what I did with the main part of the cheese, for the holes I used the more concentrated colour

Another way is to use Stampin' Write Markers to colour on a clear block, then pick up the colour with your blender pen, which is how I coloured in this next mouse:
 

And the last (and my personal favourite) is to colour your image roughly with watercolour pencils, then use the blender pens to smooth out the colour, I did use this in the balloon above, but I love being able to combine colours, and blend them together with the blender pen, so I showed this one too in the video:  A little warning with the Blender Pens, Don't overwork the paper, as it will ball the paper, rather like using a felt tip pen repeatedly on paper, it will make the paper too wet and ball it up.

The Blender pens are 3 in a pack for only $21 so I think a bit of a bargain! The stamp sets I've used: the mouse one is called "Mischievous Mice", and will be available to host's only, in the new mini catalogue, from 4th January to 30th June.  You would need to either host a party with a minimum total order of $250, or place a $250 order, and pick it out in your host goodies. 

However the good news is that the first 2 months of the year also have Sale-a-Bration in them, so for every $90 you spend you get to pick a Sale-a-Bration item, there's stamp sets and designer papers - Bonus!!

The last set with the sunflower is from the stamp set Celebrate Sunflowers (click the link to view it)  and don't forget your accessories...!

I hope this inspires you to create too (and you get to create a bit over the Christmas time)

God Bless love

Heather xox

Cascade Card (Something Saturday)

 Hi there Creators,

Well today I'm showing how to make a really simple cascade card, once you've got the dimensions worked out you can make it in any size.

I couldn't remember the name of this to begin with and waterfall card, accordion card both came to mind, but after a spot of googling, it's actually called a Cascade card!

Here is the finished article (which will be off to my friends who are getting married this afternoon, so they shouldn't be able to see this post!)

Cascade Card 

Cascade Card
As you can see I ended up having to create an envelope too for the card, as it was just too big for a standard envelope (plus this dresses the outside up nicely!)😉  How gorgeous is this Edens Garden Paper? and the meadow dies I think go nicely with it.  I couldn't resist using some of my favourite Garden Gems too (sad to think at the end of the year the Eden's garden paper and gems will retire 😢)  So if you want some get them now!!
Cascade Card
See this link for the products I used in this card:  What Heather Used

Whatever size card stock you choose, here's how you do it.....

score it into 3 equal pieces so it concertina's up, then you'll determine how high you want the first tier of your card to be, say you want it to start the slope at 1", you mark a 1" on each side (see the photo) then you cut the diagonal between the 2 marks.


Cascade Card
Now you should have 2 equal (hopefully) pieces 😃  Line these up on top of each other, make sure the bases are together, even if the top isn't. Then work out the middle (both ways) of each individual section, then put a pin mark in so it goes through both pieces of card.  You'll then want to cut lines up and down, (opposite for each piece of card) see the picture below:

Cascade Card

these should then slide into each other to create your card :) Like so....

Cascade Card

It's really not complicated!  have a go, I'd love to see what you make.

I hope this inspires you to have a go.

God Bless love

Heather xox


Really Pretty Baubles!

 HI there Creators,

I saw these really pretty baubles on pinterest, and thought I'd give it a go, she cut all hers by hand, Yikes!!

I took the easy way out and used punches lol.  I picked out the Label me Lovely Punch, and the other things you'll need are ribbon and an adhesive that will draw a fine line - I used Multipurpose Liquid Glue (Tombow to most)

They are remarkably simple to make, punch yourself 20 of your chosen punch shape.

Then fold them in 1/2 then draw a fine line of glue across the inside middle of each individual one, do this to all 20.

then draw a fine line of glue at each end, so you can stack them together, and they stick together top and bottom.

 Once you have the stack of 20, and the glue is dry, check it out, slowly pull the 2 end pieces round to meet each other, you can add some ribbon, before you attach the 2 sides together (again by a line at the top and the bottom)

 Check out the video I made if that doesn't make sense😊

I hope this inspires you to have a go and make your own baubles

God Bless love

Heather
 

Something Saturday - Shepherds Care meets Snowy Delights Masks

Hi there Creators,  Today I thought I'd play around with a couple of my latest goodies, Shepherds Care Stamp set and Snowy Delights Mas...