Something Saturday - Brightest Birthday Kit

Image
  Hi there Creators Today we're checking out one of the new kits, I have to say WOW!, maybe it's the holographic blingy bits (ooooo bling....🤣)  if you're a regular reader of my blog or watch my YouTube or Facebook channels then you'll know I can't resist bling.  Anyway check out the kit here: Brightest Birthday Kit And here are the cards it makes.... oh and their matching (also blingy) envelopes. Then you'll notice on the first card with the balloons it has a box that has the holographic outline, which is actually a sticker, so in the video I show you how to get the sticker off and onto a separate piece of card without having to pick it off and re-piece it yourself. And this is the card I made with it:  I probably should have used the same Azure Afternoon colour, but I had this piece of Shy Shamrock hanging around my desk, so chose to use that instead, and seeing as the star stamp hadn't been used I figured I should put it into action.  Its not a bad littl...

Cascade Card (Something Saturday)

 Hi there Creators,

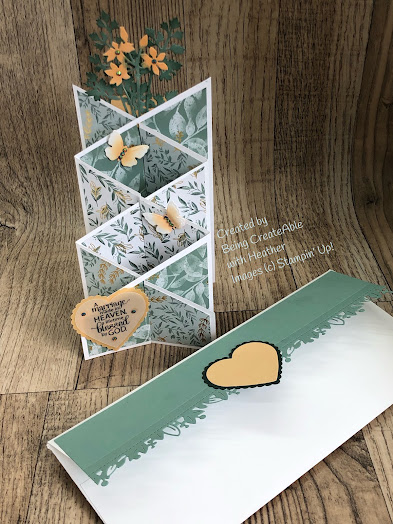
Well today I'm showing how to make a really simple cascade card, once you've got the dimensions worked out you can make it in any size.

I couldn't remember the name of this to begin with and waterfall card, accordion card both came to mind, but after a spot of googling, it's actually called a Cascade card!

Here is the finished article (which will be off to my friends who are getting married this afternoon, so they shouldn't be able to see this post!)

Cascade Card 

Cascade Card
As you can see I ended up having to create an envelope too for the card, as it was just too big for a standard envelope (plus this dresses the outside up nicely!)😉  How gorgeous is this Edens Garden Paper? and the meadow dies I think go nicely with it.  I couldn't resist using some of my favourite Garden Gems too (sad to think at the end of the year the Eden's garden paper and gems will retire 😢)  So if you want some get them now!!
Cascade Card
See this link for the products I used in this card:  What Heather Used

Whatever size card stock you choose, here's how you do it.....

score it into 3 equal pieces so it concertina's up, then you'll determine how high you want the first tier of your card to be, say you want it to start the slope at 1", you mark a 1" on each side (see the photo) then you cut the diagonal between the 2 marks.


Cascade Card
Now you should have 2 equal (hopefully) pieces 😃  Line these up on top of each other, make sure the bases are together, even if the top isn't. Then work out the middle (both ways) of each individual section, then put a pin mark in so it goes through both pieces of card.  You'll then want to cut lines up and down, (opposite for each piece of card) see the picture below:

Cascade Card

these should then slide into each other to create your card :) Like so....

Cascade Card

It's really not complicated!  have a go, I'd love to see what you make.

I hope this inspires you to have a go.

God Bless love

Heather xox


Comments

Popular posts from this blog

Crafty Collaborations Sale-a-bration Blog Hop

Class cards for May

Something Saturday - Twisted Star Ornament