Showing posts with label Shimmer Paint. Show all posts

Interactive Card Class - Double Slider Cards

Hi there,
Well after Slider Cards last month, we're now onto Double Slider Cards, slightly different in that there's no "pop-up" element, but totally cool!  The class is on Thursday 18th October, as usual this class is available as a mail out class $17 mailed out, or as an In Person class $20, I'll be providing full instructions and doing a video to go with it.
However I'm pretty sure you want to see the cards lol
Card #1 is this cute quirky elf card using the cute Santa's Workshop Specialty Designer Series Paper..... this is it closed
then pull on the side sticking out, and voila.....
then Card #2 is this more elegant card, using the Hometown Greetings Edgelits, the Merry Christmas to All bundle, and the Vegas Gold Shimmer Paint (ooo love that Shimmer paint lol)
And then opened, you can pull on either side and the other side slides open too
and a little video to show them in action....
Do let me know if you're keen to be part of this class or would like to order a kit for yourself.
I hope these have inspired you to create!
God Bless love
Heather xox

Shimmer Paints

Hi There,
Only 4 days to go till the new Holiday Catalogue goes live!  Unless of course you're a demonstrator, in which case you'll most likely have ordered from it already!  (If you'd like to find out about becoming a demonstrator and joining my rapidly growing team, just ask :)

HOWEVER!  I'm here today to introduce you to the Shimmer Paints that are in the new Holiday Catalogue (if you have one they're on page 38)  Gotta tell you Vegas Gold closely followed by Bright Copper are my favourites.
I have done a video for you on how you can use the new shimmer paints as they're kind of hidden away on the page, and they're so fabulous that I figured you'd need a few tips.

They are waterbased, but you can heat set them for use on fabric (haven't shown that in the vid), let's just move onto it......
I hope you find this video useful, and do let me know if there's anything you'd like to see in a video.

I hope it inspires you to create,
God Bless love
Heather

Step It Up with Timeless Tidings

Hi There
By now those who I've mailed out the Holiday catalogue to should have received them - let me know if you haven't got a copy and you want one!  It starts on the 5th September (unless you're a demonstrator, in which case you can order now!) Yay!

Some of you will have received a card with your catalogue that showcases the Timeless Tidings Stamp set, if you're a regular reader of my blog, you'll remember a few posts back this Timeless Tidings Project Kit I showed you (Still in love with it, it's such amazing value for money and such stunning cards!).

Just in case you didn't receive the card, I thought I'd show it to you now, and also a "Stepped Up" version, when I go to Stampin' Up! events they often mention "stepping up" your cards, I really should do this more often, it was fun! lol.
Here is the first nice simple version:
My idea behind this was to show something that anyone could do, doesn't require lots of fancy cutting or punches that people may or may not have, and when I started stamping I would have been proud to be able to send this out to people as their "homemade" Christmas card.  It uses only the Timeless Tidings Stamp set, and 3 colours, Garden green, Pumpkin Pie and Cherry Cobbler.  The Cherry Cobbler has been "smudged" using a Blender Pen, these are clear pens that you can use to pick up colour and colour in with, or in this case once I stamped I used it straight away to move the colour inside the stamped image, just gives it a subtle hint of colour.  The other thing I did to make this card "bling" was spritzed it with a gold spray.  I used the (oh so in love with this) Gold Vegas Shimmer Paint.  I've poured some into a Stampin' Spritzer Bottle,(on a side note what amazing value are these? 2 for only $5!) topped it up with Rubbing Alcohol, shake it up and spray.......

Don't you just love that shimmer effect?
So, to step it up I wanted to use the same stamps in the same order, then add some extras, here's what I came up with:
Again it's not majorly complicated, but does require a spot of cutting with the Stampin' Trimmer, Paper Snips and the Layering Oval Framelits.  Then the added extra of the little metallic Leaves Trinkets, aren't they lovely?
If you look closely you can just see the gold glimmer on the tree oval.
The Flower I stamped twice on spare card, then cut them out and layered them up, it's a nice easy flower to do that with as the lines are not blurred in together.  Oh and in case you're wondering why the yellow colour doesn't look like Pumpkin Pie, it's because it's not! by the time I made this card I'd packed the Pumpkin Pie up to use in a class, so I went with Mango Melody instead😊

Well I hope this inspires you to create, do feel free to leave me comments, I always love to hear from people!
God Bless love
Heather xox


Team Day August 2018 Part 2

Hi there
As promised I'm back again to show you the Make&Takes that I created for our team day.

Initially I'd planned just to make one, but got a bit carried away, 3 later thought I'd better stop! lol
 My initial idea was to make one of the new cute little "Takeout Treats" boxes using the matching stamp set "Take Out Treats", so we did make this one:
Gotta tell you that ribbon is so soft! it's called Merry Merlot & Copper 5/8" reversible ribbon, and it's so beautiful!

Then I kind of felt that really we should try out the other 2 new embossing folders from the new Holiday Catalogue! (having used the Swirls and Curls one in Jenny's card)
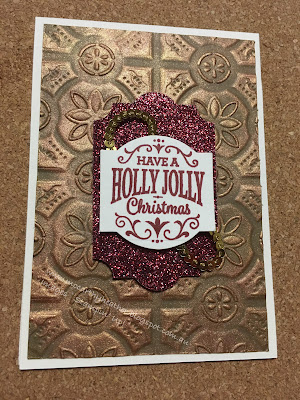
Hence this card came in to being.  Using the new Corrugated Dynamic Textured Impressions Embossing folder, also the Merry Christmas Thinlit dies, the Oh my goodness so amazing! "Shimmer Paints"  (do you get that I really like the shimmer paints? lol)  I've also added some of the Metallic Sequin Assortment (so pretty)

Ok and the other embossing folder is Tin Tile Dynamic Textured Impressions Embossing Folder, just so you know the "Dynamic" embossing folders have more layers than normal embossing folders, they can emboss deeper, and so some parts are more deeply embossed than other parts (pretty cool!)  Oh and funnily enough those Shimmer Paints make a showing on this card too!
This is a 1/2 size card, I've used Soft Suede Cardstock to emboss, then burnished using a dauber over the top with Vegas Gold and Bright copper Shimmer Paints, the punch and saying are from the "Christmas Traditions Punch Box", and the punched piece underneath is the Everyday Label Punch.

The new Holiday Catalogue starts for ordering on 5th September, if you haven't got one and would like to check it out let me know.

I hope these have inspired you to create!
God Bless love
Heather

Sneak Peeks from the upcoming Holiday Catalogue

Hi there,
Can you believe it? the Holiday Catalogue is almost ready to go live on 5th September!  And guess what? I've got some of the new products (shhh!)  Well actually as a demonstrator I get to pre-order some of the new stuff (so exciting).  So I thought I'd share with you some of the bits I've had a go at making.

First up I want to show you the absolutely stunning Timeless Tidings Project Kit.  I never used to be into the Project kits but they seem to be getting better and better (either that or I just love the fact I can whip up cards in next to no time and these ones I don't even have to think about!)  Just an extra comment before you get to see them, I happened to be in the supermarket yesterday and was eyeing up Fathers day cards - you know checking them out to see what ideas I could garner from them...... and I nearly fainted when I saw the price of them! none of them were under $5 and most of them were quite simple printed cards.  So just sayin' that these stunning cards are only $1.75 each when you break it down, how's that for value?!!

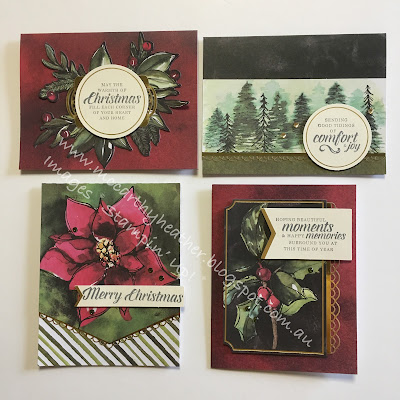
I'm guessing you want to see them now after all the hype lol here they are as a group, the kit will give you 5 of each design.
and now for a little closer.....
 there are gold stickers for each one........
 pretty little rhinestone jewels..........
 You don't have to colour them in.......
There are also matching envelopes!
 
OH, and the stamp set itself that you can purchase to go with it is currently one of my favourites too! Look what I made with it.....
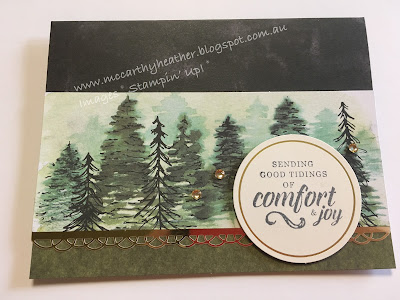
Cards don't have to be complicated to be lovely - this little tree (and the font in the writing) was what really drew me to this stamp set.  Can you see the gold shimmer on the card?
Guess what? another "new" product, although this one is a "returning" product.  After a few years apart I still love it lol, it's called Shimmer Paint, I've used it here by adding it to a Stampin' Spritzer, which are remarkably cheap at only $5 for a pair of them, topped it up with some rubbing alcohol, and spritz'd away.  I now need to buy more spritzers because there's 4 colours of shimmer paints which incidentally are only $14 each........ soooo worth it!

Well I think that's probably enough "talking" from me today I hope you like what you see!
New catalogues will be on their way to people shortly, if you've ordered from me in the last year I should be sending you one.  If not but you really really want one, place an order or just let me know!  If you can't wait, I do have Coffee&Cards class on next Wednesday, and my interactive class on Thursday 23rd (and those who attend will be getting one).
I hope this inspires you to create!
God Bless love
Heather


Something Saturday - 2 from 1 Stripes & Trees

  Hi there Creators Today I'm doing one cut with my Designer Paper and creating 2 different cards - gotta love it when you can get 2 for...