Thankyou for joining me today, I have been a Stampin' Up! Demonstrator, since 2008. My blog will show you how to make cards and projects using Stampin' Up!'s fabulous products. And occasionally random extra stuff (that's the way I roll 🤣) Please do sign up to receive my emails, so you get my latest info.
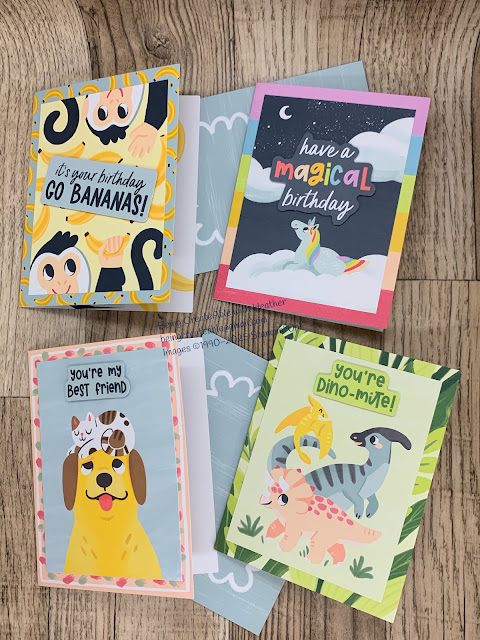
Today I thought I'd show off this kit, which is really cute! Would make great kids cards (and even some Big kids would enjoy them I reckon!) It's the Pop Up Pals Kit (click the link to see it) you'll get to create 4 individual cards, and I think a bit of a bargain at $17.50 (just under $4.50 per card) which if you have had to buy a pop up card recently I'd imagine they are a lot more than that!, plus the added bonus of being able to say "I made it" 😍
Ok, so here are the 4 cards you'll create with this kit:
Then the insides of the cards:
How cool are these cards?! I love the pop out elements in them (and in fact even Tom (hubby) was impressed🤣)
having reviewed the video I notice the white cards of this kit really didn't show up well (I'm so sorry!)
On a positive note I did have a play around with the rest of kit and came up with some ideas, so check them out below...... If you do want to purchase the kit check it out here: Thankyou Kindly Kit.
Here are the cards as they're meant to be made:
They're much nicer in person than the photos make them out to be! anyway I thought I'd try something different with them and this is what I came up with...
I used the leaves as a mask to create the soft background, by which time the leaves were green, so I added more (Old Olive) to the stems, and a bit of Blueberry Bushel to the circle edges, and voila, you can actually see the texture in the paper of the circles (same as the envelopes and white rectangle in the other card. I think it looks quite fresh in these colours.
Then the other card I chose to use some of the lovely subtles colours: Soft Sea Foam for the leaves and creating the soft masked background, then Petal Pink for the flower, and I chose to leave the rectangle white (which shows up way better in person again!)
Although I'm not sure there's a way of splitting up the pieces to make something different, you can certainly make each card look different with a variety of colours!
If you missed the video and want to see it check it out here:
Well today in the video I show off the Sale-a-Bration Catalogue (SAB for short). For every $100 of goodies you purchase you can pick for free from the Sale-a-Bration Catalogue (Woo Hoo!💖)
There is another bonus with SAB is that if you fancy joining Stampin' Up! there is a ripper of deal, (well actually there's 2 deals, one I think is better than the other)
Deal 1 (in my humble opinion the better deal) you pick out $235 of goodies, and only pay $169, then on top of this you also pick out 2 of the Stampin' Write Marker Sets (Brights/Regals/Subtles or Neutrals) these are worth $62.50 each, for free PLUS you get an exclusive rather lovely stamp set worth $37
Deal 2: pick out $286 of goodies and only pay $169
Just ask me if you want more info, or you can check out my Stampin' Up! website here: Join my Team
Ok so onto the kit, it makes 6 cards (approx these ones), I say approx, because I accidentally put the wrong size dotty rainbow on 2 of them🤣
Then I had a piece left over that the dotty rainbows came out of, and felt a need to use it!, so this is what eventuated.....
here is the piece..
And this was the first card, I used the Make a Wish from Birthday Celebration Stamp set (which actually has really cool dies with it, so I've given you the bundle link) I've added a couple of bows as "pots at the end of the rainbow"🤣 and some of the amazing Sunny Day Iridescent Dots which incidentally I also added to the cards above!
Then this one I teamed up with one of the other Sale-a-Bration products "Day to Celebrate" to create the streamers and saying.
I was excited to receive this Natures Paintings kit, it's kind of like getting a colouring in book, but using watercolour instead😍
So for the video I picked out one of the designs to colour in and showed off 4 ways to use the watercolour pencils, and water painter that come with the kit.
The 4 ways are:
using the pencils direct to paper, then using the water painter to move the colour around
using the water painter to "lick" the colour off the tip of the pencil and colour with it
colouring a block onto a scrap bit of paper, and using that as a dry paint block, ie add water and use that to colour with
then lastly and my preferred way, is to add a drop of water to a clear block, then scribble the pencil into the drop until it colours it, then paint with this.
I can't show you specifically where I used which technique as they kind of end up looking the same, however as I mentioned in the video I did think I could split the piece into 3 for 3 cards, and voila........
these next 2 use this lovely saying from Layers of Beauty Stamp set.
I'm really happy with the way it cut up so easily to create the 3 cards, the last card uses pieces from both sides of the design, whereas the other 2 use the top section and the bottom section individually.
If you missed the video, here it is:
I hope this inspires you to have a go too, don't forget to use the links above to check out the products😉
Today I thought I'd show off this new kit I brought the other day, oooo it has gold foiling in it, ummmm💖😍 Christmas Wishes Kit, it contains a stamp set, mini ink pad and stampin' block as well as the cardstock to create 8 cards, although, having said 8 truly if you are economical and prepared to do a spot of cutting and adding more cardstock, then you can double it, as the base cards are the same pattern on each side (woo hoo!)
The official 2 cards it makes are these 2: the one saying Merry, Merry, Christmas was actually meant to have 3 "Merry"s on it but in my typical way I changed it 😃
I did discover that inside the cards is this rather lovely gold square frame with leaf, which I thought would look lovely on the front of a card (plus it takes opening up the card before you start to make sure it's on the correct side and the right way up - and I didn't 🤣) So this card came into being, using some of bits I cut off the edges to create 3 strips down the bottom of the card:
Then lastly I felt a need to use the other 1/2 of the above card - and just happened to have this circle hanging around in my scraps pile (very convenient), I have stamped the leaves from the set onto the circle lightly as a background.
If you missed the video here it is:
If you do fancy purchasing this kit there is a kits discount this month so it's only $36.90 and not $41 for the month of October (woo hoo!)
Today we're onto the last of the 3 kits I bought a while back, this one is Your Day to Shine card Kit. Again it's a pretty one, no stamp set this time hence it's cheaper at only $25, but you still get to make 9 cards with it! which at $2.78 per card is still cheaper for a decent card than what you'd buy in a shop! Plus you have the Crafting fix time and you're able to say "yes, I made this"😍
So here are the 3 styles of card it officially creates, although I have changed a few elements around, so if you do want to see the proper "official" way click on the link above 🤣
this first card is a mini card (with matching envelope) once again beautiful bling with these cards! This card is pretty much true to their suggestion
This next card got turned around a bit as I wasn't terribly happy with their design, I didn't think the butterfly stood out so well on their card (I could be wrong - seems unlikely but you never know.....🤣)
And this last one I had to cut the foliage as I was a bit disappointed that on my card it would have pretty much been hidden by the blue flowers.
Anyway I also created a couple of other cards using these scraps:
Have to admit every time I play with the Ephemera packs I end up getting really into it, I think it's because they're so much fun to pair up together! (and cheap at only $14 a pack, you get heaps to play with!)
Anyway if you missed the video, here it is:
I hope this inspires you to either purchase a kit or play with what you already have
Today we're having a look at this gorgeous Hello Hollyhocks Card Kit at only $25 it's a bit of a steal! with this kit you create 9 cards. Although potentially you could create more, by cutting the base cards up as they are coloured on both sides,
Here are 3 of the cards I created with this kit then a bonus card
Today I figured as it's holidays people might be looking for something quick and simple to take away, and what better than a kit? This Painted Wishes kit is just gorgeous! you get to create 9 cards from this kit and it's only $25 (check it out here: Painted Wishes Kit) however just quickly......
The new mini and
Sale-a-Bration catalogues have now started, so for every $90 of goodies
you order you can pick for FREE from the Sale-a-Bration (SAB) offering, or why not think about joining Stampin' Up!? you can get a bonus during SAB, so check it out here: Join my Team. I'd love to have you in my team! 😊
I show off creating one of each of the cards in the video, and here they are.....
Not sure you can tell from these photos but the writing is foiled in Pretty Peacock colour (one of my favourites). Stampin' Up! do have a variety of different kits and I've always found the quality to be amazing, you can check out all the kits available here: Stampin' Up! Kits
Well we're on the last week of August and the kits are still discounted, so I promise I'll move away from kits next week, but this "Million Thanks" is a lovely kit (currently this month reduced to $31.20 from $39), and you'll see you don't just have to stick to the kit!, especially as there are some extra bits in it, and you do get a stamp set & mini ink pad to continue creating with. (just think with a few different kits you'd end up with a few different ink pad colours, and a heap of stamps!), and Kits really are an amazing way to have a self-contained crafting session.
Anyway on with the photographic evidence..... here are the 3 cards types you make with this kit (which incidentally creates officially 9 cards) As you can see they have clear embossing on them so the surface is shiny in places.
I have also created this one using one of the spare labels and the piece that the heart pushes out from, then stamped using the little flowers in the stamp set, and added a spot of bling with the Brushed Brass Butterflies and Festive Pearls.
Then I can't remember which video I mention it it, but the boxes are fabulous for gifting things in and so easy to decorate up! I've used the Fresh as a Daisy Designer Paper to pretty up this box 😊
If you missed the video, here it is...
I hope this inspires you to purchase a kit (ideally from my online store while they're on special, 😁 check all of the kits out here: Stampin' Up! Kits) and start playing.
As August is Kit'tastic month (ie kits are reduced) I figured it was high time to hop on and show off one of my latest kits, so here we go..
It's a Christmas kit called Cozy & Bright, I have liked the look of this kit for a while and did end up getting it for free at our recent Creative Collaborations Team event (woo hoo!)
Discovered once I opened it in the video that it actually does 12 cards, which at the discounted August price of $32.80 is actually a bit of a bargain, especially as it includes an ink stampin spot, a stamp set and a block!
Anyway I'm sure you're way more interested in seeing the creations that having me waffle!
this is the main card the kit creates:
then I cut one of the cards up to create 2 more cards....
This first one I've fussy cut out some of the greenery, then used some gilded leafing on the background (which is the back of the card cut down) I've added a layer of gold foil cardstock underneath. to see all I've used on this card click here: What Heather Used
This second card I've stamped all over the background with the same saying, then again used some of the fussy cut images, pressed out images, stickers and more, check out what I used for this card here: What Heather Used personally I think I prefer this second card. Which is your favourite?
If you missed the video here it is:
I hope this inspires you to create different things with your kits too.
Oh my goodness you need to get this kit!! I have just scratched the surface of some of the things to use it for (other than making the 9 cards it's meant to make lol)
Here is the link to check it out: Colorful Kaleidoscope (yes colour is spelt wrong 🤣- it's an American thing) Seriously amazing kit especially if you're prepared to add more cardstock, some extra ink colours and potentially sacrifice some of the intended cards.
Anyway here are the "official" cards you can make with the kit (it comes with 3 of each) Won't you just check out those envelopes!! I reckon there's a card or two just by taking those apart 🤣
However when you are prepared to sacrifice a bit....... (admittedly they're not quite finished yet, still require sayings but you get the drift!)
I used the reverse sides of the overlays as a mask, and they do turn out kind of pretty themselves! got to add bling! If you're careful with them you can turn them back over and use them as intended too
If you'd like to check out the video, here it is!
I hope this inspires you that you can do more with a kit than it's meant for😉
Today I thought I'd show off another new Kit I received although the kit isn't new, I have only just got round to buying it😁 Gee Stampin' Up! make some beautiful kits! This one Light the Candles is one that contains ink and a stamp set too, so you can really go to town and make extra cards with a little bit of extra cardstock.
Here are the cards the kit actually makes: the candles are lovely and glittery (I don't think it shows up well in the photos)
This kit only makes up 2 different cards, but you get 4 of each so 8 cards in total, and as the purchase price for the kit is $33 it would make the cards $4.13 each, but wait.....
You can split up the candles from the top card..... and because both base cards have the pattern on the front and back you can split them up too, add your own base cards and voila!
the only things I added that weren't from the kit were the base cards (thick basic white cardstock used), and the bling, I've used some of the gorgeous In Colour Opal Rounds, which are kind of similar to the bling in the kit, only prettier colours. As I explain right at the end of the video, I've cut down the front of the green patterned and orange patterned card and turned it over to get the little white strips for the saying and strip across the card.
Let me know if you have this kit and if you made extra cards with it (if you don't have it - what are you waiting for?
If you missed the video here it is:
I hope this inspires you to create something different from your kits