Thankyou for joining me today, I have been a Stampin' Up! Demonstrator, since 2008. My blog will show you how to make cards and projects using Stampin' Up!'s fabulous products. And occasionally random extra stuff (that's the way I roll 🤣) Please do sign up to receive my emails, so you get my latest info.
Hi There Creators Today I thought it would be fun to try out a technique I haven't done in ages - Paper Tole, using the new Citrus Blooms stamp set and dies. Every so often I come across a stamp set that inspires me to do a spot of Paper Tole'ing, and this one has lots of dimension to it perfect for this technique. To those of you who are saying "Paper Tole-what-ing?" Paper Tole is a way of taking a picture and literally adding dimension by having several images of the same picture a and cutting out the various parts of it and laying them up, so the picture literally builds up and gives a 3D type image. I thought it would make a beautiful framed piece (and a nice gift for a friend) - let me know what you think.... I did team it up with the fabulous sayings from Unbounded Love Stamp set (the dies that go with this stamp set are a must have!) Then to create shiny bits I've added some of the fine tip glue pen which dries shiny clear😍 I also said in the video I&
Get link
Facebook
Twitter
Pinterest
Email
Other Apps
January Mega Class
Get link
Facebook
Twitter
Pinterest
Email
Other Apps
-
Hi there Creators,
this post is a combined "Something Saturday" and Mega Class info.
It's that time of year again, when I do one of my mega classes😃
Details are:
Either by mail, or in person at Laanecoorie Town Hall,
Saturday 29th January from 10.30am till 3pm,
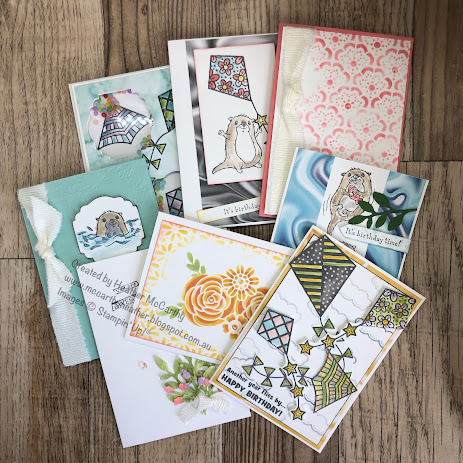
We'll be making 12 cards, and included in the cost are brand new products: 2 stamp sets, 1 punch, 1 set of stencils, 1/2 pack of bling, 1/4 reel of ribbon and more (and lunch). Cost $130 for In Person, $120 for "by mail"
I do need to have your place booked and paid for by 11th January, so I can order the products, and make sure it's all arrived in time and prepped ready for each one of you.
You will need to bring:
Glues (I will provide a sheet of Dimensionals for each person)
scissors (for intricate cutting)
Pin tool or tweezers (if you like to use them)
A Clear Block, "D" size is the best size, and will fit all the stamps
Also if you have them please bring:
Aqua Painter
Basic Gray or Black Stazon Ink pad
Stampin' Pad (firm spongy pad you put under your work when using photopolymer stamps)
A Stampin' Cleaner.
I will have spares of things, but do let me know what you'll need! If you are doing this "by Mail" you'll also need some ink colours (I've used Flirty Flamingo, Bumblebee, Pear Pizzazz, Balmy Blue, Highland Heather, Crumb Cake & Smoky Slate, but they can be interchanged for other colours)
Anyway on to the photos, there are a couple of "special cards" in the group, and not all of them made it into this photo, but it's a pretty good representation of the cards.
On to Something Saturday, and one of the cards that didn't make it into the above photo!
It's called a clear envelope shaker card.
It uses (funnily enough) clear medium envelopes, which you can buy as a pack of 50 for only $10.50! (should keep you going for a while lol)
you'll also need a base card, but cut so it's A4 in 1/2 lengthways then folded at 14.8cm, and trimmed down to 14cm. A piece of window sheeting 14cm x 11cm. You'll need something to decorate the base card, some shaker'y bits and I've punched out some small dragonflies as it fits with my theme.
Decorate the front of your base card I used the new Butterflies & Flowers layering decorative masks (so pretty!), NB: make sure your card is upside down - might seem weird but, really important!
If you plan to add punched shapes to the front of your card, attach them to the window sheeting then slide this inside the clear envelope.
Add your shaker'y bits (in my case I used some old dazzling diamonds glitter and new frosted bead assortment) I love the way the glitter coats the beads and makes them look pearly.
then seal it NB not with the envelope seal! Just use some clear plastic cellotape to make sure the glitter and beads won't come out.
Now use the envelope seal inside the top of your base card, then seal the whole of the base card together (see the video) this becomes the back of your card, and the clear envelope stiffened with the window sheeting is the front of your card.
Here's the video for you to check out:
Don't forget if you're interested in the class either in person or by mail. Book your place before 11th January!
Hi there Creators Well.... I found this amazing card on Pinterest (as you do) and thought I've got to have a go at that! it's by Mixed Up Craft, and here's the link: Tricorn Style Fold Card in case you want to see it too, I made mine up from an A5 card as I really hate to waste cardstock by cutting it to inches! So at some point I might do up a quick video just to convert it to A4 format for you! Anyway after doing up my draft I then proceeded onto my "proper card" and all was going well till I realised I'd scored it all wrong lol, however as I really don't like to waste cardstock I persevered on with it, and I really liked what I accidentally made, so I figured I'd share it with you, I'm pretty confident you won't find this anywhere else, and if you have a more inspiring name for it than my fancy fold mistake card, please let me know! I was wondering about Fancy Fold Arrow card, what do you think? So after all this talking I'm su
Hi there Creators, I've been waiting ages, but finally this stamp set has arrived and it's every bit as cute as I expected it to be! So of course I had to play with it....... First up I stamped all the images using Black Stazon (they come in strips of 3 to match the dies) and cut them out with the big joined together die. Then got to work creating cards with them, I ended up with 5 cards in the end, Oh and I've just realised I forgot to take photos of the insides, bother! This first one didn't get anything on the inside, I stamped the tag up, then debated what I could do to lessen the impact of the white card, and came up with the idea of inking the little label then stamping it a few times without reinking, and repeating till the card was covered sufficiently. I'm quite pleased with the effect I got! This second card is such a fun kid card, you might recognise it from my previous post on Global Design Project #264. I've tied the ribbon at the end, then th
Hi there Creators, I have joined a Facebook group called Crafty Collaborations, which is a Stampin' Up! demonstrator only group, demos all round the world, and there are various blog hops to join in with, which I thought sounded fun and might prompt me to remember to do blog posts lol! The "Share it Sunday" is an, anything goes one, which I figured was a great start for me! Today I thought I'd share with you a bit of a sneak peek! Coming in January is our new Jan to July Mini catalogue and there is this AMAZING suite in it called Fine Art Floral, so beautiful! I've made 3 cards up and kind of ended up a bit "blue" not in feelings though - you'll see.... lol The first card is this one: I love the way it's got the 2 step stamping in the flower I've used one of the gorgeous Blue gems in the middle and bit of Wink of Stella on the flower too. This next card uses the matching dies: Floral Gallery dies, and the stamp set: Art Gallery. Again th
Comments
Post a Comment