Thankyou for joining me today, I have been a Stampin' Up! Demonstrator, since 2008. My blog will show you how to make cards and projects using Stampin' Up!'s fabulous products. And occasionally random extra stuff (that's the way I roll 🤣) Please do sign up to receive my emails, so you get my latest info.
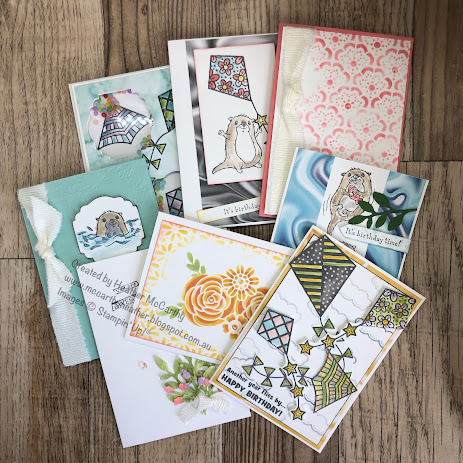
I have worked out our class cards for May now woo hoo!
Class dates are: Tuesday 7th at 1.30pm in Laanecoorie, Thursday 9th at 7pm in Laanecoorie, and Saturday 11th at 10.30am in Maryborough. Class cost is $24 for 4 cards with envelopes. It's important to book your place if you're coming to Laanecoorie as space is limited.
Here are the cards we'll be creating:
Using the beautiful Unbounded Love Bundle and Layers of Beauty (I've only used the stamp set here, but Oh My Goodness the bundle is so worth it!), also showcasing some of the new colours: Shy Shamrock and Peach Pie (guess which is which 🤣)
Then back in time a little as this was in the mini catalogue (if you want it, buy it now before the end of the month while it's still a bundle price with 10% off it!) Ice Cream Swirl Bundle (stamps & dies) again showcasing one of the "new" colours, although Pretty in Pink is actually an old colour with a come-back!
and "that's it folks" as they say at the end of the Looney Tunes Cartoons. Hoping you can make it to one of my classes, if not I hope this inspires you to create in your own space 😊
these are the cards we'll be making in my classes next month, the class dates are: Wednesday 5th 10.30am in Laanecoorie, Thursday 6th 7pm in Laanecoorie and Saturday 8th 10.30am in Maryborough.
I thought we'd do 2 Christmas cards again this month, as we work our way up to 3 in November and 4 in December 🤣
This first card uses Quatrefoil embossing folder, then the Handmade wishes bundle (stamps and punch) I love this punch I think it's so versatile! I did do a blog/video on it back in July, you can see it here if you want to find out just how versatile it is: https://mccarthyheather.blogspot.com/2022/07/something-saturday-handmade-tag-punch.html, for some reason this embossing folder to me looks "Christmassy" To see what I used click here: What Heather Used
Last time someone mentioned that we hadn't done much by way of embossing folders recently, so this month we're rectifying that 😃 This next card uses Charming Landscapes Embossing Folder (there's 2 in the pack, the other one has mountains, which also might work with this, umm might have to play around with that one too! Anyway I've also used the Wisteria Wishes Stamp set. To check out what I used click here: What Heather Used.
Next Up, I was thinking I haven't used my Jar punch for a while, and I thought it would be cute to use it as a little fish bowl, then I had the saying stamped directly on the card, but it went a bit "skewiff" However there's always a way to fix these things 🤣 I quite like combining my "sea'y" stamp sets, so this combines Friends are like Seashells and A Fish & a Wish, and having not found a good use for the white pieces of Vellum Layering designs previously I'm quite happy with the strip of it down the side of this card. You probably can't see this in the photo, but I've added some window sheeting on top of the jar to make it look more glass-like. To see what I used click here: What Heather Used
Last but not least, I thought it would be nice to do a "fancy fold card" it is quite simple but it packs a bit of a wow (I hope) I love this spiral or plaited look down the side. Check out what I used here:
Do let me know if you can join me at any of the classes (Laanecoorie one's do have a capacity limit, so get in quick!). If you can't make it I hope these inspire you to create in your space.
A friend of mine, when I asked her if there was anything she'd like to see on my videos commented that vellum would be good (how it turns white when pressure is added to it)
For those of you who have done Pergamano work you'll know all about this, and Pergamano is all about vellum and the stunning effects you can get with it although it is somewhat painstaking! (it's been quite a few years since I did Pergamano work), however I happy to say there is a much quicker and simpler way to get some really cool effects with vellum 😃
First up, I had (before the video) made up this card, as you can see I've used the Wintry 3D embossing folder to create the snowflakes using vellum, I've actually used the Iridescent rhinestones for the 'bling' but coloured them with the dark Night of Navy Stampin' Blend (bear in mind the Stampin' blends are alcohol based so don't rub off if you use them to colour embellishments or ribbon). Also if you're going to stamp on Vellum, you'll need to either use Stazon Ink, as waterbased inks will rub off, or stamp with Versamark and heat emboss with whatever colour suits your work.
I wanted to try out my new Gingham embossing folder next , and as I only wanted the pattern 1/2 way up the vellum I've put the Vellum all the way into the folder then the folder into my Stampin' Cut & Emboss machine sideways, so that I could run the folder only 1/2 way into the machine before backing it out again, If you put the vellum only partially into the folder (so the vellum sticks out at one end) and run it all the way through you end up with a line where the folder stops, and I didn't want that, I wanted it to kind of fade into the vellum rather than stopping abruptly. Then I figured the Round and Square brads kind of went nicely with the design and also the Classic Matte Dots (I'm going with this being a 'bloke'y' card!)
Then lastly I've used my Simply scored Scoring Tool, the great thing about the Stampin' Up! one is that it's actually 12x12 so you can fit your whole scrap book papers into it (admittedly it does take up a fair bit of space) Anyway I cut the vellum to 4" x 5 1/2" so I could score it into 1/2" blocks.
I find some of the designer paper a bit too dark, so I thought this would be a good way to lighten it up but still see it, I added a saying from Good Feeling Stamps, and used some of the cute little Loose flower flourishes that I usually forget about! the leaves are cut using the Bough punch, you don't have to use the whole punch I just cut a couple of leaves off the end. Oh and I added some of the iridescent pearl basic jewels in the centre of the flourishes, although they have sticky backs I did fill up the centre of the flowers with a bit of tombow first to make sure they definitely stuck well (seems to have worked 😉)
If you missed the video here it is:
I hope this inspires you to have a play with your vellum and see what you can create!
this post is a combined "Something Saturday" and Mega Class info.
It's that time of year again, when I do one of my mega classes😃
Details are:
Either by mail, or in person at Laanecoorie Town Hall,
Saturday 29th January from 10.30am till 3pm,
We'll be making 12 cards, and included in the cost are brand new products: 2 stamp sets, 1 punch, 1 set of stencils, 1/2 pack of bling, 1/4 reel of ribbon and more (and lunch). Cost $130 for In Person, $120 for "by mail"
I do need to have your place booked and paid for by 11th January, so I can order the products, and make sure it's all arrived in time and prepped ready for each one of you.
You will need to bring:
Glues (I will provide a sheet of Dimensionals for each person)
scissors (for intricate cutting)
Pin tool or tweezers (if you like to use them)
A Clear Block, "D" size is the best size, and will fit all the stamps
Also if you have them please bring:
Aqua Painter
Basic Gray or Black Stazon Ink pad
Stampin' Pad (firm spongy pad you put under your work when using photopolymer stamps)
A Stampin' Cleaner.
I will have spares of things, but do let me know what you'll need! If you are doing this "by Mail" you'll also need some ink colours (I've used Flirty Flamingo, Bumblebee, Pear Pizzazz, Balmy Blue, Highland Heather, Crumb Cake & Smoky Slate, but they can be interchanged for other colours)
Anyway on to the photos, there are a couple of "special cards" in the group, and not all of them made it into this photo, but it's a pretty good representation of the cards.
On to Something Saturday, and one of the cards that didn't make it into the above photo!
It's called a clear envelope shaker card.
It uses (funnily enough) clear medium envelopes, which you can buy as a pack of 50 for only $10.50! (should keep you going for a while lol)
you'll also need a base card, but cut so it's A4 in 1/2 lengthways then folded at 14.8cm, and trimmed down to 14cm. A piece of window sheeting 14cm x 11cm. You'll need something to decorate the base card, some shaker'y bits and I've punched out some small dragonflies as it fits with my theme.
Decorate the front of your base card I used the new Butterflies & Flowers layering decorative masks (so pretty!), NB: make sure your card is upside down - might seem weird but, really important!
If you plan to add punched shapes to the front of your card, attach them to the window sheeting then slide this inside the clear envelope.
Add your shaker'y bits (in my case I used some old dazzling diamonds glitter and new frosted bead assortment) I love the way the glitter coats the beads and makes them look pearly.
then seal it NB not with the envelope seal! Just use some clear plastic cellotape to make sure the glitter and beads won't come out.
Now use the envelope seal inside the top of your base card, then seal the whole of the base card together (see the video) this becomes the back of your card, and the clear envelope stiffened with the window sheeting is the front of your card.
Here's the video for you to check out:
Don't forget if you're interested in the class either in person or by mail. Book your place before 11th January!

.JPG "Unbounded Love, Layers of Beauty, Stampin' Up!")
.JPG "Ice Cream Swirl, Stampin' Up!")
.JPG "Leaf Collection, Layering Leaves, Bough Punch, Stampin' Up!")
.JPG "Dotted Circles 3D embossing folder, Stampin' Up!")
.jpg "Stampin' Up!, Handmade wishes, Quatrefoil Embossing folder,")
.jpg "Stampin' Up!, Wisteria Wishes, Charming Landscapes EF")
.jpg "Stampin' Up!, Friends are like seashells, A fish & a wish, Jar punch")
.jpg "Splendid Day, bough punch, double oval punch, Stampin' Up!")
.JPG "Stampin' Up!, Vellum, Wintry 3D embossing folder")
.JPG "Stampin' Up!, Vellum, Gingham 3D embossing folder")
.JPG "Stampin' Up!, Vellum,")


.JPG)
.JPG)
