Showing posts with label Itty Bitty Greetings Stamps. Show all posts

ClassCards@Home for August

 Hi there Creators, 

Well, having made up cards to be done with me, we've been locked down again! hence I've made up 4 more cards that you can use your own stamp wording with.  This way you can order the kit and do them at home (and dream of getting together for a class again.....) Kit cost $20 plus $2.20 for postage (if I need to mail them to you) please order by 14th, I'll make up the kits that weekend, and either mail them on the Monday or wait till I'm in your area and deliver them off as soon as I can after that.

Ok, so the cards are:

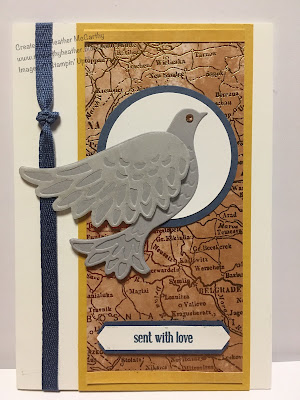
First Up, it's been Wintery and raining, so I had a need for some sunshine lol, I chose to utilize the Friendly Silhouette dies!  I made this card up, then decided it would actually make quite a cool retirement card, and it's the first time I've used this saying from Itty Bitty Greetings such a handy set! Friendlly silhouette Dies, Itty Bitty Greetings, Stampin' Up! After this card, I couldn't resist using some of the new goodies I have from the August to December Mini catalogue!  The Detailed Dove dies in this card plus the World of Good Specialty Designer Series Paper, it has Brass foil accents in it, and the Misty Moonlight In colour ribbon. (by the way the dove dies can be bundled with matching stamp set) Dove of Hope Bundle.Detailed Dove dies, World of Good Paper, Stampin Up

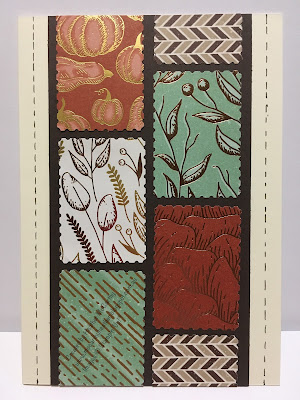
Oooo this new Gilded Autumn Specialty Designer Series Paper is so nice! with copper foil accents ummmm lol, I've used the Rectangular Postage stamp punch with it, and left the card sentiment free, sometimes you don't need a sentiment on a card!
Gilded Autumn Specialty Designer Series Paper, Stampin Up
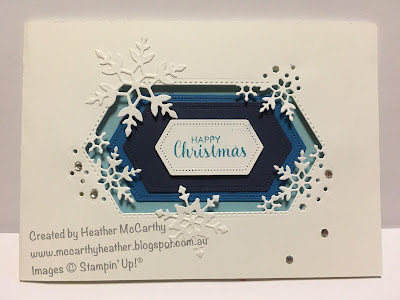
And the last card, I wanted to give the feeling of a diorama, this So Many Snowflakes dies was one I saw and fell in love with! (and not disappointed!) You can actually get it as a bundle with stamp set too: Snowflake Wishes bundle. As you can see this die pairs up nicely with the Stitched Nested Dies.
Snowflake Wishes Dies, Stitched Nested Dies, Stampin Up

I hope that if you don't order the kit these cards inspire you to create in your own space!  If you would like the kit, let me know by Friday 14th!

God Bless love

Heather xox

Cards for September classes

Hi there Creators,
Well from September I start adding a Christmas card into the mix (September 1, Oct 2, Nov 3 and of course Dec all 4 of them!) It's my sneaky way of making sure that you all have a few Christmas cards made :)
The new Holiday Catalogue goes live on 4th September and my classes conveniently start on 4th! Wednesday at 10.30am in Laanecoorie, then Thursday 5th at 7.30pm in Laanecoorie and Saturday 7th at 10am in Maryborough. If you haven't got a copy of the new Holiday Catalogue let me know and I'll get one to you!

Anyway on to the cards!...... this first card uses new products, really cute stamp set called "Elfie" and this fabulous Real Red Ruched Ribbon.

Card #2 uses uses my new favourite Stamp Set "Beauty and Joy" it's one of the DistINKtive sets - just amazing the detail! and one of my new favourite Ink pads, Oh my goodness the Metallic Ink pads are back this one is Golden Glitz (but there's also Silvery Shimmer and Celestial Copper) Oh and I've used one of the new "Basic Pattern" masks too in the background.

Card #3 again uses new but mixed with old  New is the "Stitched Stars dies", that I thought went really well with these words from the Itty Bitty Greetings stamp set, and one of the new "Star designer Elements" which are really nice metal copper stars.
Last card uses a set that I keep meaning to use more often! lol and I really felt like I needed some summer time, and to feel warm!.....  So this one uses the Waterfront Stamp set, the Everyday label punch and the Tailored Tag Punch.  I feel much more summery when I look at it lol :)

And that is my line up for September!  I look forward to seeing whoever can make it, do let me know if you plan to come to one of the Laanecoorie classes as spaces are limited at it!  I think most of you know now that the price of the class had to increase to $20 for the 4 cards and envelopes (with instructions) at the beginning of June.

Happy Creating, I hope I've inspired you to create, even if you can't make it to class, and remember if you want to order, and you're not part of my Craft@Home group do use this hostess code which will go till near the end of September: GNHTRZ7G and you'll be in the running to gain the hostess benefits - however if you're order is over $250 don't use the hostess code as you'll qualify for the free hostess benefits for yourself!

God Bless love
Heather xox


Cards for April

Hi there Creators,
Well almost at the end of March, and so here are the cards I'll be teaching in April.  The class dates are Wednesday 3rd 10.30am in Laanecoorie, Thursday 4th at 10.30am and 7.30pm in Laanecoorie, then Saturday 6th at 10am in Maryborough.  Do let me know if you plan to come to one of the classes (and haven't done so already).
Best start showing you the cards!  This first one uses the stunning Country Floral Dynamic Textured Impressions Embossing Folder, which is currently a Sale-a-Bration item till the end of March, so spend $90 and you can choose it for FREE! (you can't purchase this one at the moment).  I've also used the Label Me Pretty Stamp set with Matching Pretty Label Punch, and the lovely chunky ribbon is Gray Granite Textured Weave Ribbon.
 
Card #2, I thought we hadn't used the Stampin' Blends for a while (don't forget if you're using the Blends they are alcohol markers so you need to use memento ink for your base lines so it doesn't smudge with the pens.  I really love the way this card came out, I've used the Serene Garden Stamp set and Itty Bitty Greetings Stamp set.
Moving onto the next card, I think I had a couple of triangle off-cuts lying on my desk, so then of course I played with them, and Oh light bulb!  a pinwheel card lol, I've used the Tropical Escape Designer Series Paper, such lovely colours in it, and paired it up with the Sunshine Sayings Stamp set and some Gingham Gala Adhesive Backed sequins (they're so pretty).
And the last card, I was asked for more heat embossing, so I thought it would be fun to have 2 embossed colours together - gold and silver (hope it works in class lol)  I've used the Sheet Music Stamp set with the Better together stamp set.  thought this saying was somewhat appropriate to the background 😆
As the silver/gold embossing is not so obvious in the above photo thought I'd give a close up too, this Sheet Music Stamp is really one of my favourite stamps!
oh and as you can see from this photo I've used the rectangle stitched framelit dies too (such a useful set of dies)
Well that's it!  I hope if you can't make it to class these cards inspire you to create in your own space.
God Bless love
Heather xox
Oh and if you're ordering between now and the end of the month, make sure you use this hostess code to go in the draw for the free hostess benefits:  2H4RBNQQ


Cards for October

Hi there!
well we're in the thick of school holidays now, but I have finally found a few minutes to let you know the cards we'll be creating in my classes in October.

I'll just go with the order I made them in, so first up is this beautiful bouquet from "wishing you well" stamp set, I've loved the bouquet and bow since I set eyes on them in the holiday catalogue, they are what Stampin' Up! calls Distinktive stamps, which means that they create different opacities in a single stamped image, it's really amazing
 doesn't it create such a beautiful subtle image?  I've also used the Swirly Frames stamp set with this card too.
Card #2 I had to use this Buffalo Check stamp, oh my goodness it's fabulous!
I've teamed it up with the His Light stamp set, I do love the font in this set! then added a couple of the gorgeous Red Rhinestone basic jewels.
Moving onto Card #3 this was again one of those I couldn't resist stamp sets lol, "Trick or Tweet" it's meant to be Halloween, but I'm not big on that, however how can you resist the elephant, and the other animals?
I've teamed it up with 2 stamp sets,  Birthday Backgrounds (how about those streamers?) and Itty Bitty Greetings (only for the Happy Birthday, but it's a really handy stamp set for all the greetings in it!).
Ok last card.... back to Christmas!  I've used the Merry Christmas to All/Merry Christmas Thinlits bundle, lovely combination of Christmas sayings you can produce with this bundle!
I've teamed it up with the lovely "All is Bright Designer Series Paper", the Decorative Ribbon Punch, and the Merry is cut from the fabulous Joyous Noel Glimmer Paper.

Well that's it! hope you can join us, the dates for these classes are next Saturday 6th Oct 10am in Maryborough, then Wednesday 10th at 10.30am and 7.30pm in Laanecoorie.  Do let me know if you plan to come along. Look forward to seeing whoever can make it, and if you can't I hope these have inspired you to create! 


WANT TO EARN MY FREE BONUS GIFT THIS MONTH? Only a few days left!
Chicken Wire Elements and 3 metres of Merry Merlot & Copper 5/8" Reversible Ribbon
(it will be sent out to you next month)
  • $125 – $249.99 ORDER:  ADD HOST CODE, G43WBCJC for orders of $125 or more and under $250 (before shipping). To claim your bonus gift from me, you MUST include this host code. Example below on where to add your host code when ordering on-line.
  • $250+ ORDER:  PLEASE DO NOT ADD THE HOST CODE.  You will automatically qualify for the free bonus gift, the Chicken Wire Elements and ribbon as well as earn Stampin’ Rewards.
 God Bless love
Heather xox


Thankyou and Tag Cards for August

Hi there,
Thought I'd share with you the cards you'll be receiving from me when you place an order this month.  If you're part of my Craft@Home group, you'll be receiving way more than this! (if aren't part and you want to know more, just ask)

So my first card is the Thankyou card, which uses the lovely Dandelion Wishes Stamp set, and also the Abstract Impressions Stamp set for the saying and underline.  Oh and the Detailed Trio Punch for the corners.
Then onto the tag card, which also uses the Abstract Impressions Stamp set,  the Itty Bitty Greetings Stamp set for the saying, which is cut out with the Classic Label Punch, and the tag itself is cut with the scalloped tag topper punch. Keep reading as I'll explain how to put it together after the photo.
 Right, so if you are one of the lucky ones who's placed an order with me this month, here's how to finish off your card.  The tag is all done for you, that is my gift to you (and if you've ordered from me it should be on your bag)  having said that the ribbon will need to be tied at the top with the white thread, and trim down the ribbon and thread till it fits onto your card.  Also in you bag will be a piece of card with holes in it, use this as a mask to press colour through, choose a light colour (I used Gray Granite, such a great colour!) and use a sponge or dauber.  Daub or sponge colour over the mask and move it round your card till it has lots of dots on the background. 

If you are ordering with me, there is a special this month from Stampin' Up! for every $90 you purchase, you'll receive a $9 gift voucher for use next month, don't forget to use my "open host code" WZTSTANH

I hope these inspire you to create
God Bless love
Heather xox 

Something Saturday - Shepherds Care meets Snowy Delights Masks

Hi there Creators,  Today I thought I'd play around with a couple of my latest goodies, Shepherds Care Stamp set and Snowy Delights Mas...