Showing posts with label Beautiful You. Show all posts

Cards for classes in November

Hi there Creators,
Oooh it's almost Christmas and for November we're up to 3 Christmas cards 😀

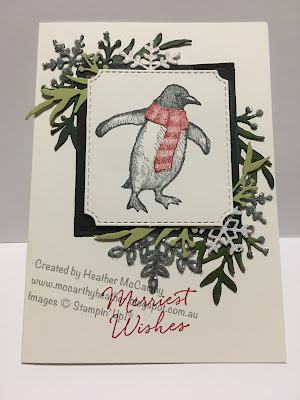
So card #1: I've had my eye on these gorgeous penguins since the beginning of the catalogue and have finally purchased them! They're called "Playful Penguins", I've also used the fabulous Frosted Frames dies, and also some of Shimmery Crystal effects with the new Ice Stampin' Glitter, I wasn't going to get it, but then I saw someone else's and it's rather cool!  the glitter has a consistency of granulated sugar.

moving onto the 2nd Christmas card....GOLD it's so Christmassy!  I've got the Gold foil cardstock, the new Golden Glitz ink pad........  And I've used the So Many Stars Stamps and the Stitched Stars dies (which are really amazing)  and fabulously the 2 come as So Many Stars bundle yea for 10% off!  
last Christmas card..... this one uses up some Christmas paper scraps, gotta love that?!  I've also used some of the brand new Gold Shimmer Ribbon and Gold Glitter Dots both of these only available while stocks last from 1st November, and my favourite Christmas saying stamp set: Itty Bitty Christmas
And the last card for November, I'm trying to use some of my stamps I haven't used in a while so this one uses Beautiful You and Birthday backgrounds, oh and Handwritten!  Also some vellum, heat embossing, and not forgetting the beautiful Scalloped Lace Trim.
Phew you made it through the 4 cards!  Class dates are Saturday 2nd November 10am in Maryborough, and Thursday 7th at 10.30am and 7.30pm in Laanecoorie, I hope you can make it, do let me know if you're planning to come.
If you can't make it I hope these have inspired you to create!
God Bless love
Heather xox

Cool! watercolour pencils on black card

Hi Creators,
I was thinking about a gorgeous technique I've done before that uses white embossing on black cardstock then you use the aqua painter to add white craft ink to the design, allow it to dry a bit, then add colour over the top, (it's a little time consuming) and I was wondering if I could produce any other ways of colouring on Black card (I'm sure others have done this too, but I haven't noticed it).  So......enter the Watercolor Pencils , yep they're spelt missing the 'u' in the catalogue (it's an American thing!) although its really hard to spell color that way when you're so used to spelling it colour! lol

However moving on if you're a regular reader of my blog you'll notice that in my class this month we're using this technique on this card:
however I decided to make a video on it, and thought I'd use a different set, that doesn't have quite so much to colour in (keep the video shorter).  This next photo shows what I used to make the card, the watercolor pencils, White craft Ink stamp pad,  the Designer Series Paper is the gorgeous Petal Promenade, and the stamp set is Beautiful You
And finally the video itself:
I hope you enjoy it and it inspires you to dig out your black cardstock and watercolour pencils (don't let it get wet on the card, as the colour then sinks into the card, and disappears)
Happy Stampin'
God Bless
Love
Heather xox

Cards for Regular Classes in September

Hi Everyone
Gee we're almost at the end of August already!  On 1st September the new Holiday catalogue is officially released (yay!)  If you are coming to one of my classes next month, I will have them ready for everyone to have one, if not and you'd like me to send you a catalogue - let me know!
Class dates are: Maryborough Sat 2nd 10am, Kangaroo Flat Wed 6th 10.30am, and Laanecoorie Wed 13th 7.30pm.

Ok, well, I may have delved into the new catalogue for a couple of our cards this month lol
first up, one of my new favourite stamps: Painted Harvest:
this is one of those 2 step stampin' sets where you stamp one image then the next one directly over top, for the flower and for the leaves (Oh it's so pretty!)  and, get this, there's a punch that goes with the leaves! (how exciting!!, it comes as a bundle too 😃)

Card #2 New stuff again *Hooray!!*
Thought we'd better have a Christmas card in the mix as it's leading up to Christmas (only 4 months!) this one uses the new SnowFlake Sentiments, beautiful set! (the dies that go with it are gorgeous too)  Also used Versmark resist technique on this one, with the glossy cardstock, and a touch of Silver Metallic edge ribbon

Card #3, I saw someone else had used the daisy punch to create a cute skirt for the dancing girl in "Beautiful You", and I just couldn't resist trying it myself, so here's my version
Isn't she gorgeous?, then I've used the Lovely Laurel Thinlits and the Powder Pink Shimmer Ribbon.

Ok, last but not least, I dug out the Paisleys and Posies Stamp set, and my new Happy Birthday Die
this one has a bit of a fancy fold, and I love the effect of colouring in some of the inside of the stamps with the white. And the Happy Birthday really stands out fabulously (I think)

Which is your favourite?
I hope these cards inspire you to create in your space, and I'd love to see anyone who can make it to my classes - let me know if you need more details.

God Bless love
Heather xox

Today's Party

Hi Everyone,
I thought I'd share what I taught at the party I did today, the hostess really likes the Beautiful You Stamp set so I created this card for the ladies to make:
They had a choice of the new Sale-a-bration glimmer papers to choose from to put behind their row of hearts, this one uses the Sweet Sugarplum, but also available in the pack is Mint Macaron, and Bermuda Bay (they're officially available from the 20th Feb to 31st March)  Also uses one of the beautiful lace trim stamps from Delicate Details stamp set, and the Serene Scenery Designer Series Paper

Then the other thing I wanted to show was the really cool Project Life Cards, so we created cards like these, using the 3x4" cards from 2 different sets of cards - All Year Long Project Life Cards, and Hello Lovely Project Life Cards. (first card)


We used the Decorative Label Punch on both cards, funnily enough I hadn't realised I'd used it for both until I came to prep for the cards, Umm just goes to show which punch is my favourite! (such a handy size!), we sponged round the edge of the card (if it needed it), and it's mounted onto one of the notecards and envelopes that are in the catalogue
Just goes to show that you can create cards really easily with not too much, the ladies were pleased with their creations.

I hope this inspires you to create, and know that you don't need much to create a cute card!
God Bless love
Heather xox

Creations for classes in January 2017

Hi Everyone,
I hope you've all had a lovely Christmas and that 2017 will turn out to be an amazing year for you 😊

I have worked out my January class class projects (dates for classes are: Saturday 7th January 10am, and Wednesday 11th January 7.30pm which is what I'll be showing you in this blog
First up we have:
I couldn't resist using this new "Beautiful You" stamp set, I've also used the new Watercolour pencils to colour her in, and cut out with the Flower Medallion punch, the background paper is
As the background papers are all different, I thought I'd do another one to show you too:
I've done a close up of the writing to show you too as it's not so obvious in this photo, as the area I wanted to put the writing on is quite dark, I've added a layer of white first, but you do have to let it dry properly or it will fade away!
So the next card again uses a new set, that I've done a blog post on before feel free to check it out here:  Bookcase Builder Stamp set blog post
I said it last time and I'll say it again, I just love the sayings in this set! and I really think it makes a great baby card, I even think this card would look cute in a scrapbook album!
So onwards - next card uses, Oh look at that, again some new stuff! (huh who would have thought!)
Alright so this card uses the "So in Love Bundle" one of the pretty Thinlit dies, and one of the sayings from the set, the sayings can be interchanged, I just thought it's been a long time since I did a Happy Anniversary card!  Underneath you'll see the embossed piece - that's done with the Hexagons Dynamic Embossing folder (and Smoky Slate cardstock) - it's pretty cool!  Add a bit of the sequin trim (I've used the Blushing Bride colour to match the cardstock)  Love the way Stampin' Up! colour codes everything so it matches!
Onto the last card, and this time I chose not to use a new stamp set, but a continuing one from the Holiday Catalogue:
Paisleys and Posies, I haven't used this set much in the lead up to Christmas so I was quite relieved when it was continued!  Until the 3rd January you can actually buy the stamp set and the dies as a bundle, Paisleys and Posies bundle so if you're interested in them get in quick, or you'll be paying 10% more :(  I've also made up this board to show you what the dies will cut out.
the little tiny tear drops fit into the little stemmed flower next to it.

If you're free on either of the above dates, do come along to one of the classes, if you're not free but interested in instructions (or a kit, although bear in mind that I can't do the stamping for you), do let me know.

I hope this has inspired you to create (and check out the new Occasions Catalogue) if you don't have one let me know and I can get one to you 😁

God Bless love
Heather xox

Something Saturday - Shepherds Care meets Snowy Delights Masks

Hi there Creators,  Today I thought I'd play around with a couple of my latest goodies, Shepherds Care Stamp set and Snowy Delights Mas...