Posts

Showing posts from November, 2021

Something Saturday - Hooray for Honeycomb Kit

Image
 Hi there Creators, Today I thought we'd take a look at one of the new Kits that Stampin' Up! has brought out, it's really fun!, the name "honeycomb" kind of gives it away🤣 There are 9 cards to create, and it's a nice simple kit, would make an excellent gift for anyone who is thinking of starting off with card-making, there's no stamping involved - it's all "stick it together" and everything is included to do this.  At $32 it works out to $3.56 per card (which let's face it is pretty cheap for a card these days!) So here are the cards you can make (3 of each): Don't you just love the matching envelopes? The front of each card has clear embossed shiny bits on it (most obvious on the rainbow card at the top! with my photography) And there you have it, I haven't had the chance to play around and see what else I can create with this kit yet, so if you get it and do play around, let me know what you do! If you missed the video here it

Eden's Garden Cotton Paper

Image
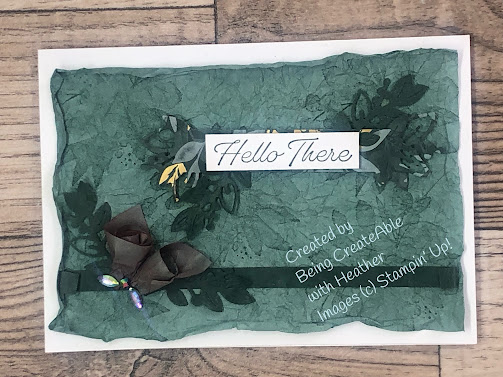
 Hi there Creators Well this isn't exactly my "Something Saturday" as it will be aired a little sooner thanks to Craft Alive Bendigo.  So if you're joining me for the first time from Craft Alive or GICS, Welcome!, and welcome back anyone who's been here before, I'm so thrilled you choose to see my blog posts and videos 😊 In my video this week I have gone through the Eden's Garden Collection of products and the Suite Sensation I currently have on offer (if you want to see the info about that, click here: Eden's Garden Suite Sensation Blog Post . Today's post is about the card I make in the video using the cotton paper, I'll admit that I wasn't 100% sure how to use it to begin with, so I googled and pinterest'd it and found a video by Wow Nola Creations, using the paper as a special textured background so I had a go, and changed it slightly, and voila:  Funnily enough the shabby chic thing doesn't usually do much for me, but I think

Eden's Garden Suite Sensation

Image
 Hi there Creators wow I didn't realise I hadn't done a blog post on this yet!  (had it in my emails for a while - oops!) Eden's Garden is a gorgeous new Collection, sadly the papers and gems are only hanging around for a couple of months till 3rd Jan (or while stocks last) 😢, then the stamp set and dies will carry over into the upcoming catalogue. My New Suite Sensation! Using the new Eden's Garden This Kit I have created is available to you for $40 , which includes: 1/4 pack of Ever Eden Specialty Designer Series Paper (you will have left overs) A 1/2 pack of the Garden Gems (again you'll have left overs) the ribbons and various papers, all cut & scored/ die cut etc for you to get creating. Envelopes for all the cards full written instructions to create all 6 cards  (3 of which are fancy folds) plus video instruction links if I feel it needs them. If you would like this kit, you can order it through this link: Eden's Garden S

Embossing folders 3D & Standard

Image
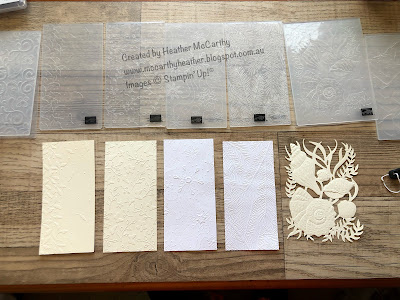
 Hi There Creators,  I had a request to do an Embossing folders video, so that's what this weeks video is all about.  They can be a little confusing as they come in small, medium and large, Standard and 3D.  And how do you know how to get them through your machine so they actually work? Stampin' Up! has 2 Stampin' Cut & Emboss Machines, the mini and the standard.  The Standard one is a similar size to the Bigshot (I find it has a tad more room for the plate, the Bigshot used to shave bits off my plates if I didn't have them lined up exactly, I haven't noticed that with the Cut & Emboss machine) Anyway, as you'll see from this picture our embossing folders come in a thin (small) size, which would emboss around 2/3 of your card front, a Medium size, which completely embosses your A6 card front and also a "large" which is 6" x6" sized (handy if you want the pattern on an angle!)   An important tip is to make sure the fold of the embossin

Mixing it up with Embossing Powders

Image
 Hi there Creators,  Well this Something Saturday I've mixed up my embossing powders - literally! I thought it would be interesting as they come in packs of 3 now to see what black and white would look like mixed up and embossed etc. Therefore here are my findings..... first up the embossing powders straight up -  Top Row: Gold, Silver, Copper,  Bottom Row:  Black, Clear & White (yes the clear isn't obvious, but bear with me!) So then I took a bit of 2 different colours from the sets of 3 and mixed them up in separate containers, and these were the results: I've put the 2 original colours either side of the mixed colour Gold and Silver mix Silver & Copper Mix Black & White Mix Gold & Copper Mix (I really liked this one!) Now I asked you to bear with me on the clear, and here is what I did with it (actually I did 2 things....) Firstly I took the clear embossed on white cardstock, and added colour to the background using Blending Brushes;  where the embossing

Creating a Card with a window opening

Image
 Hi there Creators, In my Something Saturday video today I'm showing how to create a card that has a window type opening in it, if you plan to create your own advent calendars this would be one easy way to do it with the right dies 😀 So here are the cards I made using the Bright Baubles Bundle: Firstly the lines on the outer card are simply made by dropping the ink pad repeatedly onto the card! (make sure you have scrap paper under your work, or everything will get coloured! lol) Also quite a good way to hide mistakes 🤣 Next up you create the opening - to do this you'll need to only partially cut the die, leaving a small amount uncut where you want the "hinge" to be (see the photo below) After that it's just a case of decorating, you can have it as an opening to the inside of your card, or in my case I added extra under it.   I added a piece of coloured card covering the back of the front of the card (how confusing is that?!), in other words I added a piece of c