True Love Designer Series Paper

 Hi there Creators

Well after having played with a bit of the True Love Designer Series Paper, (DSP) I just couldn't resist continuing on with it, so here is my next lot of cards that I've made up with it.  I got a bit inspired when I saw what others had done with it and adding hearts into the equation!  Having recently treated myself to the Heart Punch Pack, which consists of 2 heart punches, that fit together nicely.

Anyway onto the cards......

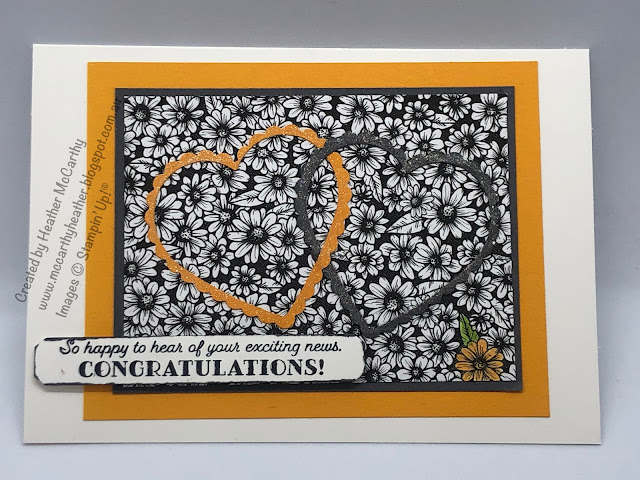
The first card I made I just punched the straight heart out from a piece of card, lined it up on the DSP and drew round the cut out heart, then I coloured in where it needed it, attached it together, and if you're a regular reader of my blog, you might remember that I stamped up the Many Messages stamp and cut out all the messages with the matching die, so I had 18 sayings to pick from (have to admit I'm loving this way of adding my sayings!)  check out the Many Messages Bundle!

True Love Designer Series Paper, Many Messages, Stampin' Up!


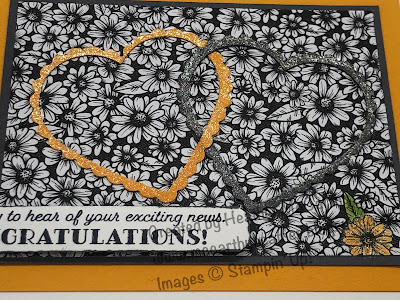
This next card, I have punched out the straight heart first then punched the scalloped heart, as you can see where to position your scallop heart this way round, I've added Wink of Stella over both hearts. And another one of the sayings......

True Love Designer Series Paper, Many Messages, Stampin' Up!

You can see the Wink of Stella better on this photo:

True Love Designer Series Paper, Many Messages, Stampin' Up!

The next card I made was this one, extremely simple, but quite effective!, take a piece of the DSP, punch the straight heart out of the middle, then punch the scallop heart out too, pop the rectangular piece of DSP down on the card add a line of the Black organdy glittered ribbon. Daub round the edge of the heart, I've also used my new blending brushes, and add the heart on dimensionals to your card. Did you guess I used another one of the sayings from Many Messages?

True Love Designer Series Paper, Many Messages, Stampin' Up!

And the last card, I've coloured in the flowers with my Stampin' Write Markers (I've used the 2020-2022 In Colours) Again I've cut the straight heart out first, then the scalloped heart, and utilized both, the straight heart is painted over with Wink of Stella (it's a lot more glittery than my photo gives it credit for!)  You know what I still have a heap of the sayings left over on my desk from the Many Messages!

True Love Designer Series Paper, Many Messages, Stampin' Up!

There is the potential to make so many cards out of this fabulous pack of DSP (and it's only $20! pretty good value!) I've used a small section of each pattern in the cards I've made so far.

Well I hope these inspire you to create in your space!

God Bless love

Heather xox

What's New?


Hi there Creators, 

Today I'm joining a Crafty Collaborations hop, this is a group of Stampin' Up! demonstrators from all round the world, cool eh?   This particular blog hop is What's New? and open to our own interpretation.

Sitting out in my craft room I spied the True Love Designer Series Paper that arrived a few days ago, and decided on a spot of colouring in therapy, and the cards started from there.....

This Designer Series Paper is black and white, and has some great images to cut out (if you don't mind a bit of fussy cutting)

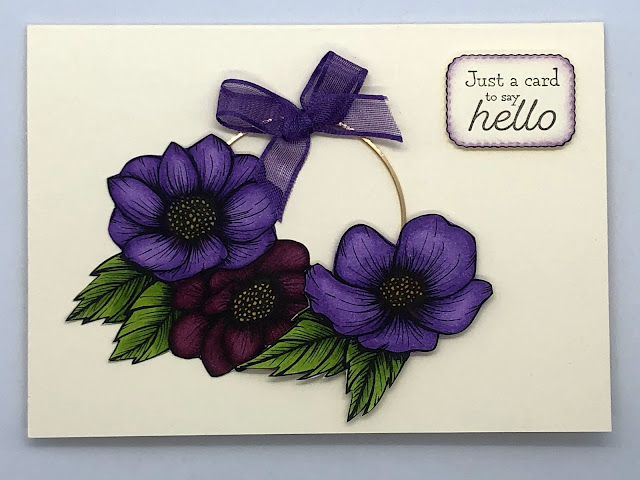
The first card I made with the paper was this one, I've cut the flowers out from one of the sheets of Designer Series Paper, and used Stampin' Blends to colour them in. With this first card I've also used one of the Gold Hoop embellishments which I haven't used before too, I have to say the metal ring is really quite sturdy
Stampin' Up!, True Love Dsigner Series Paper

you can see the Gold Hoop a little more clearly with this photo, I've used a bit of the Gorgeous Grape Sheer ribbon too, as it matched the Stampin' Blends I chose to colour with (Highland Heather and Rich Razzleberry)


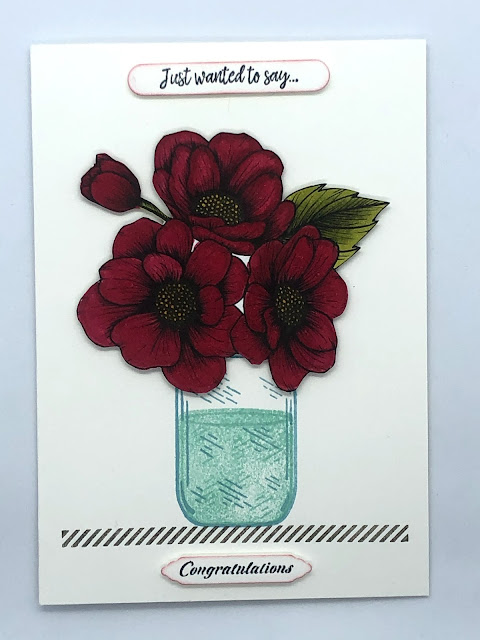
The other card, I used Cherry Cobbler blends, it's such a lovely rich red! These flowers needed something to sit on, so I've used the Jar of Flowers Stamp set to create the shelf and the jar, the sayings for both cards are from the fabulous Many Messages Stamp (heaps of sayings on one stamp, then they cut out with a matching die)

Stampin' Up!, True Love Designer Series Paper


 Have you tried colouring with the Stampin' Blends? they're alcohol markers, so when you use them you can keep colouring till you get the right colour and they won't ball the paper.  These cards are really quite easy to make if you don't mind the colouring and the cutting (and after all colouring is meant to be therapeutic πŸ˜‰)

I hope these inspire you to create!

God Bless love

Heather

Do check out what others have created, I love the inspiration!

Cheats Watercolour techniques

 Hi there Creators,

The other day I joined in a blog hop with others showing watercolour techniques  I was relieved to hear most of them saying watercolouring was a challenge for them too!  Anyway this morning I thought I'd take it to my Facebook live and give you a video for prosperity πŸ˜€

Here is the card I ended up making from the components I made in the video....  I've used In Bloom stamps, Pierced Blooms dies, they also happen to come as a bundle (yay for 10% off)  the bundle is called: In Bloom bundle, I've also used watercolour paper for the flowers and leaves, shimmery white card for the background

Watercolouring, In Bloom stamps, Pierced Blooms dies, Stampin' Up!

 And if you want to learn how to do it , check out my video here:

 
Let me know how you go with these 2 techniques.
I hope this inspires you to create!
God Bless love
Heather xox


All Berry Good Revised!

 Hi there Creators,

Well this is embarrassing! Obviously it wasn't "berry good" the first time lol.   Someone (thanks so much Reyne) has kindly pointed out to me that my Strawberries were upside downπŸ˜‚  oopsy  still they'd make great pears in green (as was suggested by Deborah).  However after all the hilarity I thought I'd better re-do them, so....same post as before, different photo!   (I'll try pears next time....)

I'm using the gorgeous new Sweet Strawberry Bundle and matching Sale-A-Bration Berry Blessings stamp set + Berry Delightful Papers.  When I originally saw theses goodies I knew I needed to do something with them, you can only get the Berry Blessings Stamp Set + Berry Delightful Designer Series papers when you spend $180 on other goodies (then you can choose them for FREE!) by the way Sale-a-Bration is referred to as SAB for the rest of this post :)

I have 3 ways for you to get your hands on this gorgeous set of cards: 

Stampin' Up!, Sweet Strawberry, Berry Blessings, Berry Delightful DSP
they look great the right way up don't they LOL

Here's the deals: 
  • Purchase $180 of Stampin' Up! goodies, include the Sweet strawberry bundle, and pick the Berry Blessings bundle from the SAB as your free item, I will send you the kit of plain papers, punched label pieces, instructions and bling for you to make a set of these cards using your own Berry Delightful Papers and new stamp sets for $7  to cover postage and materials.
OR
  • Purchase $180 of Stampin' Up! goodies, include the Sweet strawberry bundle, and pick the Berry Blessings bundle from the SAB as your free item, let me know that you'd like the instructions emailed to you and I'm happy to do that for free.
OR
  • Book a date to come and make these cards with me for $20 in my classroom (as there's stamping involved it's not one I can mail out, sorry)  However, I have managed to procure 2 of the SAB bundles so, all who book into this class will go into a draw to win my "extra" Berry Blessings Stamp set.  So book your place asap, as I am limited with the amount of Designer Series Paper I have!  I have a couple of spots left on Wednesday 3rd Feb at 10.30am or 6pm.  If you can't make these let me know and we'll arrange another time.

I hope these cards inspire you to get creating, they're such gorgeous Summery cards!

God Bless love

Heather xox


Watercolour technique for a Watercolour challenged individual.


HI there Creators

Well this week I'm joining in the Watercolour Technique Blog run by Crafty Collaborations which is a collection of Stampin' Up! demonstrators from all over the world😊 this one was truly a challenge as I'm not really that great at watercolour!

So I had an idea that I wanted to watercolour a few flowers from my new Pierced Blooms dies and make a kind of bouquet out of it, my initial attempts at properly watercolouring them failed dismally lol however after dropping one into the remains of colour that was on my silicone sheet I had an idea......

Here is the card I made, and I have some close ups and explanations to follow.
Stampin' Up!, Pierced Blooms dies, In Bloom Stamps, Watercolour
 
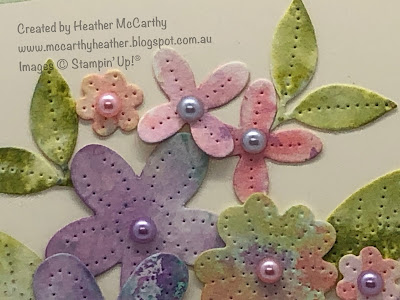
So my technique....  I used water color paper and cut out the die pieces, then painted each piece with water, inked up a blank stampin' block then dabbed the block onto the pieces till I liked the colour of them, with the flowers I repeated this method with a couple of colours.  I've used the Subtles colours.
stampin' Up! Pierced Blooms dies, In Bloom stamps, watercolour
I really love the way it gives that slightly splotchy look (plus it's so easy to accomplish)πŸ˜‰

stampin' Up! Pierced Blooms dies, In Bloom stamps, watercolour
For the label I've stamped first, with one of the saying from the matching In Bloom Stamp set then cut out with the dies, and just painted the edges with water, then dabbed the inky block onto the edges. Just so you know the dies and stamps do come as a bundle - In Bloom Bundle (yay for 10% off!!)   I really felt this ribbon the Pool Party Sheer ribbon matched the watercolouring on the card nicely.
Lastly I've added some of the oh so gorgeous Pastel Pearls, it was very hard only to add a couple hence every flower ended up with pearls lol.

Well that's it from me, I hope it inspires you to have a go at this way of watercolouring!

do check out what the others in this blog hop have created
God Bless love
Heather xox


All Berry Good!

 Hi there Creators,

Wow I am so organised LOL  I've got the class for February ready already!

I'm using the gorgeous new Sweet Strawberry Bundle and matching Sale-A-Bration Berry Blessings stamp set + Berry Delightful Papers.  When I originally saw theses goodies I knew I needed to do something with them, you can only get the Berry Blessings Stamp Set + Berry Delightful Designer Series papers when you spend $180 on other goodies (then you can choose them for FREE!) by the way Sale-a-Bration is referred to as SAB for the rest of this post :)

I have 3 ways for you to get your hands on this gorgeous set of cards:

Stampin' Up!, Sweet stawberry bundle, Berry Blessings Stamps, Berry Delightful DSP, Sale-a-bration 2021

Here's the deals: 
  • Purchase $180 of Stampin' Up! goodies, include the Sweet strawberry bundle, and pick the Berry Blessings bundle from the SAB as your free item, I will send you the kit of plain papers, punched label pieces, instructions and bling for you to make a set of these cards using your own Berry Delightful Papers and new stamp sets for $7  to cover postage and materials.
OR
  • Purchase $180 of Stampin' Up! goodies, include the Sweet strawberry bundle, and pick the Berry Blessings bundle from the SAB as your free item, let me know that you'd like the instructions emailed to you and I'm happy to do that for free.
OR
  • Book a date to come and make these cards with me for $20 in my classroom (as there's stamping involved it's not one I can mail out, sorry)  However, I have managed to procure 2 of the SAB bundles so, all who book into this class will go into a draw to win my "extra" Berry Blessings Stamp set.  So book your place asap, as I am limited with the amount of Designer Series Paper I have!

I hope these cards inspire you to get creating, they're such gorgeous Summery cards!

God Bless love

Heather xox


Crafty Collaborations Sale-a-bration Blog Hop


Hi there Creators,

thought I'd join in this Sale-a-Bration Blog hop today, and I'm excited to see what others have created using the upcoming Sale-a-bration SAB products.  For those un-initiated  SAB is a special time of year where we have 2 months of FREE Products *YAY*: When you purchase $90 of products you get to pick a free product from the SAB offering, this year is the first year we're going to have 2 SAB's in a year there's another one coming in July too (it'll be different products) *DOUBLE YAY* lol

Anyway there were a couple of products that I have to admit I wasn't so keen on, but at the time I was ordering it was a case of pick the stamp set I didn't have as others weren't available, then lots of people seemed to be raving about the Designer Series Paper that I ended up using (again I wasn't so keen on it)  However I have a thing about not being beaten by a stamp set, so I was determined to make something of it (especially as I can see a lot of my customers/friends liking it too) - of course now I rather like it lol

Anyway enough waffling and on to the photos......

Corners Bouquet, Approaching Perfection, Stampin' Up!
The first card I made was this one, I have to admit I was just playing with the main stamp in this Corners Bouquet stamp set, and I didn't really consider how I was going to put this onto a card, so I picked some nice bright colours and set to work colouring in the stamp with the Stampin' Write Markers, I love the way it came out, there's 4 stamps in the set, the main one is this big sprig of greenery and flowers, on the bottom of this you'll see 2 branches of leaves, this is another stamp in the set.  Then I thought "I know I'll pair it with the Oh So Ombre Designer Series Paper (DSP)" (also a SAB product, which I wasn't keen on before I saw it lol)  However I then discovered that I'd used none of the colours in the DSP, (oops) Oh well!  the back is Bermuda Bay, which really didn't go with the inks I'd used, so it's covered up with the Misty Moonlight ribbon.  Thankfully the pinks look ok together!  Oh and not forgetting the saying, this is from another SAB set called Approaching Perfection, (this could well be my favourite set) I just love the sayings in it, I like little "whittisms" 😊

The next one I made is a little mini card, with the second largest image in the set, again I've used the leaf stamp at the bottom, and the final stamp in the set also makes an appearance in this one, which is a little flower, in this card the pink and yellow flowers aren't part of the main stamp they're a cute little stand alone stamp, again I really like how it turned out!  And again using the Approaching Perfection stamp set (you can see where it gets it's name from this stamp).

Corners Bouquet, Approaching Perfection, Stampin' Up!

Lastly I really wanted to try a spot of watercolour with this set as I kind of think it lends itself to it

Corners Bouquet, Approaching Perfection, Stampin' Up!

I've gone with the main image and again coloured it with my Stampin' write markers, did you know that Stampin' Write Markers have 2 ends? one you can colour in your stamps with so you can get different colours on the one stamp (makes you feel very artistic) and the other is a thin pen end (you can correct your mistakesπŸ˜‰, or journal with them)  I tried different methods of spritzing water onto the stamp that didn't end up how I wanted to, then I ended up stamping direct to the card stock and spritzing water onto the card stock, I like the way it faded slightly.  I wanted a raggedy edge around it, and to create this effect I've used my water painter then ran my nail up and down the edge till it looked ragged.  This card I actually thought of the colours I was using (see I do learn from my mistakes lol) and again I've paired it up with the Oh So Ombre DSP and my favourite stamp from Approaching Perfection stamp set.

Let me know if you have a go at this method of "water colouring" tell me how it turns out.

I hope this inspires you to create, now do go and check out what everyone else in this blog hop has created, - enjoy!

God Bless love 

Heather xox


Something Saturday - 2 from 1 Stripes & Trees

  Hi there Creators Today I'm doing one cut with my Designer Paper and creating 2 different cards - gotta love it when you can get 2 for...