Hi there Creators,
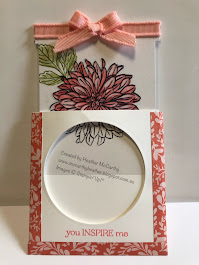
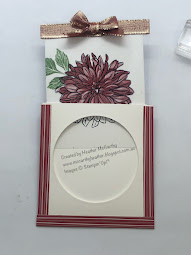
my "Something Saturday" video this Saturday was on this Magic Slider Card, in the video I mention that I'll pop the instructions/measurements here too.
However first up the photo.... As you can see I ended up making it in 3 different colours, I just think it's so pretty using the Delicate Dahilas stamp set! Remember you only have until the end of this month (September) to get this stamp set as it's one of the Sale-a-Bration sets, to get it for free you need to purchase $180 of goodies then you can pick it for Free!
I promised the dimensions and I've done a Photgraphic "journey" of some of the way I've made it, so I'll pop this below, If you want to see the products I've used click on the links at the bottom and you can easily add the ones you need to your shopping card.
First up you'll need
- a 1/2 sheet of A4 (cut longways), should measure 29.7cm x 21cm score it at 9.9cm in from both sides, so it folds into 3 equally.
- you'll also need a piece of card 9.5x11.5cm
- And a piece of window sheeting the same size 9.5x11.5cm
- cut a hole in the front of your card I used the Layering circle dies (you'll see them in the link below)
- now you need to create the bit that will hold the slider part of your card in position (so it doesn't fall out of the card) Open the full card out, and on the top end (away from the circle), you need to create a small fold inwards, I went with 1/2cm square, check out the photo
- Next you want to create the same sort of thing in the corner opposite it, so cut a slit 1/2 cm long, then fold it inwards as shown in the photo below
- when you fold it up again it should look like this:
- Next create the slider, card should measure 9.5x11.5cm, you need to cut a chunk out of each side, it's shown here with the longest side on the top, I've left 1.5cm on one end and 1cm on the other end and gone in by about 0.5cm (not an exact science!)
- this is how it should look measured up against your card
- you then need to flap the front down and draw round the circle to know where to place your image
- I then had to use my stamparatus to line things up properly, so, fit your card into the stamparatus (up into the corner) lay the stamp onto it where you want it then pick the stamp up with one of the plates, ink it up and stamp it with whatever colour you want.
- replace the plate with your other stamping plate, and line up the next stamp directly on top of the stamped image, again pick it up with your stamping plate, However this time lay the window sheeting on top of your stamped cardstock and stamp the outline image using stazon directly onto the window sheet.
- now you want to add any extra stamps to the white sheet (I added leaves)
- then you need to join the 2 images together, I used a strip of tear & tape adhesive, which I pulled part of the end up, so I could line up the images first before removing the rest of the backing:
- now to assemble your card! The white piece goes in the back 1/3 of the card base, once its in you can glue the first small flap you cut kind of round and behind it (sorry I couldn't photograph it, best to view the video, it'll make more sense on that!)
- The window sheeting part goes behind the circle cut out if for some reason it doesn't slide up and down easily you may need to trim the sides of the window sheeting slightly
- now you can decorate up your card (if you plan to daub around the circle, you'd be wise to do that before putting the card together - now she tells us lol!)
- I've used 10x2cm strips of DSP, and scored in 1/2 at 1cm. Attached to the 2 sides then across the bottom.
- Last but not least ribbon! I've measured the ribbon round the top of the slider section and cut off the amount I needed, then run a line of tear & tape adhesive all the way along the ribbon, allowing it to come off either side, then trim it down (the tear & tape will stop your ribbon from fraying) attach it along the top of your slider section, then create a bow and stick this on top.
Phew I think we're done! If you make one let me know. I'd love to see your creations - you're welcome to post them onto my facebook page Being CreateAble with Heather
Looking for the products I used? Click the appropriate photo or heading for it's "ingredients"

I hope all these links work! and this inspires you to have a go and create your own magic slider cards
God Bless love
Heather xox


.JPG)

.JPG)
No comments:
Post a Comment