Hi there Creators,
well this morning I did my Facebook live and thought I might share what I made with you, hopefully by the time I've finished the write up the video will be uploaded to YouTube and I can add it to here too!
Anyway I started off my video showing how I cut and score my cardstock to create my base cards, actually I score it, then cut it, as it cuts down on one step (no pun intended) So I score the card all the way down the sheet at 10.5cm, and if I need to do a few I'll get the lot scored first, then move onto my cutter, and the 1/2 way mark for A4 paper is 14.8cm, I know my trusty Paper Trimmer will cut at least 2 pieces of card in one go, so that makes it a bit quicker too.
Anyway onto the cards, I've cut my Designer Series Paper to 5 3/4" x 4" the piece of plain card for the top part is 1cm less all round, so cut to 13.8cm x 9.5cm. I have used the Sale-a-Bration Flower & Field Designer Series Paper which is only available when you purchase $90 of goodies from the catalogues, then you can choose it for free! That's right, during Sale-a-Bration you get rewarded for orders of $90+, Bonus!!
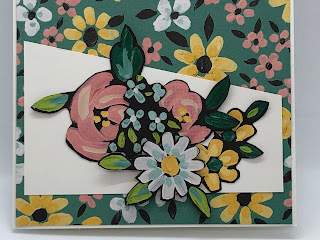
I took the white card and made 2 diagonal cuts in it, the middle one is for one card and the other 2 pieces go on the other card. As you can see I've taken more of the pretty "Flower & Field Designer Series Paper" and fussy cut some of the images, they don't have to be complete images as you can "hide" the lost bits under others. I have used the lovely stamp set from Hello Dear Friend All inclusive card kit as I really like the writing, and I thought the flower and leaves really suited this paper well.
The Blue flower in the photo below is missing the left and bottom of the image, but it's covered well with the other flowers so you wouldn't know!
How cute is this little flower from the Hello Dear friend All inclusive Card kit and doesn't it suit this paper so well? I've also used one of the Opal Rounds embellishments (as this card had a smudge I needed to cover!)
Oh and look at that, the video has managed to upload to YouTube, so I'll attach that too. yay!
Ok well I hope this inspires you to have a go and dig out your beautiful flowery papers! Of course if you want this paper to do this with, all you need to do is order $90 of goodies and choose it for free (it's only available till end of Feb, so you need to get in quick!)
God Bless love
Heather xox


.JPG)

No comments:
Post a Comment