Posts

Something Saturday - Click Clack Concertina Card

Image
 Hi there Creators Well I was sitting last night wondering what to do for my Something Saturday, and playing around with a bit of paper, ended up designing this card, I've made similar cards before like the cascade cards, this is probably a bit more basic, but I'm happy with it and it's way simpler to create, but still packs a cool Woah factor🤣  I've used Sentimental Christmas Designer Series Paper which is on the last chance list. I decided it needed a sentiment so picked out this one from Sweetest Star Stamp set (last chance list again), because it has 6 words (1 for each panel!😃) and these Adhesive backed Snowflake Assortment are also on the last chance list and happen to be reduced to 1/2 price (woo hoo!) Ok, onto measurements.... You'll need a sheet of A4 for the base card, score it at 9.9cm either end, then cut in 1/2 at 10.5cm, fold so each piece is concertina'd into 1/3rd's then each folded piece needs a cut that goes 1/2 way up the card (in the...

Something Saturday - Double Window Shutter Card

Image
 Hi there Creators today I'm showing how to make a card I'm calling a double window shutter card, as I'm not sure where I saw it (if I did I may have just dreampt it up!, or what it was called if I did see it somewhere and it had a name!) Anyway I doubt very much mine would be the same as anyone else's (I'm like that!) So here's my original one I created, I've used the Sea Turtles stamp set to make this one: this time I decided to use the Inked Botanicals Designer Series Paper, I love that it has a vanilla background to it and gives my white cardstock a rest! I've added the Cheerful Daisies Dies , and used the Distressed Gold Specialty paper for the inside pieces of the flowers, I've deliberately left the other side without stamping, as I'm not quite sure who I'm giving it to yet! If you missed the video here it is: I hope this inspires you to have a go too! God Bless love Heather xox  

Something Saturday - Delightful Doily Hybrid

Image
 Hi there Creators Today we're looking at the Delightful Doily Hybrid , it's an embossing folder with dies.  During July you can earn Bonus Days Coupons Spend $90 and get a $9 coupon (this is cumulative), whilst these dies are $74 you could add the embellishments I've used below and some glue (or add a bit of ribbon, paper... you name it!)    As the name suggests you can create a doily effect with it and I've shown off a few ways to use it in the video, but basically... you can cut the main flat images as shown (excuse the fact the large one is embossed, this gets done in the video) then you can line them up inside the embossing folder and emboss them (I've brushed over a bit of colour so you can see the pattern) Then lastly you can cut them out with the intricate die, and emboss them, it creates such a wow! then I thought you might need to see a close up, I've added some of the Festive Pearls to the middle of each of mine as they blended really well with t...

Something Saturday - Paper Florist Dies

Image
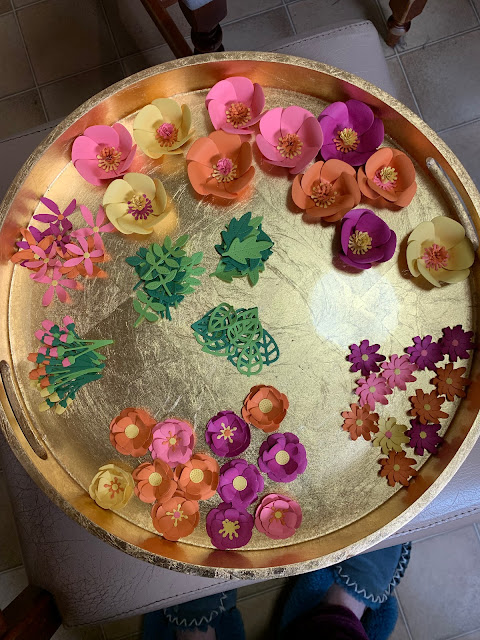
 Hi There Creators Today we're checking out the really Cool "Paper Florist Dies"   these are stand alone dies, which create absolutely fabulous flowers, you can make arrangements out of them.. attach them to paper bags.... create displays with them, pretty much wherever you can use artificial flowers you could use these!  During July you can earn Bonus Days Coupons Spend $90 and get a $9 coupon (this is cumulative), whilst these dies are $65 you could add the embellishments I've used below and get over the line (or add a bit of ribbon, paper... you name it!) I have used them on the bags I've made for my Mega class which actually is happening today! (didn't click when I made the video that it would be on the same day!)  I've used some of the Brights cardstock to create my flowers and here they are.... First up a heap of the ones I created before the video for the bags then the embellishment on the bags themselves I've also added some of the Brushed Bras...

Something Saturday - A Useful Gift

Image
Hi There Creators, Today I needed a new notebook for my sermon notes, so I thought what better than to show you how I decorate up notebooks as presies for others, (and myself)  I buy mine from Kmart, but I don't think it would matter where you buy them. And on to the photos:  My notebook started off without the extra elastic, and at the end of my video I added an extra section to show how I add the elastic to it to keep it closed when not in use. But basically you just punch two small holes in the backboard of your notebook (top & bottom) thread through the elastic and tie it tight enough that it will loop round the front and not be baggy.  I've also given my Designer Paper 2 mats one in Copper clay and the other as Pretty Peacock.  It really is a case of measure your notebook and decide on your own sizes!  the last thing I did was add a length of ribbon tied to the top of the spiral binding (make sure you only tie it to one piece of wire (not the double loo...

Something Saturday - Memories & More

Image
 Hi There Creators Today I was showing off the Bright & Beautiful Memories & More Cards & Envelopes and also the matching Bright & Beautiful Memories & More Card Pack (bit of a mouthful!)  However if you want to make a heap of quick and easy cards this is the way to go! You get 20 base cards of 2 designs in the pack with matching (absolutely gorgeous envelopes!) And way more cards in the card pack, to see them all check out the video. Anyway, here are the cards I made up with some of them, I only added some of the Adhesive Backed sequins trio for a bit of bling, I've used some of the stickers in the pack too, oh and one stamp from the matching Beautiful Balloons stamp set in the second card If you missed the video - here it is 😁 I hope this inspires you to create! God Bless love Heather xox

Mini Camera Shutter Card

Image
 Hi There Creators, Today I'm showing you how to make a mini camera shutter card, it's made with an A6 piece of card (so cute!) Here are 3 of the cards as closed ,1/2 open, and open, so it makes a bit more sense (little hard to photograph!) And these are the components you'll need to make this particular one, check out this list for the products used: what Heather used   and the measurements are below. j   You'll need: A6 thick white card, scored in each side at 3.7cm 2 pieces Misty Moonlight card cut to 7cm x 5.9cm scored at 1cm on the long edge 2 pieces of designer paper cut to 1" x 4" 1 piece of designer paper cut to 2" x 4", scored in at 1/2cm (or 1/4") both ends and with the medium filled in balloon from the dies cut from the middle of it. a small balloon cut from designer paper. 2 3/8" circle punch take your pick tool  I'm not sure I'd do justice to explaining how to create this one, so I'll leave it up to the video!    I ...

Something Saturday - Fancy Fold Planets Card

Image
 Hi there Creators, We're onto Week 3 of the Designer Paper sale (which goes all of June)  and I'm still kind of stuck on the AMAZING Stargazing Paper (currently on sale for $18.48 from $21.75), it is actually part of a whole suite Stargazing Suite, but the stamp set didn't really appeal to me, however the papers are a different matter......  Oh and check out the Holographic Trio Papers (oh WOW!) having said that I haven't used them in these projects! Also there's a joining deal on during June too!  you can get an extra $48 on the normal starter kit's amazing value, so that's: Join my team in June and pick $283 of goodies but only pay $169!!  wow!  If you're interested ask me for more details - or if you know you're sure, go here:  Join Heather's team However I'm guessing you want to see the cards, and get the measurements, so here goes.................. by the way I think they might be called a Reverse bridge fold card, but I wouldn...