Thankyou for joining me today, I have been a Stampin' Up! Demonstrator, since 2008. My blog will show you how to make cards and projects using Stampin' Up!'s fabulous products. And occasionally random extra stuff (that's the way I roll 🤣) Please do sign up to receive my emails, so you get my latest info.
Hi there Creators,
Coming up soon is the Picture to Page show at the Primary School in Kangaroo Flat 16th & 17th March. Rosalie, Cindy and myself will be there again. Once again we'll be offering classes throughout the weekend, so I thought I'd give you the heads up! If you're part of my team and you want to learn what I'm teaching, let me know, and we'll organise a team gathering 😊
Anyway, what am I teaching? Oh I'm so glad you asked lol
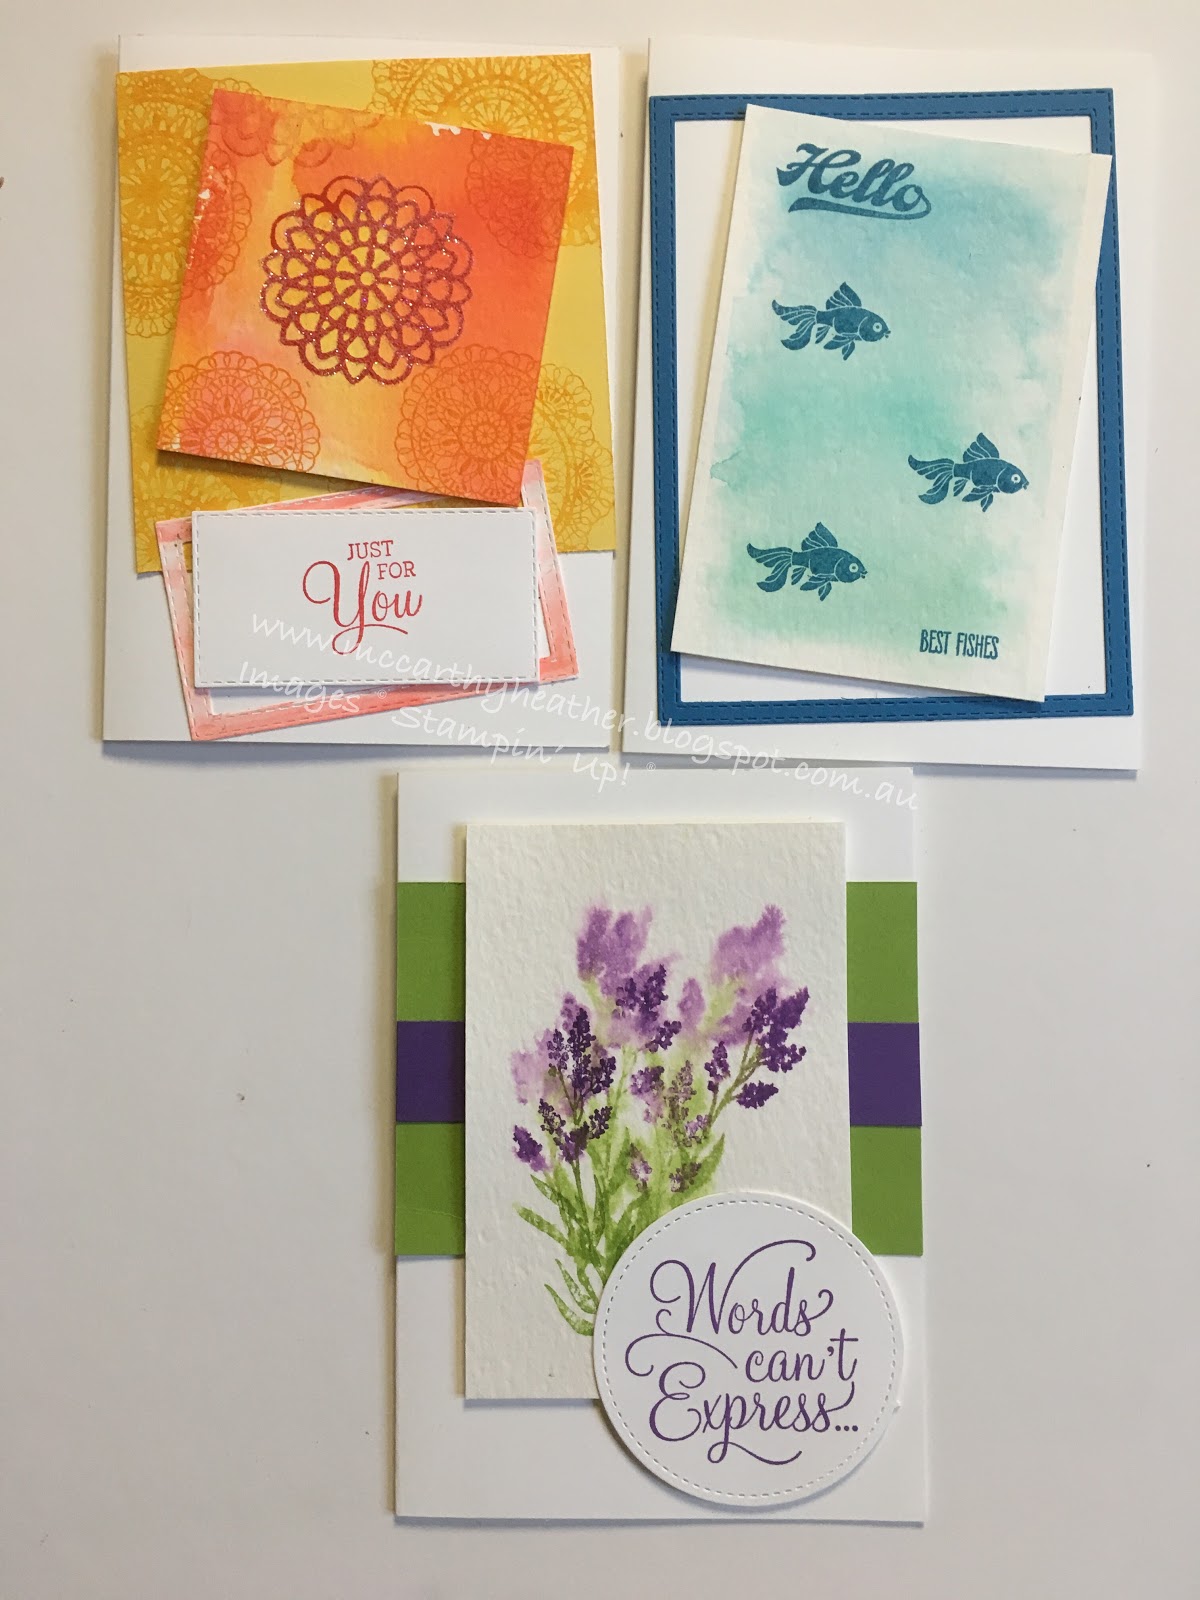
I thought I'd teach 3 ways to watercolour, and here are the cards I'll be teaching: My class cost is $20 with $10 redeemable against a $90 order (which will also qualify you for a FREE Sale-a-Bration item) I will be teaching this on Saturday at 1-2pm and Sunday 2.30 -3.30pm
Rosalie is going to be teaching this gorgeous little matching bag and Card (Rosalies' projects are always so neat and feminine) Rosalie is charging $15 for her class, and will be running it Saturday 11am-12noon, and Sunday 1-2pm
Cindy will be teaching 5 quick and easy cards giving you ideas on using up some of those gorgeous Designer series Papers that you've got stashed! (haven't we all got a heap of those!) Cindy is charging $15 for her class, and will be running it Saturday 2.30 - 3.30pm, and Sunday 11am -12noon
And that's it from me tonight, as I need to get off to bed! hope we get to see you at Picture 2 Page show if you're planning to come, let me know as I do have a few entry discount vouchers that I'd love to pass on to you!
I hope you are inspired to create seeing our projects.
God Bless love
Heather xox
Hi Creators,
I know I say it every month, but but wow another month almost gone!! March is a busy month with Picture to Page show in Kangaroo Flat happening the weekend of 16th/17th March, click this link to find out more info.
Anyway on with the cards for March..... Class dates are: Saturday 2nd 10am Maryborough, Wednesday 6th 10.30am Laanecoorie, and Thursday 7.30pm Laanecoorie.
First up, I was asked for a spot of watercolouring, and I figured this card would work for a male or female card.
I've used the Well Said bundle that has heaps of words! (both dies and stamps) with a spot of watercolouring in the background.
Incorporating a bit more watercolour this next card has gorgeous watercoloured butterflies
Remember that during Sale-a-Bration for every $90 you order you can pick a FREE Sale-a-Bration item!, or if there are so many Stampin' Up! goodies you want to get, how about joining? the deal during Sale-a-bration is really sweet! Check it out here: Join Stampin' Up!
or click on the link above - "Join my team the CreateAbles" for more info.
Well I hope I have inspired to you create!
God Bless love
Heather xox
Hi There Creators,
thought I'd drop in and show you a few things I've been creating recently.
After the class I had a few horse cards unfinished so one of them got turned into this, using some of of the other stamps in the Let It Ride stamp set, to do this I've ended up cutting out more stencils, 2 for the single horse and one for the 2 background horses, so that I could stamp the trees into the background I think it's kind of cool having the 2 galloping away in the foreground, what do you think?
There is a second wave of Sale-a-bration products available from tomorrow 15th Feb, and this card that I have made up as my "tag" card for the month uses some of them. I've used the Country Floral Dynamic Textured Impressions embossing folder, which is so pretty! I've used Rich Razzleberry, Pumpkin Pie and Old Olive daubers to lightly daub over the raised pattern. For those of you receiving it I've left it white for you to add your own colour to it. The tag itself is made using the beautiful stamps in the Painted Season Bundle, and also the really useful Rectangle Stitched Framelit dies (have you noticed them? they're on page 28 in the catalogue) and I've just realised that they bundle together with the Amazing Life Stamp set!
always good when things bundle and you get 10% off!
I also thought I'd show you the "one sheet wonder" type sheet I created to cut the stamped tags from, as it really lends itself to a one sheet wonder this stamp set! I stamped up the whole A4 sheet (and I have some left over, so I'm planning to see how many cards I can make out of it!) aren't the flowers so pretty though?
Ok moving on.... actually lets not move on too much as I also made up another card with the same stamp set, slightly ironic as the main reason I went ahead and got the set is for the Pine cone and I haven't used it yet! I wasn't sure I'd like the flowers so much, but I really do! this card I took the flowers and stamped them on the card, then stamped them a couple more times on scrap card, and cut out the bits to create a Paper Tole type image, layered up with dimensionals. The saying are from the beautiful Dear Doily Stamp set (more about that too in a mo!)
thought I'd show you a close up of the flowers (because I can lol)
Then we'll flow onto the Dear Doily stamp set.....which conveniently comes as a bundle too. And Oh My Goodness! it is awesome! however I don't have anything with the dies to show you just yet, as all I've done is cut them out in white card and ooh and Aah over them lol, but I did make up this simple card with the stamps, as it's so delicate I was looking around for a ribbon to go with it and thought this one was perfect - it's the Whisper White 5/8" flax ribbon, although it's chunky it has the right amount of delicacy for this card, I think it's the slightly see through nature of the ribbon. Colours I've used with this are Balmy Blue, Mint Macaron and Petal Pink, which has a slightly coral/orange'y hue to it.
Well I think that's it for now, do let me know if you have any questions, or you're interested in placing an order but unsure how. Don't forget for every $90 you order till the end of March you get to pick a free Sale-a-Bration product YAY!
Thanks for reading this, and if you're not on my e-mailing list and would like to be, do let me know!
Happy Creating
God Bless love
Heather xox
Hi Creators,
I was thinking about a gorgeous technique I've done before that uses white embossing on black cardstock then you use the aqua painter to add white craft ink to the design, allow it to dry a bit, then add colour over the top, (it's a little time consuming) and I was wondering if I could produce any other ways of colouring on Black card (I'm sure others have done this too, but I haven't noticed it). So......enter the Watercolor Pencils , yep they're spelt missing the 'u' in the catalogue (it's an American thing!) although its really hard to spell color that way when you're so used to spelling it colour! lol
However moving on if you're a regular reader of my blog you'll notice that in my class this month we're using this technique on this card:
however I decided to make a video on it, and thought I'd use a different set, that doesn't have quite so much to colour in (keep the video shorter). This next photo shows what I used to make the card, the watercolor pencils, White craft Ink stamp pad, the Designer Series Paper is the gorgeous Petal Promenade, and the stamp set is Beautiful You.
And finally the video itself:
I hope you enjoy it and it inspires you to dig out your black cardstock and watercolour pencils (don't let it get wet on the card, as the colour then sinks into the card, and disappears)
Happy Stampin'
God Bless
Love
Heather xox
Hi there Creators,
Almost February, so thought I'd best show you what we're going to be making at the classes on Saturday 2nd 10am in Maryborough, Tuesday 5th at 7.30pm in Laanecoorie (my classroom) and Wednesday 6th 10.30am in Laanecoorie (my classroom)
Card 2 uses the Let it Ride stamp set, combined with the Stamparatus for ease of stamping my sister and daughter are both into horses so I really felt this was a must have set for cards for them!, and as so many people around this rural area have horses I also thought it was a fairly safe bet to do a horse card, I think just about everyone I know, knows someone who has a horse!
Last card I thought we'd better do a valentines card for those who'll need it, although I will have a Happy Birthday to fit for the saying just in case!
So this one uses the Geared Up Garage Stamp set and Garage Gears thinlits, along with the Corrugated Embossing folder, which has made it onwards from the Holiday Catalogue!
I thought it kind of looks like a roller garage door using the corrugated embossing folder.
So that's our line up for the cards we'll be making in February, do let me know if you'd like to come and join in any of the classes, and if you don't have the new Occasions or Sale-a-Bration Catalogues and would like them, do let me know, and I'll get them to you.
Hope these inspire you to create! let me know which is your favourite
Happy Stampin'
God Bless love
Heather xox
Just makes you want to go Muwah!
Hi There Creators,
well today I'm showcasing the "All My Love Designer Series Paper" Oh it's so pretty! I have made a determined effort that this year I'm going to actually use my DSP's (Designer Series Paper's) rather than just looking at them and admiring them lol (which seems to often happen)
So with this series of 5 cards I've managed to use a piece of each of the 6 papers - admittedly I've used what I consider to be the prettier side of each, although sometimes it's a hard choice! Stampin' Up! are also doing a Simple Stamping challenge, which means that you try and take your stamping back to basics, by just using Stamps, Ink and Paper, and in this months challenge a punch too. This month the theme is Valentines Day, which conveniently fits in nicely with these papers!
So onto the cards here they are all together, then I'll show you them individually:
For the #simplestamping Challenge I have 2 cards that specifically stick to the parameters, one more that uses a bit of ribbon then the other 2 are more birthday cards 😊
So first up this one, which has used a piece of the DSP, and I've cut the hearts out of it, you probably (I hope) wouldn't know this but in this collage of hearts there's only 3 whole hearts! the rest are all parts and arranged to "underlap" the whole ones. I've teamed it up with the "Forever Lovely" Stamp set
The other card that managed to stick to the parameters of the challenge is this one: I've stamped the background using the "Forever Lovely" stamp set then I've managed to use front and back of this DSP, using a strip of the DSP instead of ribbon, this one I've also used the Everyday Label punch for the saying, I've trimmed down the top and bottom of it, to give myself a narrower label, as it was taking up too much space on the card and covering some of that gorgeous DSP!
this is the 3rd card for the challenge although I have to admit this one did get ribbon added to it!, the ribbon is from the matching ribbon pack "All My Love Ribbon Combo Pack". And I have Wink of Stella'd a couple of the hearts. The saying is again from Forever Lovely stamp set as well as the tiny tiny hearts with it, I've punched out one of the Everyday Label's from the Lovely Lipstick cardstock, cut this in 1/2 and layered it behind the saying (in case you're wondering how I got the coloured edging to it.)
On to the last 2 cards in this series:
Out of all the cards this one is probably my favourite, it's just so simple, again it uses both sides of the DSP, by using the back, as the strip across the card. Don't the sayings fit nicely inside the Everyday Label punch?
And last but not least, this card uses 2 pieces of DSP (as I had the small square left over from something else, so I really felt like it needed to be used!) I've backed it with a square of Lovely Lipstick then Soft Sea Foam. I've used the other ribbon from the "All My Love Ribbon Combo Pack" which is quite a thin ribbon, so I thought I could use it the way I'd use twine (what do you think - does it work?)
Well congratulations on reading on to the end of this post!
Just before you go, did you know that till 31st March is "Sale-a-Bration"? what does this mean? Oh I'm so glad you asked lol! Well it means a few things:
It means that for every $90 you spend on Stampin' Up! goodies, you'll be entitled to a FREE Sale-a-Bration item, there's stamp sets/ribbons/accessories/DSP (and all except the framelits) will be gone at the end of Sale-a-Bration
If you've ever thought about hosting your own Stampin' Up! party if you have it now you'll end up with even more free stuff! when the orders go over $400 for your party you'll end up with an extra $40 of rewards (and let's face it your friends will want to order $90 to get free Sale-a-bration items!)
Are there so many Stampin' Up! goodies that you wantthat a constant 20% discountwould be handy? Well now's the time to join Stampin' Up! During Sale-a-Bration you can pay $169 and receive $315 worth of goodies!! or option 2 is pay $210 and receive the same PLUS the amazing Craft&Carry exclusive tote bag (valued at $87) and believe me it's really worth it, I love mine, you can fit so much into it, including the Stampin' Trimmer!
Any questions? let me know!
Well I hope these cards have inspired you to create! let me know which is your favourite!
Hi Creators,
I've made a YouTube video on these 6 cards, and wanted to pop it in writing too, so here goes!
I wanted to show how you can take a Designer Series Paper pack add one stamp set and create a heap of cards quick and easily from it. (I used Birthday Cheer stamp set, which coincidentally has a fabulous die set to go with it!, and of course it comes as a bundle, so you can get 10% off it *yay, gotta love bundles*),
First up, cutting your cardstock, I've added white cardstock as my base card and a piece cut to 10.5cm x 7.4cm. As I don't like to waste cardstock, you'll find that A4 cut in 1/2 creates A5 (14.8cm x 21cm). which you can fold in 1/2 at 10.5cm and create your base card. Then cut A5 in half (10.5x14.8), and in half again gives you the 10.5x7.4cm, and you have the perfect size for a focal piece for your card.
On to the cards I've used the How Sweet it is Designer Series Paper which will be available from tomorrow! in the new Occasions Catalogue. It has some great images you can just cut out. When I've made these cards, I've created the focal piece as a separate entity, then added it to the background - hopefully that makes sense!
I've taken my white focal piece, stamped the 2 sayings, and sponged round the edge, then taken the Designer Series Paper (I'll call it DSP) and the jar is cut from one of the sheets added to the middle of the white focal piece, this piece is now finished. The pink background is DSP cut to 4x6", then a 1cm slice taken off the end to fit it onto your card. (keep the slice as it's used in another card!)
Again I've decorated up my focal piece first, so this one I've stamped with the confetti type stamp all over, then added the saying, and sponged round the edge. Then taking the DSP I've cut out the cupcake, sweeties and jelly beans, added them on. And (you'll start to see a pattern forming here) the background DSP cut to 6x4", with 1cm trimmed off the end.
I think you'll be getting to grips with this by now but the white focal piece gets stamped first and sponged round the edge, then I've used one of the 1cm cut off strips to give the gumball machine something to "stand" on, again the gumball machine is cut out from the DSP, as are the jelly beans and teddy. Again using the 6x4" DSP with 1cm cut off the end for the base stripy colour. (I really like these stripes!)
This one uses 2 of the 1cm strips, again cut out the jars from the DSP, sponge round the edge, I've stamped last with this one, so I knew how much room I had.
Definitely stamp the sayings first with this one! and sponge round the white focal piece, then fit the cut out pieces in, there are a few lollypops that are coming off the edge of the page, which is what I've used here, hence the top lollypop doesn't have much of a stick!
This one again stamp and sponge round the edge first, there is a cupcake which is half off the paper, I've used this to create the green scalloped layer on this cupcake. When it comes to the 4x6" background I've just folded over a 1/2 cm at each end, and stuck it down, rather than cutting off the 1cm on this one.
In case you'd like to check out the video, here it is.......
thanks for reading this blog post, and I hope it has inspired you to dig out your DSP, and start creating with it. If you'd like to purchase anything, these products will be available from the 3rd Jan, and if you haven't got your own catalogue and would like one, please let me know and I'll get one out to you!
Happy Stampin'
God Bless love
Heather xox


.JPG)

