Colour INKspiration Challenge #26


Hi there,
I decided to join in with the Colour Inkspiration challenge for this fortnight, as I love these colours they remind me of a peacock :)
So, this is the challenge, to use the below colours:

No automatic alt text available.
And here is my creation for the challenge:
https://www.facebook.com/groups/349642308720075/?multi_permalinks=545181619166142&comment_id=545670212450616&notif_id=1516790436430494&notif_t=feedback_reaction_generic&ref=notif
I have used all the colours in the cardstock I have in the card, but the background is made from the Iridescent Glimmer paper in the Myths and Magic Glimmer Paper pack, then I've spritzed it with water, and sprinkled over the new Brusho Crystal Colour , and added more spritzed water. Then allowed it to dry (eventually got fed up with the waiting, blotted it and dried it with the first setting on my heat tool lol)  I just LOVE the background effects you can get with the Brusho!  For this particular one, I used the Moss Green, Prussian Blue and Yellow.  The Word and flower are cut out using the Sunshine Wishes Thinlit dies.
Hopefully it works for the challenge! what do you think?

I hope this inspires you to create.
God Bless love
Heather xox


Interactive Cards Class for February

Hi there,

For my February Interactive Cards Class on Tuesday 20th Feb, I will be teaching Twist'n'Pop Cards, this will be available as a kit for those who can't make it to the class (the only part I can't provide you with is the stamped images)  All the cardstock will be cut and scored for you and there will be instructions included.
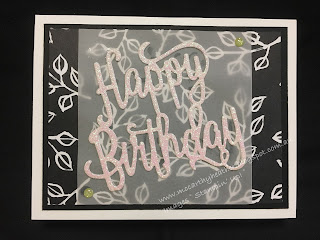
Here are the cards:

The Designer Series Papers used may vary from card to card, in the first card we'll be using the Petal Passion Designer Series Paper,  The Happy Birthday will be die cut for you using the Happy Birthday Thinlits die cut from the stunning Myths and Magic Glimmer Paper and the cute Pandas are stamped images cut out (the Party Pandas stamp set is available for FREE when you order $90+ until the 31st March)
In the second card we'll be using the Tutti Fruity Designer Series Paper, the Celebrate You thinlit dies (which are available for FREE with an order of $180+) Also the Pretty Label Punch, and the fun Bird stamped images are from Bird Banter Stamp set (just love these birds and sayings!) And I think at $30 for 19 stamps it's a complete bargain!
I'm uploading a couple of videos of opening the cards below (hopefully they work!)
If you are interested in joining the class I have one in the morning at 10.30am and one in the evening at 7.30pm in Laanecoorie Class cost is $20.  Otherwise I can mail this pack out to you, cost for the pack is $15 with $2 postage ($17 all up)
I hope this inspires you to create.
God Bless love
Heather xox


X Box fun!

Hi there, 
Well tomorrow son #1 (Benjamin) is off to a party, so.....Mum can you make him one of those X Box controller cards....
After making it (actually I ended up making 4 so I have some spares!) I thought wey hey I can do a blog post on this lol!

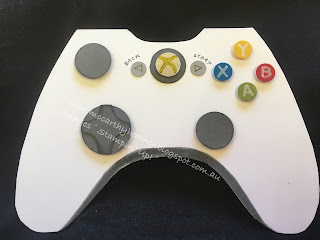
Here is my version of the X Box controller as a card:
I have used a combination of circle punches 1", 1/2", 3/4"  (and other punches such as the Cookie Cutter builder punch!)
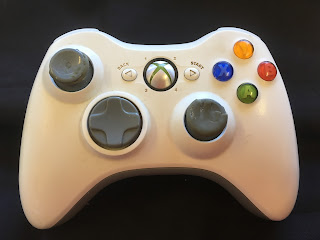
Here is the original controller that I copied from:

And then I decided to get creative, as Ben said, well they do come with patterns on them too Mum:
Break out the Sale-a-Bration set Epic Celebration - if you purchase $90 of goodies you could get this set for free! :)
 He picked the creative one!
What do you think? which would you pick?
Thanks for reading this, and I hope it inspires you to look at things around you and see if you can create a card to look like them!, I'd love to see what you create!

God Bless love
Heather


Love Roller Coasters?

Hi There

Thought I'd share a video from Stampin' Up! today, which uses the "Let the Good Times Roll" bundle (stamps and dies), it is a really cute set, if you like roller coasters you'll love it! and it would make such a Wow card when you open it up.

Let me know what you think of this, love it or leave it?
I hope it inspires you to create! 

If you are placing an order, do use this hostess code for the chance to "win" the hostess dollars AYMSXB66

God Bless love
 Heather xox

Cards for February

Hi there,

It's been hard trying to make up my mind what to teach in February!  However I think I've narrowed it down lol!  Just in case you don't know, this time of year with Stampin' Up! is Sale-a-Bration, when you order $90 of goodies, you get to pick a FREE Sale-a-Bration product, this year Stampin' Up! have also produced a couple of $180+ Sale-a-Bration products.

So these are the cards that made it.....
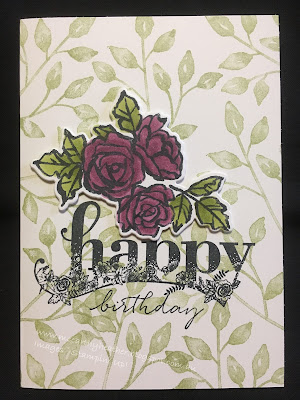
Card #1 uses possibly my 2 favourite sets (Sale-a-Bration and from the Occasions Catalogue) and my favourite colouring medium!  So allow me to introduce you to the Petal Palette Bundle, and the Happy Wishes Sale-a-Bration set to get this set for FREE you'll need to place a $180+ order.  Love that the roses are cut out with dies!, and I've coloured them in with the fabulous Stampin' Blends.
Card #2 mixes a couple of stamp sets, I think I've shown it before on this blog, it uses the Bubble Over stamp set, and the Fruit Basket Stamp set, some of the smoky slate gingham ribbon, and the absolutely gorgeous Myths and Magic Washi tape:
Card #3 I was thinking that Valentines day is in Feb, although some of the classes will miss it, so this can be adapted to a birthday/ anniversary or whatever you'd like card :)  This card uses the really pretty Painted with Love Specialty Designer Series Paper (just love the gold foil in this paper), and also back to the Petal Palette Stamp set for the wording:
And last but not least, I've gone with a "boy card" although it could be girl depending on the colours you choose!  This uses the Sale-a-bration stamp set Epic Celebrations (having 3 boys, I felt this one was a absolute must for me to get!)  When you purchase $90 of goodies, you could get this set for FREE! the set also has wording that says "You're Awesome".

So..... dates for classes making these cards in February are: Saturday 3rd Feb - Maryborough 10am, Wednesday 7th February - Bendigo 10.30am (all being well, but just check with me a few days prior),  Wednesday 14th Feb - Laanecoorie 7.30pm.   In case you haven't been to one of these classes before I charge $15 to cover the cost of cards/envelopes and instructions, or you can choose to purchase $50+ and have the class for free!  Do let me know if you plan to make it to any of the classes, I'd love to see you there!

I hope these cards inspire you to create!
God Bless love
Heather xox


Stamparatus video

Hi,
Let me introduce you to the Stamparatus!

I was privileged enough to be on the team that Stampin' Up! consulted with to develop this tool, so as a result I have been allowed one earlier than everyone else, so I thought I'd a do a quick video on how I've been using my new Stamparatus. (sorry about the view of the back of my head at one point - lol)
It really is an AMAZING tool, I have shown some of the ways to use it here but there is more! for example the hinges are designed so you can move the plates down or to the side, and I have discovered that the Stampin Pierce Mat is exactly the right height to continue your stamping down or across your page!  If you'd like to check mine out, let me know, and we can schedule some time together or maybe book you in for a party and show you and your friends!

These will be available in June when the new Annual Catalogue becomes available, so if you're checking out the MISTI, believe me this is soooo much better! worth the wait!  If you haven't already reserved your Stamparatus when I was able to reserve it for you, let me know that you're interested, so I can remind you about it in June :)

Hope you enjoy this sneak peek!
God Bless love
Heather xox

January's Tag card

Hi,
If you order from me this month, you'll be receiving this Tag Card (unless you order over $180) then you'll receive January's Mail Out Class :)

So here is the Tag Card:
I have used the Coffee Cafe bundle (stamps and thinlits) along with the matching Coffee Break Designer Series Paper.  To put your card together, fold 1/2" over on each of the pieces of Designer Series Paper attaching the flap down well, then sponge round the edge of each, and adhere them to your card. Lastly add your tag to the front of the card using dimensionals (tuck the twine under, or trim it off).  It would look quite nice on a scrap page too I reckon, what do you think?

If you have ordered over $180 of goodies, you'll receive not only 2 Sale-a-Bration items but from me you'll be getting this January Mail out Card Class which uses the Sweet Soiree Embellishment Kit (included).  If you would like the kit, but can't manage the $180 I do have it available for $25, let me know if you'd like one!
Ok, well that's it from me for today.
I hope these inspire you to create (potentially purchase some goodies from my Stampin' Up! shop lol)
God Bless love
Heather xox

Petal Passion Suite

Hi!
Today I've been playing around with Petal Passion (quite possibly my favourite suite from the new Occasions catalogue), it has not only Petal Palette Stamp set, and Petals and More Thinlits, but it also has absolutely gorgeous Petal Passion Designer Series Paper (haven't used that much yet), Petal Pair Embossing folders, some pretty Petal Passion Embellishments, AND Petal Passion Memories and More Card Pack.  It doesn't come as a complete bundle, so you can pick and choose (but of course I ended up with it all lol)
However you're not here to hear me waffle on, so on to the cards!

I'll start off today with the Petal Passion Memories and More Pack this can make some beautiful cards (you could even use it for scrapbooking lol)
this first card uses one of the accent sheets, a small card and the heart sticker (with a touch of Clear Wink of Stella - I've used it as a paint brush, and picked up a bit of Blushing Bride colour from the lid of the ink pad)
Next Up:
again uses part of an accent sheet (smile), and also one of the acetate card overlays, I have found that to stick it down Tombow is the best. Isn't it pretty?!
Moving on..... this one uses one of the larger cards, cut down a little, and coloured in, again using the clear wink of stella, and picking up colour from the lids of the ink pads
 thought you might like a close up of the wink of stella that glistens on the cardstock.
Then the final card I made with the Petal Passion Memories and More Pack (for today), again uses one of the large cards trimmed down, then the frame comes from the Petals and More Thinlit dies, and the "Celebrate" comes from a completely different stamp set "Picture Perfect Birthday"
what do you reckon, could you fall in love with these Petal Passion cards too?  there's stickers in the pack as well... Oh the possibilities LOL.  I'll try and create a bit more with the Stamp set and dies before I do a post on those, so stay tuned :)

Oh, and if you're after value for money the above cards were all made with a kit that is only $17.50! how's that for value?  add some cardstock, maybe a stamp set and a punch or dies..........

I hope this inspires you to create.
God Bless love
Heather xox

Painted with Love Designer Series Paper

Hi Everyone,
As I accidentally ordered 2 packs of Painted with Love Designer Series Paper (which ironically I wasn't terribly keen on to begin with lol)  I thought I'd do a few cards to showcase the papers to encourage my enthusiasm for them!  I do love the gold foil card in them (gotta have bling! lol) they're on page 19 in the new Occasions catalogue.
Just so you know I cut each to a piece of 6x3", then trimmed it down to fit on the cards, I wanted the paper itself to have centre stage, let me know what you think!

So the first one might look a tad familiar if you've been following my blog.....
then the rest are "new" lol
So up next I thought I'd play around with "non-standard" folded cards, so made these 2 also using the, Sale-a-Bration thinlit dies "Celebrate You" you can earn these for FREE! with an order over $180 during the Sale-a-Bration period 3rd Jan to 31st March, the second card also uses wording from "Picture Perfect Birthday" stamp set (page 5 in the new Occasions Catalogue)

 Then I've teamed it up with another Sale-a-bration set, this time "Happy Wishes" Stamp set it's a Mega set that has 16 stamps in it!  If you use the Black Archival ink pad, and allow it to dry, it will stamp over the gold embossed areas in the paper.  This first "Anniversary" card I've flipped the Designer series paper over for the saying - it's cut to 6x3", then I've trimmed off 2cm from one end to add, flipped it over and stamped the saying on it.  The second card I chose to keep the end piece the same way up, but have sponged round the edge.  Isn't that "Happy" gorgeous?  there's another large saying "best" which I haven't used in these cards (work on that.....,watch this space....)

Ok, so one last piece of DSP (Designer Series Paper) to go, I think this one could be my favourite card from this set.

What do you think, do you like this Designer Series Paper?  which is your favourite of the cards above?
Hope this inspires you to create
God Bless love
Heather xox


Something Saturday - Shepherds Care meets Snowy Delights Masks

Hi there Creators,  Today I thought I'd play around with a couple of my latest goodies, Shepherds Care Stamp set and Snowy Delights Mas...