Hi there Creators,
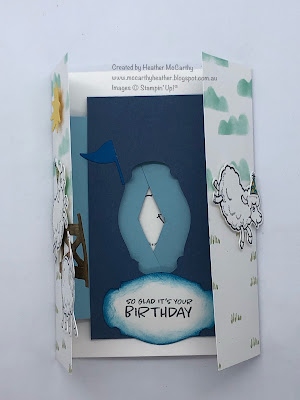
Well my Something Saturday this week is showing you how to create a Camera Shutter Card (I'm not sure if that's what it's called but that's what I'm calling it 😀), so here is the card.....
The photos above are the finished card from the video, I did add a little to this one.
Anyway the basic ingredients are:
You will need 1 piece of A5 card for the card base, you'll need to "gate-fold" this, which means scoring at 5.25cm in on each edge. It gives you the usual A6 size card but the opening is in the middle.
You'll also need 2 pieces of 7.4cm x 10.5cm, which need to be scored on one side in by 1cm
And one piece of 14.8cm x 7cm, scored in at the top and bottom by 1cm
You'll also need an appropriate punch ideally one that's fatter in the middle and tapers towards the ends slightly.
Also a pencil, rubber, ruler and glue Oh and some images to stampI've used the really cute Sale-a-Bration Counting Sheep stamp set and Sheep Dies (you can only get each of these by purchasing $90 of other Stampin' Up! goodies - so worth it, and the bonus is that you end up with heaps of goodies all in one go lol)
I recommend decorating your outer card and single strip (the one measuring 14.8cm x 7cm) before you put your card together, if there's any other parts you want to decorate do them too!
I've taken a heap of photos of the stages, so I'm putting them below, but feel free to watch the video it should be clearer!
first up the pieces you'll need:
next close your card up and mark (lightly with pencil) the middle of the card
open one side and mark the yellow (in my case) piece
repeat for the other side
now draw a line from each corner to the dot
now test to see if it will close properly with the flaps intertwined
Next take the 14.8cm x 7cm piece and mark where the punched shape should go, then punch it out, and attach 1 end only of this piece to your card.
After this you position what ever you want under the punched shape in place, then glue down the remaining flap. Voila your card is done!
I'm going to be teaching this to the kids at my youngest sons school, so I thought I'd show you a couple of other pictures I've taken too.....
Very simple all done with white cardstock and I've just drawn lines on with my Stampin' Write markers to give interest to the layers I was thinking theirs would look cute with photos of themselves in the middle bit, and I'm sure they'll want to decorate them their own way.
Anyway I hope this inspires you to have a go and create your own Camera Shutter Cards!
God Bless love
Heather xox


.JPG)

No comments:
Post a Comment