Something Saturday - Waterfall PopCorn Card

 Hi there Creators

I was scrolling through Facebook the other day and came across a short with a simple Waterfall Card on it, and realised, hey I haven't done one of those in ages!  this is nice and simple (in theory, although towards the end of the video, I had to do a bit of adjustment!

I ended up making a second card with only 5 waterfall pieces rather than the original 8, and it seems to work better (plus I didn't have to think up another 3 windows for it🤣  I've photographed them side by side, so you can see each window.....

Poppin' By, Not 29 Anymore, Stampin' Up, Waterfall Card

Poppin' By, Not 29 Anymore, Stampin' Up, Waterfall Card

Poppin' By, Not 29 Anymore, Stampin' Up, Waterfall Card

Poppin' By, Not 29 Anymore, Stampin' Up, Waterfall Card

Poppin' By, Not 29 Anymore, Stampin' Up, Waterfall Card

Poppin' By, Not 29 Anymore, Stampin' Up, Waterfall Card

Poppin' By, Not 29 Anymore, Stampin' Up, Waterfall Card

Poppin' By, Not 29 Anymore, Stampin' Up, Waterfall Card

Poppin' By, Not 29 Anymore, Stampin' Up, Waterfall Card


Now for the measurements, for the Popcorn Card you'll need:  And if you want to see the goodies I used click this link: Popcorn Waterfall Card
  • 8 pieces of 7cm x 7cm (colour)
  • 8 pieces of 6cm x 6cm (white)
  • strip 2cm x 14cm
  • 7cm x length of A4 (29.8cm), scored at 7cm, 8, 9,10,11,12, 13 and 14cm
For the "Not 29 Anymore" Card you'll need: And if you want to see the goodies I used click this link: Not 29 Waterfall Card
  • 5 pieces of 3"x3" (colour)
  • 5 pieces of  2 3/4" x 2 3/4" (colour)
  • 5 pieces of 2 1/2" x 2 1/2" (white)
  • strip 1/2" x 4" (colour)
  • 3" x 12" (colour) scored at 3", 3 1/2", 4", 4 1/2" and 5"
If you missed the video here it is:

I hope this inspires you to create
God Bless 
love
Heather xox

Class Cards for September Class

Hi there Creators,

Well we're 1/2 way through the month already, and Wow I now have 2 separate card Classes sorted for September!  the first is our regular class, which is what this post is about, the other is the special Gingerbread Man & Sophisticated Alternative Cracker class (click the link to see, should open in a new window).

Anyway back to our regular class for September, which will be on Friday 5th; 1pm in my classroom and Saturday 7th; 10.30am Maryborough Class cost $25 for the 4 cards.

As we'll be 4 months out from Christmas, we'll be making one Christmas card at this class (2 in Oct, 3 in Nov, 4 in Dec) 😃  gotta work your way up to it!

So, by popular demand I've created this little guy with the sliding "behind".  

To see all the "ingredients" click here: Sausage Dog Slider

Long Time no see, Stampin' Up!

Next up using new goodies is this elegant sympathy card, although it could easily be changed to other sentiments using the same Unbounded Love stamp set, the new Peace on Earth dies & matching Peaceful Greenery embossing folder are very elegant!  To see all the goodies I've used click here: Unbounded Peace Sympathy (the details for the new dies & embossing folder may not be present on the link until the catalogue goes live on 3rd September)

Unbounded love, Peaceful greenery 3D Embossing folder, Peace on Earth dies, Stampin' Up!

Next up I thought it might be prudent to do something for Fathers Day as it'll be just after the classes!  Having said that if you're coming and you don't have a Father around anymore, this can be easily changed to a "thankyou" handy man card, let's face it if you're a card giver, chances are it'll be "handy"🤣 pun intended, to have a card for this purpose.  I've used the Trusty tool stamp set, see all the goodies I've used for this card here: Handy Dad 

Trusty tools, Stampin' Up!

Last but not least is this pretty card using the Joined Together 3D embossing folder, see all the goodies I've used here: Joined Together Patchwork

Joined together 3D embossing folder, Stampin' Up!

I hope you can join us to create these, make sure you book your spot!

I hope these inspire you to create
God Bless love
Heather xox

Gingerbread Man & Sophisticated Cracker Class Info

 Hi there Creators

Yay I finally have my order and spent yesterday playing around with this really fun set!

                                 Gingerbread Man &

 Sophisticated Alternative Cracker Table Decoration

(At Home by Mail kit or In Person)

Sat 20th September 1pm to 5pm.
 
Max of 6 participants in my Classroom (Laanecoorie)

Book by Wednesday 3rd September.

You'll make 6 Cards & one Sophisticated Alternative Cracker Table Decoration with a template to take home
In the price of $85 you'll receive:
Gingerbread Man stamp set (see note below about dies)
1/2 Pack of Modern Christmas Designer Series Paper
1/2 pack Drusy Bling
And more
(snacks & drinks provided)

If you would like to 
add on the Dies to go with the stamp set (saving you 10% on the individual prices) and believe me it's worth it! the cost of the class is $135

If you are in my team the cost is $50 (you need to purchase your own bundle)

Excuse the darkness of the photo, but the packaging kept reflecting the lights of my light box, so I had to turn them off!😞

These are some of the goodies you'll potentially receive as part of the class:

gingerbread man bundle, Modern Christmas DSP, Stampin' Up!

The class has 6 cards in it, and to be honest I could have carried on making way more, it really is a fabulous bundle, and if you plan to come to the class, although I'll be cutting all the die cut pieces for you, I totally recommend getting the die set as well for yourself, it really makes the whole thing!

Here is a conglomeration of the cards & "cracker" well be making on 20th September:
gingerbread man bundle, Modern Christmas DSP, Stampin' Up!

I hope you can join me for this fun class, but remember to book your spot soon before they run out (if it's really popular I can schedule in a 2nd class, and let me know if you want to share your stamp set with a friend, and I'll work out an alternative price.)

I hope this inspires you to create 😊
God Bless love
Heather xox

Something Saturday - Iridescent Treat bags meets Sweet Jar

 Hi there Creators

We're back to the same stamp set & punch as last week, this time adding the Iridescent Treat Bags to create a really cool internal part to the jar. Wow the Iridescent Treat bags are really something, also incredibly sturdy, they do not rip (believe me I tried🤣)

To see all the goodies I've used click this link: Heather's Treat Bags/Jar Cards

This is the first card I made before the the video, I had stamped the baubles onto the window sheet and coloured them in with Stampin' blends (alcohol markers) as they will stay on the window sheet.

Iridescent Treat Bag, Sweet Jar bundle, Jar of Joy, Stampin' Up!

But this second card I made in the video I wanted the sweets to be behind the iridescent layer (plus I wanted them to not be black!, and the only ink I have that will stamp on window sheets is my Stazon Black

Iridescent Treat Bag, Sweet Jar bundle, Jar of Joy, Stampin' Up!
Not sure how easily you can see the bling, but Oh my goodness it goes well with this, I've used the Two tone Sparkling gems (very pretty blue & purple'y colours)

I've used a white piece measuring 7cm x 9.9cm and 
the coloured piece underneath is 10.5cm x 7.4cm. 
Both of these sizes cut out exactly from A4 sheets (yay)

If you missed the video here it is:


I hope this inspires you to create!
God Bless love
Heather xox

Something Saturday - Christmas Favours Boxes

 Hi there Creators

Today I thought I'd show off these little Christmas Favours Boxes.  Rose came to class the other day with one and I forgot to take photos, but I think this is pretty similar, so cute!

The link to all the products used can be found here: Christmas Boxes products used (if you're reading this let me know if this makes it easier to see the products used, I usually put up individual links for everything but thought I'd try something new, and potentially easier!)

Anyway onto the photos.....

the front:

Jar of Joy, Sweet Jar Bundle, Christmas Favours, Stampin' Up!

The lift up flap at the front

Jar of Joy, Sweet Jar Bundle, Christmas Favours, Stampin' Up!

The Back

Jar of Joy, Sweet Jar Bundle, Christmas Favours, Stampin' Up!

And I wanted to show off the gorgeous little "Low Profile Sparkle Dots", not sure if it really shows up as well as it could

Jar of Joy, Sweet Jar Bundle, Christmas Favours, Stampin' Up!

Jar of Joy, Sweet Jar Bundle, Christmas Favours, Stampin' Up!

I've just realised in all the photos you don't really see the box! That's ironic!
so here's one of the box!
Jar of Joy, Sweet Jar Bundle, Christmas Favours, Stampin' Up!

Right now I can give you the measurements for the box!
Really simple:
12cm x 12cm, then score in each side by 4cm.
then cut as shown:

fold in the flaps and glue together to form the box.

If you missed the video here it is:


I hope this inspires you to create
God Bless love
Heather xox


Something Saturday - Time for Celebration Ephemera Pack

 Hi there Creators

Today I'm showing off this Time for Celebration Mix & Match Ephemera Pack because I discovered something really cool...... They're sticky backed!  I totally recommend having your Take Your Pick tool handy for removing the backing.  Here are the links for products I've used in these cards:

Sweet Jar BundleOld Olive Two-Tone Cardstock, Green "Luck" card

Beautiful Butterflies stamp set,  Petal Pink Two-Tone Cardstock Peachy Hearts Celebrate Card

Simply Said Mix & Match Stamp set,  the Tools card and Disco Ball Card

I also added some Rhinestones to the ones in the first 2 photos (let's face it gotta have bling!)💎

time for celebration Ephemera Pack, Stampin' Up!

Then I got carried away and made a heap more......  I pressed out all the images then put them into piles of things I thought would go well together (Christmas was the easiest pile 🤣)  But it's really cool that there's a bit of everything in the Ephemera.

time for celebration Ephemera Pack, Stampin' Up!

These Christmas cards I used Jar of Joy Stamp set and the Real Red & White Adhesive backed Peppermints  for my "bling"

time for celebration Ephemera Pack, Stampin' Up!

If you missed the video, here it is:

I hope this inspires you to create
God Bless love
Heather xox

Something Saturday - Pop Up Pals Kit

 Hi there Creators,

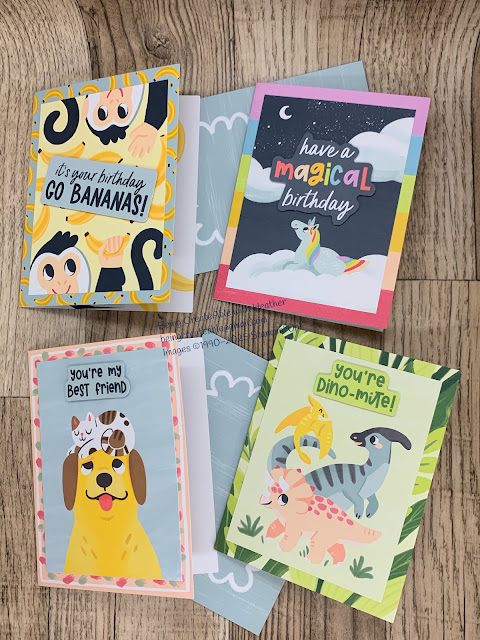
Today I thought I'd show off this kit, which is really cute!  Would make great kids cards (and even some Big kids would enjoy them I reckon!)  It's the Pop Up Pals Kit (click the link to see it) you'll get to create 4 individual cards, and I think a bit of a bargain at $17.50 (just under $4.50 per card) which if you have had to buy a pop up card recently I'd imagine they are a lot more than that!, plus the added bonus of being able to say "I made it" 😍

Ok, so here are the 4 cards you'll create with this kit: 

Pop Up Pals Kit, Stampin' Up!

Then the insides of the cards:

Pop Up Pals Kit, Stampin' Up!

Pop Up Pals Kit, Stampin' Up!

Pop Up Pals Kit, Stampin' Up!

Pop Up Pals Kit, Stampin' Up!

How cool are these cards?!  I love the pop out elements in them (and in fact even Tom (hubby) was impressed🤣)

If you missed the video here it is:


I hope these inspire you to create
God Bless love
Heather xox

Something Saturday - 2 from 1 Stripes & Trees

  Hi there Creators Today I'm doing one cut with my Designer Paper and creating 2 different cards - gotta love it when you can get 2 for...