Something Saturday - Bendy Floating Window Card

Hi there Creators, 

I saw a version of this card online pretty sure it was Lisa Curcio over in the States, I have simplified it right down (my husband says conserving cardstock and being economical) 🤣

She had used 4 pieces of A6 Cardstock to create hers, mine only uses one, plus the designer paper, embellishments and a couple of white strips for the back to write on.

Anyway here are the ones I created:

This first one uses Sweet Jar bundle (stamps & punch), also the new Regals Designer Series papers , and the Spotlight on Nature Dies (although when I cut the circle I wasn't really thinking about the fact the pretty bit is on the inside 🤦‍♀️)

Sweet Jar Bundle, Stampin' Up!

The card I made in the video uses the ever so pretty Frames & Flowers Specialty Designer Series Paper, then paired up with the new Extraordinary Flora Washi Tape and matching Extraordinary flora bundle.  Oh my goodness you're going to want to get those!  I've attached the saying in the same way with a strip of matching Blueberry Bushel Cardstock

Extraordinary Flora, Stampin' Up!

and just to kind of show you the workings of it:


Ok, so to make this card take a piece of A6 cardstock (10.5cm x 14.8cm), fold in 1/2 lengthways (at 5.25cm) 

Then take a piece of Designer paper, and cut a hole in the middle of it with a die that will allow the element you put into the middle of it to fit well, score a small margin at each side, (and if the card is quite stiff you'll need to use your bone scorer to break the fibers down a bit so it will bend easily)

Attach this down to your A6 card (only attaching the 2 margins)

you'll then need a piece to hold your element as it will need to hide behind your element you'll need to determine the size, but you need to mark the middle of it and fold the 2 ends over a little bit (1/2 cm or 1/4 " will do, attach it down using the folds , and ensuring the middle matches up with the middle of your card

As you fold your card both the designer paper and the piece to hold your mechanism will puff out, lastly add a small line of glue (or use glue dots down the centre of the mechanism piece) and add the element in place

Voila all done 😃

If that was as clear as mud, check out the video here;


I hope this inspires you to create.

God Bless Love

Heather xox

Something Saturday - Louvre Windows Card

 Hi there Creators

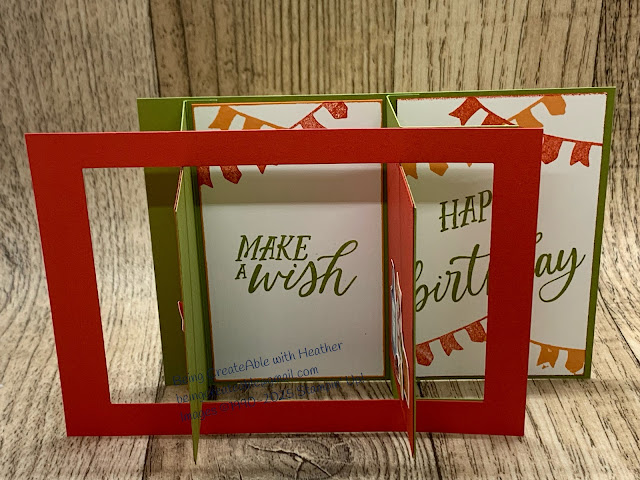
Today I thought I'd show you how to create this Louvre Windows card (little bit of trivia, did you know Louvres were invented back in the middle ages around 1500 years ago?, they were made of wood and put on pitched roofs to let out smoke, and increase circulation)😃

Anyway moving on.... I saw these kind of cards at the Picture to Page show, and of course the company selling them had dies to cut out all the components, but I figured I could make it work my own way.

And so Voila: I made this card up before the video using the Celebratory Sips Designer paper (see all the links below)

Celebratory Sips DSP, Stampin' Up!
and here it is opened up (little difficult to photograph!)

Birthday Celebration Stamps, Stampin' Up!

So this is the bit that's obscured above!

Birthday Celebration Stamps, Stampin' Up!

Then in the video this is the card I made up, this time using the Beautiful Gallery Designer Paper (again links below)

Beautiful Gallery, Stampin' Up!

and the middle..... as you can see I used a bit more of the designer paper to cut out and add to the middle sections

Beautiful Gallery, Stampin' Up!, Textured Note Dies

and again the obscured bit

Beautiful Gallery, Stampin' Up!, Textured Note Dies


Links for products Red card:


Flowers Card:
Beautiful Gallery Designer Series Paper
Unbounded Love Stamp set
Stampin Cut & Emboss Machine

and again Textured Note Dies


Measurements:
You'll need 3 pieces of A6 card (10.5cm x 14.8cm) 
cut one in 1/2 so you have 2 pieces of 10.5x 7.4cm and score 1 end of each 1cm in (see my mud map workings then if all is as clear as mud, feel free to watch the video 🤣
You'll also need 2 pieces to pop inside the windows I made these 10.2cm x 6cm and 10.2cm x 6.5cm
Louvre Windows Card

and here's the video....


I hope this inspires you to have a go too.

God Bless love
Heather xox

June Class Cards

Hi there Creators

Can't believe we're 1/2 way through the year!  June cards seem to focus on Designer Papers (it just happened that way 🤣)  however as I've been working out ways to show them off to their potential there are a couple of interesting folds we'll be doing,  Dates are Friday 6th June and Saturday 7th June.  Here goes.......

Using the Beautiful Gallery Papers and a spot of pretty heat embossing

Beautiful Gallery DSP, Stampin' Up!

Beautiful Gallery DSP, Stampin' Up!
then moving onto the Boho Vibes Designer Paper, and Round we Go Dies (continued from last year) 
Boho Vibes DSP, Round We go dies, Stampin' Up!

This next card uses the beautiful "Thoughtful Journey" Designer Series Paper, another carry over from last year, and I've pair it up with the Cheers & Sips Stamp set.

thoughtful journey dsp, Cheers & sips stamps, Stampin' Up!

Last but not least we have the Poppin' By Bundle used to create this cute card, also used the Textured Note Dies to create templates for masking the background.


Poppin' By bundle, Stampin' Up!

And that's it!  I hope you can join us, let me know if you plan to, if not I hope these give you inspiration to keep creating! 😃

God Bless love
Heather xox

Something Saturday - Watercolour Pencils on Black

Hi there Creators

Today I'm showing off how you can make the watercolour pencils really pop on a black background. when you use them this way you don't add water or anything else, just simply use them as pencils.

This is the first card I made before the video: I've used the Celebratory Sips Suite (see links below) for both of these cards

Celebratory Sips, Stampin' Up!

Then I made this one up in the video, and finished it off after, by adding some greenery around the bottom, the sayings and I wanted to create a graduated background paper to kind of give a sunset appearance, so to to that I've brushed darker colours onto the Pumpkin Pie cardstock to deepen it nearer the bottom.

Celebratory Sips, Stampin' Up!

Here is a list of the products I used:

Celebratory Sips Collection (I recommend getting the whole lot 'cos it's worth it!)

but if you don't want it all, then, then in fact the only part I used here is:

Cheers & Sips Stamp set

Watercolour Pencils Assortment 1

Watercolour Pencils Assortment 2

If you missed the video here it is:


I hope this inspires you to have a go too.

God Bless love

Heather xox

Something Saturday - Bleach or White?

 Hi There Creators

Before I forget, there is an AMAZING special on this month, not only are the new catalogue (and new Online Products) live, but there is a joining special, pick out $303 of goodies but only pay $169!!  Ask me if you're interested and want to know more, or if you know you want to take the plunge, click here: Join Heather's Team.

Today I thought I'd play around with a spot of bleach stamping, then decided to throw white into the mix too, it's interesting what a difference it makes, I like both!  Bleach is fascinating when it reacts with different cardstocks (interestingly didn't work on our black cardstock at all!)  I used Pecan Pie card.

To create these cards I also needed: 

Stazon Black Ink Pad   

white Craft Ink 

You are Remarkable Stamp set  

And bleach (in my case domestos 🤣)  Oh and a pointy paintbrush

First up you stamp using Stazon (because it stays on! - in particular with bleach and waterbased components) it wouldn't work with alcohol based components, just so you know!

Then you paint either the white craft ink on, or the bleach on

once it dries you then add some colour, and voila......

These 2 both got coloured in with Gorgeous Grape ink for the flower, the bleach changes the colour 😃

And these 2 got the Petunia Pop colour (which is the cardstock underneath, so you can compare the colour😉)

To make the cards up I also used some Versamark ink  to create the pretty background, I love the way that as a "watermark" ink it just creates this slightly darker colour on the coloured cardstock (one colour fits all as it were! 😃)

You are Remarkable, Stampin' Up!


You are Remarkable, Stampin' Up!

You are Remarkable, Stampin' Up!

You are Remarkable, Stampin' Up!

If you missed the video, here it is:


I hope this inspires you to have a go too.

God Bless love

Heather xox

Something Saturday - Peekaboo Diagonal Cut Card

 Hi there Creators

As I mention in the video I was having a bit of a nostalgic wander through my old catalogue (that retired on 6th May) and came across a page that had a couple of fun fold cards.  So here we are today, trying one of them out.....  Theirs is landscape, mine is portrait but the measurements would be pretty similar just having the fold of the card in a different place.

Here is mine: as you can see it's kind of a card in a card.  I've used the Celebratory Sips Suite,  although I confess I haven't used the stamps & dies in this particular card!  The suite has Stamps, dies, 2 embossing folders, bling, ribbon, and Designer paper, all for $138.25 which I think is pretty good! (and just think with the new rewards system, you'll then have $13.80 to spend on your next order - make sure you've opted in!)

Celebratory Sips Suite, Stampin' Up!, fancy fold

Celebratory Sips Suite, Stampin' Up!, fancy fold

If you watched the video you'll know that I accidentally added glue to the wrong side of my designer paper, so I ended up making this card with it: This card also incorporates the stamps, dies, ribbon, and ....... Flower Garden Foils Designer Paper (really pretty to add an extra accent to your project, 2 different designs of 3 colours)

Celebratory Sips Suite, Stampin' Up!, fancy fold

Measurements for the fancy fold card are:

  • an A5 card folded in 1/2 then diagonally cut the front in 1/2  emboss the back of the card if you want to.
  • cut a piece of Designer paper to 14cm x 9.7cm, and cut in 1/2 diagonally
  • stick 1 piece on the front and the other in the triangle inside
  • cut another plain colour card 14.8cm x 10.5cm and score in 1/2 at 7.4cm  this will sit the wrong way round on your card, so decorate the "wrong" side!
  • stick the mini card in so the diagonally cut piece will sit nicely into it.

And that's it!

If you missed my video here it is: 


I hope this inspires you to create

God Bless love

Heather xox

 Hi there Creators

Today I thought I'd show off the Suitcase Treat Boxes, I think they'd be perfect to gift jewelry in for Christmas or birthdays.

This time I decided to decorate it with the Marbled Elegance Designer Series Paper, as I figured if I'm giving jewelry then it's likely to be for a girl, and this is very pink!🤣  Also essentials when doing this sort of thing are Tombow Adhesive, as it gives you just a little bit of wiggle room when sticking down the elements, the Take your pick tool, so useful for any projects but owing to needing to cut a small section out for the handle to poke through you can screw off the sticky end and and add in .....Take your pick crafter tips 3 different tips one of which happens to be a blade.  lastly I finished it off with the Pretty in Pink Bordered Ribbon (which is definitely still current having checked it!)

Suitcase Treat Boxes, Marbled Elegance DSP, Stampin' Up!

Suitcase Treat Boxes, Marbled Elegance DSP, Stampin' Up!

So as you can see I ended up making a card to match with some of the off cuts that were left over.  
and as promised here are the measurements I used to decorate the suitcase:

Front & Back:  plain colour 9cm x 7cm  Designer Paper 3 1/4" x 2 1/2"
Sides: plain colour 7cm x 2.5cm  Designer Paper 2 1/2" x 3/4"
Top & bottom:  Plain colour 9cm x 2.5cm Designer paper 3 1/4" x 3/4"

Now to find some jewelry to gift and a suitable friend to give it to😃

If you missed the video here it is:

I hope this inspires you to create,
God Bless love
Heather xox

Something Saturday - 2 from 1 Stripes & Trees

  Hi there Creators Today I'm doing one cut with my Designer Paper and creating 2 different cards - gotta love it when you can get 2 for...