Bubble Over New Stamp Set and Dies

Hi Everyone
Been wanting to do this post for a few days, but due to changing up my phone (or at least I'm assuming this is the reason) I'm having trouble watermarking my photos, for some reason the app I was using won't work anymore, and itunes/app store won't allow me to download a new one (grrr)
However winge over, excuse the extra watermarking.....

There is a new cool set in the upcoming Occasions Catalogue (if you've got the catalogue it's on page 32)   Bubble Over, and Bottles & Bubbles framelits
I felt it needed me to do something with it, so here's my offering!
First up I felt it should be teamed up with the new Sale-a-Bration papers that match it - Bubbles & Fizz Designer Series Paper, the "bottle tops" are in the paper, and there's a framelit to cut them out (yay)
Next card I made, I wondered how the bottles would look cut out of the new glimmer Papers (page 37) Tom (husband) wasn't keen, but then he's not so keen on sparkles lol.
Card #3 I've been meaning to try out this technique for a while now, it's where you use a Stampin' Write Marker just to colour over the edges and lines of a stamp (as you can see in the top card, the bottles are actually a block stamp, as oppose to a line stamp, I really like the look it gives them doing this this way (what do you think?)  I've teamed them up with this Painted with Love Designer Series Paper (which I accidentally ordered 2 lots of - lol) and the saying comes from Petal Palette Stamp set
Next up is the one that Tom quite liked (yay go me!) I've teamed it up with some of the Wood Textures Designer Series Paper to create the Bar table, and the circles (stamp) that are used in the middle of the "wine Bottles" above as the labels, have become the stains on the wood surface.

Ok so the last card for this post..... I just fell in love with the bubbles!, they made me think of my boy's bubble bath's, however slightly lacking in a bath stamp, so I've teamed it up with the Fruit Basket stamp set, in an effort to make it look like a washing up bowl (although thinking about it I'm not sure why I'd send a washing up bowl to someone for their birthday lol) but the bubbles are cute :)
Let me know which is your favourite? If you haven't got the new catalogues yet, let me know and I'll pop them in the mail to you/deliver them off.

I hope it inspires you to create,
God Bless love
Heather xox


Teacher Gifts 2017

Hi Everyone,
I can finally share what I made up for the teachers for their gifts this year.  As they've all got them and opened them!

When the kids start getting a cold, I put Thieves Young Living Essential Oil on them, to ward off the cold (and make sure that others don't get it).  A couple of the teachers have commented that when Sam has that on they follow him around as he smells so good (he's 6 so they can probably get away with following him around lol!).  So I thought, why not give them all some of my favourite oils?  I managed to buy these cute little bottles to put the oils into, and decorated them with different coloured beads, so they'd know which is which! (and of course decanted the oils into them!)


They needed something to sit in! and that's where Stampin' Up! came in, I made cute little round "tub boxes" for the 3 oils to sit in
And then they were all completed:
Gotta have bling at this time of year! Also gave them instructions and an explanation, otherwise it probably would have seemed a little odd - lol!

And just like that, was the end of Josh (middle son's) time at Primary School :(

I hope everyone has a fabulous Christmas and New Year, don't forget if you're after a last minute presie for a crafter, I can email gift vouchers out!

God Bless love
Heather xox

Kids Christmas Cards

Hi Everyone,
thought I'd share the cards I whipped up for my kids to give out at school, to show you how simple the cards can really be, with just a couple of stamps and a small card (in this case the A4 is cut to A5, then scored down the middle at 7.4cm, and cut into three 7cm cards, and voila 6 cards out of an A4 sheet - simples....)

Sam (6 year old) had said that he was keen to have chickens on his Christmas cards........, hence the chickens re-appearance from last years Sale-a-Bration!, he's also quite into Dinosaurs, so I figured what better on a Christmas card than a Ho Ho Ho dino? from the No bones about it stamp set (have to admit at one stage it was almost an OH OH OH dino, till I turned the stamp up the other way lol)  The dog's and cats from Santa Paws stamp set, will be retiring at the end of this month :( but again they make a cute easy card, and a little bit of colour on each card, and I reckon they all came up alright!
The 2 birds on the top row are new comers from the new Occasions catalogue being released on the 3rd January a set called Bird Banter.  And the Party hats came from the Bird Banter and the No Bones About It.

They were all so simple to stamp, and lightly colour in, I had 72 done in no time at all (now I've discovered I need to do some more, of course when I've put everything away!)

Ah well.... I hope this has inspired you to create, and know that you don't need heaps to create!

God Bless love
Heather xox

Tag Card for December

Hi Everyone,
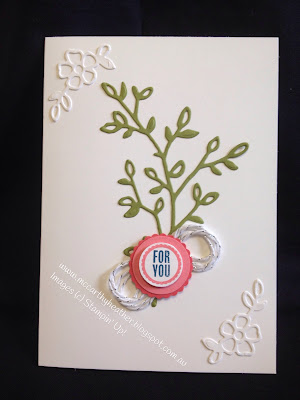
If you happen to order from me this month, this is the card you will receive to make up using your bag tag.
Thought I'd better give a little explanation of "how to put it together".
But first what's in it?
The tag is kind of small! it uses the cute Tabs for Everything Stamp set, plus the 3/4" circle punch, the 1"circle punch and the new (next month) 1 1/8" scallop circle punch.
Then the card itself uses a couple of new (next month) dies from a suite called Petal Passion, and also some new lovely silver bakers twine.

To put your card together, first attach the green leaves (I used Tombow Multipurpose Adhesive) also add the white flowers and leaves die cuts to 2 corners.  Take the twine, and wrap it round 3 fingers, then twist it in the middle, and attach it to the back of your tag (I used Tear & Tape Adhesive to do this), then I've added a dimensional to make it stand out a bit and attached to the card.
And Voila! your card is made :)

If you'd like to receive this tag card, simply order from me during December.  Also if you'd like the new catalogues that start on the 3rd January, let me know, and I'll get those out to you as soon as I can.

I hope this inspires you to create,
God Bless love
Heather xox

Mail Out Class for January

Hi Everyone,
As I won't be offering card classes in January, I thought I'd offer a "Mail Out" class.  This uses one of the new products in the new Occasions Catalogue called Sweet Soiree Embellishment Kit, that'll be released on 3rd January (as a demonstrator I got to pre-purchase this - yay!  if you'd like to be able to pre-purchase things too, let me know and I can tell you more about becoming a demonstrator and joining my team)

Anyway back to it!  this kit includes shiny (oooo shiny things.....lol) accents and embellishments, (ribbon, vellum/silver foil die cuts, cardstock/silver foil die cuts, mini paper tassels, washi tape, mini clothes pegs, and numbers), out of this I have created 6 cards for you to make, and you'll still have more of the kit left over to create more yourself!

With the 6 cards I've created, you'll be receiving all the cardstock cut to size, and basic instructions to put them together.  You will need to have:
  1. a stamp set for the sayings and the small background stamps, (I've used a new one called Perennial Birthday, which is priced at $38, I've used 10 of the stamps out of 14 in the set! which works out to only $2.71 per stamp, bargain!!) 
  2. Glues (I've used Snail Adhesive, Dimensionals and Tombow Multipurpose Adhesive). 
  3. Something to colour in with (I've used Stampin' Blends in Old Olive duo's, Pumpkin Pie duo's and Pink Pirouette duo's), 
  4. Ink Pad/s, you could use Memento Black, and colour in with the Blends, although I've used Old Olive and Marina Mist.  I'll add more details after the photos :)

Here are the cards:
the cards with the numbers are interchangeable, you pick out your own numbers from your kit.

Ok, onto the nitty gritty!

Price of the kit is $25, and $5 for postage.
HOWEVER!  
As it is Sale-a-Bration, if you order $180+ from me (either on line or in person) then I will send you this class for FREE, and you'll also receive 1 or 2 FREE Sale-a-Bration items as part of your order (double bonus!!) If you order online, just drop me a line to remind me to send your kit to you, I'd hate to miss anyone accidentally!
Please place your order with me and pop the money into my bank account with your name as a reference by 6th January (let me know and I'll send you my a/c number), I will get the order done by the 8th and will aim to have everything mailed out by the 15th (should be enough time for Australia Post to get the order to me!)

I'm hoping the new catalogues will arrive with me any day now, so I can start sending those out to you, let me know if you want one (I'm sending them out for free😊 so don't miss out by not letting me know!)

I hope this inspires you to want to create in your own space!
God Bless love
Heather xox
Something Saturday - Shepherds Care meets Snowy Delights Masks

Hi there Creators,  Today I thought I'd play around with a couple of my latest goodies, Shepherds Care Stamp set and Snowy Delights Mas...