Blender Pens and how to use them

 Hi there Creators,

For my Something Saturday this week, I'm showing off Stampin' Up!'s blender pens (to view them click the link), they're really cool!  they have no colour at all, but you can pick up colour and then colour in your stamped images with them!

These are the cards I made after the video with the bits I made in the video☺

There are different ways to pick up the colour with the blender pens.  I show 5 in the video

The first I show, is to stamp in the colour you want to use, and use the blender pen to "pull" the colour from the edges into the image, the mouse in this card uses this technique.  

the second technique is on the pencil which is coloured using blender pen to pick up colour from the pastels, literally just wiping the blender pen across the pastel and colouring with it.

Both of these techniques give quite a nice soft look.

Next is picking up colour by squeezing my ink pad (while it's still closed) this gives you ink on the inside of the lid, and you can pick up the colour from this pool of ink , which is how I coloured in this card.  If you want the colour lighter, spread the ink around a little on the lid, and use that to colour in which is what I did with the main part of the cheese, for the holes I used the more concentrated colour

Another way is to use Stampin' Write Markers to colour on a clear block, then pick up the colour with your blender pen, which is how I coloured in this next mouse:
 

And the last (and my personal favourite) is to colour your image roughly with watercolour pencils, then use the blender pens to smooth out the colour, I did use this in the balloon above, but I love being able to combine colours, and blend them together with the blender pen, so I showed this one too in the video:  A little warning with the Blender Pens, Don't overwork the paper, as it will ball the paper, rather like using a felt tip pen repeatedly on paper, it will make the paper too wet and ball it up.

The Blender pens are 3 in a pack for only $21 so I think a bit of a bargain! The stamp sets I've used: the mouse one is called "Mischievous Mice", and will be available to host's only, in the new mini catalogue, from 4th January to 30th June.  You would need to either host a party with a minimum total order of $250, or place a $250 order, and pick it out in your host goodies. 

However the good news is that the first 2 months of the year also have Sale-a-Bration in them, so for every $90 you spend you get to pick a Sale-a-Bration item, there's stamp sets and designer papers - Bonus!!

The last set with the sunflower is from the stamp set Celebrate Sunflowers (click the link to view it)  and don't forget your accessories...!

I hope this inspires you to create too (and you get to create a bit over the Christmas time)

God Bless love

Heather xox

Cascade Card (Something Saturday)

 Hi there Creators,

Well today I'm showing how to make a really simple cascade card, once you've got the dimensions worked out you can make it in any size.

I couldn't remember the name of this to begin with and waterfall card, accordion card both came to mind, but after a spot of googling, it's actually called a Cascade card!

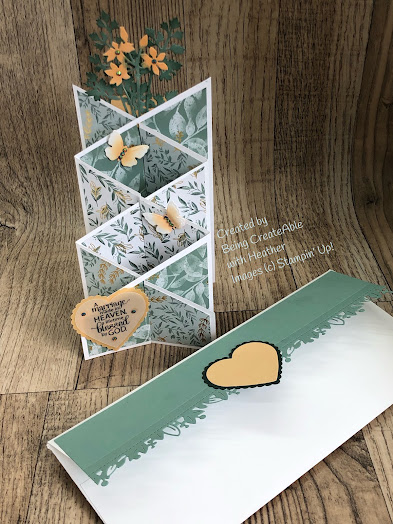
Here is the finished article (which will be off to my friends who are getting married this afternoon, so they shouldn't be able to see this post!)

Cascade Card 

Cascade Card
As you can see I ended up having to create an envelope too for the card, as it was just too big for a standard envelope (plus this dresses the outside up nicely!)πŸ˜‰  How gorgeous is this Edens Garden Paper? and the meadow dies I think go nicely with it.  I couldn't resist using some of my favourite Garden Gems too (sad to think at the end of the year the Eden's garden paper and gems will retire 😒)  So if you want some get them now!!
Cascade Card
See this link for the products I used in this card:  What Heather Used

Whatever size card stock you choose, here's how you do it.....

score it into 3 equal pieces so it concertina's up, then you'll determine how high you want the first tier of your card to be, say you want it to start the slope at 1", you mark a 1" on each side (see the photo) then you cut the diagonal between the 2 marks.


Cascade Card
Now you should have 2 equal (hopefully) pieces πŸ˜ƒ  Line these up on top of each other, make sure the bases are together, even if the top isn't. Then work out the middle (both ways) of each individual section, then put a pin mark in so it goes through both pieces of card.  You'll then want to cut lines up and down, (opposite for each piece of card) see the picture below:

Cascade Card

these should then slide into each other to create your card :) Like so....

Cascade Card

It's really not complicated!  have a go, I'd love to see what you make.

I hope this inspires you to have a go.

God Bless love

Heather xox


Really Pretty Baubles!

 HI there Creators,

I saw these really pretty baubles on pinterest, and thought I'd give it a go, she cut all hers by hand, Yikes!!

I took the easy way out and used punches lol.  I picked out the Label me Lovely Punch, and the other things you'll need are ribbon and an adhesive that will draw a fine line - I used Multipurpose Liquid Glue (Tombow to most)

They are remarkably simple to make, punch yourself 20 of your chosen punch shape.

Then fold them in 1/2 then draw a fine line of glue across the inside middle of each individual one, do this to all 20.

then draw a fine line of glue at each end, so you can stack them together, and they stick together top and bottom.

 Once you have the stack of 20, and the glue is dry, check it out, slowly pull the 2 end pieces round to meet each other, you can add some ribbon, before you attach the 2 sides together (again by a line at the top and the bottom)

 Check out the video I made if that doesn't make sense😊

I hope this inspires you to have a go and make your own baubles

God Bless love

Heather
 

Something Saturday - Shepherds Care meets Snowy Delights Masks

Hi there Creators,  Today I thought I'd play around with a couple of my latest goodies, Shepherds Care Stamp set and Snowy Delights Mas...