Something Saturday - Origami Envelopes

Image
 Hi There Creators, Guess what? it's that time of the week again for Something Saturday!😃 This week I happened to be scrolling through Facebook and came across this origami envelope quick video, so I have deciphered the video (you know how they do it and it's so fast!) And I've worked out if you do it with 12x12" cardstock you get an envelope worthy of a card, and a 6x6" piece gives you a gift card sized envelope. Here they are: then I'll try and explain how to make them...... This first one is made using one of the 12x12" pieces of  Unbounded Beauty Designer Series Paper and this smaller one uses one of the 6x6" pieces of Full of Life Designer Series Paper Now, how to create these envelopes: take your square piece of designer cardstock, and fold in 1/2 diagonally Open it up and fold one side in to the middle: then fold as shown: open up the bottom flap and fold in the sides fold up the bottom tuck the point bit inside the envelope (you might want t...

Eureka Stamper Challenge Day 6

Hi Everyone,
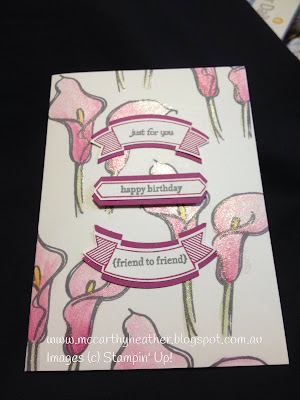
Woo hoo made it to day 6!  This one was to create something with our favourite current Stampin' Up! item (something that if it went missing we'd really miss!)  Oh my goodness what a condundrum!  I made something, but then of course looked at what others had said, and thought oh yes I'd miss that, and that........
I will admit that I'd have to replace my bigshot if it died (Oh yes I've already done that - lol) however that didn't make it into my card!

So this is what did:  Teeny tiny Sentiments, whilst it might not be my favourite item, if I lost it I'd have to replace it because I use it so much!, and my favourite current Stamp is the Arum lily from Remarkable You stamp set, my most used punch is the Duet banner Punch, Oh and of course Wink of Stella - lol, so here's what I came up with:


I have used the Wink of Stella brush to paint on the colour (using it like an aquapainter), with the colour under the banner sayings I have punched an extra shape, then cut it through the middle to attach it either side of the underneath, so you get the colour on both sides of the saying.  And even though I'm not really a big "pink" girl I have to admit to really liking the Berry Burst colour!

Ok well day 7 to blog, and that's the whole week of challenge!
Hope this has inspired you to dig out your wink of stella and give it a go at painting with it.
God Bless love
Heather xox

Comments

Popular posts from this blog

Something Saturday - Twisted Star Ornament

GDP #261

Classes for March