Posts

Something Saturday - Inchie equivalent card for those with an A4 Brain!

Image
Hi there Creators, Well today I thought I'd have a go at an "inchie" card, only mine (unsurprisingly for me) aren't inchies! The idea behind it is that you have inch squares, which get attached to a background paper (which has been scored up before hand so you have lines to attach your inchies to, and embossed with an embossing folder, which then deletes the score lines. However, as you have to cut your base card down to create an inchie card, I decided to do things "my way" hence "equivalent for an A4 brain" Here are the 2 Inchie cards I received the first one from Simone my up-line as a swap at the Stampin' Up!event. She's used the beautiful vibrant Flowering Zinnias designer series paper and the second from Lee-Allan one of my down-line (which uses some paper that now I need to buy 🤣) check it out for yourself:  Natures Sweetness Designer Series Paper then I got onto creating one - my size using retired Designer Papers (you can never

Card Class for October

Image
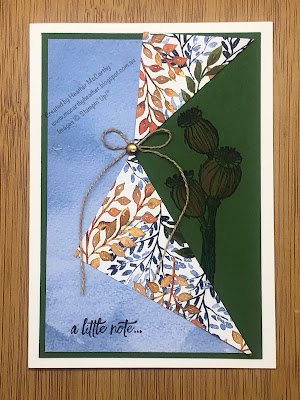
 Hi there, All going well we should be having this class on 6th October in my classroom, I've based the class around the Beauty of the Earth Designer Series Paper, and as there's quite a bit of stamping involved it is an in-person class, however there will be a new postal class coming soon (stay tuned....) Anyway here are the cards, and at the bottom I'll add links which show you exactly what I've used for each card: This first one I wanted to show both sides of the designer paper, as it's so pretty! then I've used the Enjoy the moment stamp set to stamp the seed pods (haven't used this set much) The second card I've gone with the Daisy Lane Stamp set and matching Medium Daisy Punch (again a stamp set I haven't used in a while!) 3rd card is such a wintry pattern (and of course being English, wintry patterns remind me of Christmas....)  So these 3 trees and saying come from Perfectly Plaid stamp set and the matching Pine Tree Punch. Last but not least

Stamped Heat De-bossing (Something Saturday)

Image
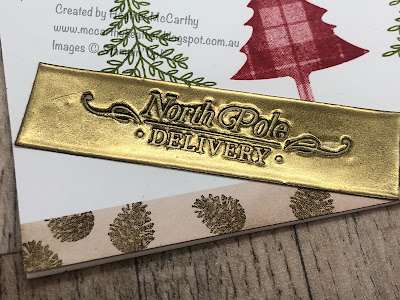
 Hi There Creators, This week my "Something Saturday" video was on Stamped Heat De-bossing, I'm not sure if it's called this but I can't think what else to call it! This is it, there's no ink used in the saying, just heat embossing powder and a stamp.  I think it creates a really cool look. These are the finished cards the top card is the one I actually make in the video : Now that I'm looking at them on here, I'm thinking it would make a really cool tag to hang on a Christmas Stocking!  They kind of end up looking a bit like dog tags!  Or even on a scrapbook layout it would look really great! Anyway I'm sure if you haven't viewed the video that you're wondering how I've done this. It's actually quite simple if you know how to heat emboss! Take your piece of card, wipe it over with your Versamark ink pad, then cover it with heat embossing powder, and heat emboss it. Then repeat the process so (in my case) the Gold or Copper gets thi

Magic Slider card using Delicate Dahlias

Image
 Hi there Creators,  my "Something Saturday" video this Saturday was on this Magic Slider Card, in the video I mention that I'll pop the instructions/measurements here too. However first up the photo....  As you can see I ended up making it in 3 different colours, I just think it's so pretty using the Delicate Dahilas stamp set!  Remember you only have until the end of this month (September) to get this stamp set as it's one of the Sale-a-Bration sets, to get it for free you need to purchase $180 of goodies then you can pick it for Free!  I promised the dimensions and I've done a Photgraphic "journey" of some of the way I've made it, so I'll pop this below, If you want to see the products I've used click on the links at the bottom and you can easily add the ones you need to your shopping card. First up you'll need a 1/2 sheet of A4 (cut longways), should measure 29.7cm x 21cm score it at 9.9cm in from both sides, so it folds into 3 eq

I'm Dreaming of a Pink Christmas

Image
 Hi there Creators Well maybe not "dreaming of a Pink Christmas", but with these cards, Pink looks good for Christmas lol!   I have put together a special kit for you, 6 cards plus the box.  In this kit you'll receive The Kraft Gift box to decorate 1/4 pack of ribbon (more than you'll need) 6 base cards with envelopes 1 page of snowflakes (more than you'll need) 1 pack of Basic Pearls (more than you'll need) 1/2 Pack of the Whimsy & Wonder Specialty Designer Series Paper Paper Instructions included with the kit  Video Instructions YouTube link emailed to you. All the card stock will be cut and scored appropriately for you.   And the kit will be mailed out to you.  Order your kit by Friday 17th September ,  I will order over the weekend, and hope to have the order by (fingers crossed 27th depending on mail, so will aim to have the kits in the mail on 29th, but will keep you informed if there's any changes to that) There are a couple of options to this k

Nuts about Squirrels

Image
 Hi there Creators There's Something about squirrels.... (Mary doesn't do it for me 😂)  So when this cute little Nuts about Squirrels set came out I knew it would end up in my collection.   Coming from England to Australia it's one those creatures that aren't over here, when I took the boys back to England a few years ago they were fascinated by the squirrels in one of the London parks, although most are now Gray squirrels I still prefer the red ones. Check out the Stamp set with this link: Nuts about Squirrels (you can purchase it from there too, and at only $30 what a bargain!!)  Oh and while I'm thinking of it for every $90 you purchase you get to pick a free Sale-a-Bration product, check them out in this link: Sale-a-Bration Products .  Till the end of September. Ok, so my first card I made is this one here:  this one I just stamped directly onto my card, then stamped 3 spare nuts, and cut these out by hand, and the saying stamped and cut by hand, I liked the

Adding colour to Patterned Papers

Image
  Hi there Creators, Have you ever thought about adding colour to your designer series paper? I was playing around last night and gave it a go..... (you can tell when I'm on holiday my brain starts trying new things lol) So I've used the Whimsy & Wonder Specialty Designer Series Paper (keep your eyes out for something else coming soon with these papers)  How stunning are the papers! they have iridescent designs on each sheet, WOW! The top piece with the trees on it I've used my Blending brushes to blend some Misty Moonlight into the top of it, then some Mint Macaron into the bottom, then the bottom piece I've used Polished Pink to really make the stripes Pop! Give it a go and let me know how it turns out.  And don't forget to join my mailing list, so you know when I post more. Hope this inspires you to create God Bless love Heather xox Click on this link to check out what I used: What Heather Used

Create a Camera Shutter card

Image
 Hi there Creators, Well my Something Saturday this week is showing you how to create a Camera Shutter Card (I'm not sure if that's what it's called but that's what I'm calling it 😀), so here is the card..... The photos above are the finished card from the video, I did add a little to this one. Anyway the basic ingredients are:   You will need 1 piece of A5 card for the card base, you'll need to "gate-fold" this, which means scoring at 5.25cm in on each edge.  It gives you the usual A6 size card but the opening is in the middle. You'll also need 2 pieces of 7.4cm x 10.5cm, which need to be scored on one side in by 1cm And one piece of 14.8cm x 7cm, scored in at the top and bottom by 1cm You'll also need an appropriate punch ideally one that's fatter in the middle and tapers towards the ends slightly. Also a pencil, rubber, ruler and glue  Oh and some images to stamp I've used the really cute Sale-a-Bration Counting Sheep stamp set and