Posts

Something Saturday - Inchie equivalent card for those with an A4 Brain!

Image
Hi there Creators, Well today I thought I'd have a go at an "inchie" card, only mine (unsurprisingly for me) aren't inchies! The idea behind it is that you have inch squares, which get attached to a background paper (which has been scored up before hand so you have lines to attach your inchies to, and embossed with an embossing folder, which then deletes the score lines. However, as you have to cut your base card down to create an inchie card, I decided to do things "my way" hence "equivalent for an A4 brain" Here are the 2 Inchie cards I received the first one from Simone my up-line as a swap at the Stampin' Up!event. She's used the beautiful vibrant Flowering Zinnias designer series paper and the second from Lee-Allan one of my down-line (which uses some paper that now I need to buy 🤣) check it out for yourself:  Natures Sweetness Designer Series Paper then I got onto creating one - my size using retired Designer Papers (you can never

Today's Party

Image
Hi Everyone, I thought I'd share what I taught at the party I did today, the hostess really likes the Beautiful You Stamp set so I created this card for the ladies to make: They had a choice of the new Sale-a-bration glimmer papers to choose from to put behind their row of hearts, this one uses the Sweet Sugarplum, but also available in the pack is Mint Macaron, and Bermuda Bay (they're officially available from the 20th Feb to 31st March)  Also uses one of the beautiful lace trim stamps from Delicate Details stamp set, and the Serene Scenery Designer Series Paper Then the other thing I wanted to show was the really cool Project Life Cards, so we created cards like these, using the 3x4" cards from 2 different sets of cards - All Year Long Project Life Cards , and Hello Lovely Project Life Cards . (first card)   We used the Decorative Label Punch on both cards, funnily enough I hadn't realised I'd used it for both until I came to

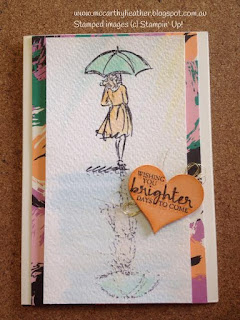
New Video - Reflection Technique using Beautiful You

Image
Hi everyone, Well finally the school holidays are over, and I have peace and quiet!  I'd been asked by a couple of people how I made this card: I have used the Beautiful You stamp set So I thought I'd do a video! However I also said at one point that I would show you how I have my room/equipment set up to do the videos!, So I got my trusty husband to take a couple of photos of me (before I started filming), he got a bit carried away, so I've picked (what I think is the best one) 😁  My room is also set up for a class this evening here, so I have just moved some of the bits back to create the space for the Vid!   Here's the Video!   And this next photo is what I actually made in the video! Do have a go at the reflection Technique, I hope you enjoy it, and as I said in the video, if there's anything else on my blog that you're interested in seeing as a video, do let me know:) I hope this has inspired you to create :) God Bless love Hea

Colour INKspiration CI02

Image
Hi Everyone, Well, there is a new Challenge over on the INKspiration Facebook Page !  As my aim is to join in with as many as possible, I had a spare moment or two today, so here we are! I have an aim to go through all my stamp sets and use them all my at least twice!, as I'm finding that  a lot of them I used heaps when I first got them, and now they've made their way to the bottom of the pile, and kind of get forgotten about, in preference of the new and shiny!  I still love this stamp set "Garden in Bloom" though! Oh I'd better tell you what the challenge is! So the challenge is to use these colours: Wisteria Wonder, Soft Sky, Mint Macaron, Whisper White and Garden Green.  My plan was to watercolour on shimmery white cardstock, umm didn't go so well!  So instead I watercoloured on watercolour paper, used the Decorative Label Punch for the saying, and created this:   which I like, but as I'd also used Stazon black and the new gorgeous

February 2017 Class Projects

Image
Hi Everyone, Wow we're almost at the end of January!  So here are my class cards for February, class dates are Wednesday 1st Feb at our new home in Kangaroo Flat - Rosedale (10.30am), Saturday 4th Feb in Maryborough (10am), and Wed 8th Feb in Laanecoorie (eve). My mum reminded me that it's Valentines day in Feb, when I was on the phone to her yesterday, so I thought we'd best do something "Valentinesey" but as I'm not big on Valentines day, this one can be dressed up for the occasion, or just for a good friend:   I love the copper foil, and I'm pleased with the way it turned out I think the copper pairs nicely with the Cherry Cobbler colour (felt I'd better use a red for the occasion - lol)  the spots in the background are from one of my favourite Stamp sets " Gorgeous Grunge "And this saying is from " Suite Sentiments " it has some fabulous sayings in it! Ok moving onto the next card:   Yes this one does seem to be 3 ca

INKspiration Challenge Offical Launch

Image
Hi Everyone, Well I have been meaning to get into my craft room for this challenge for a week and 1/2 now, finally made it.... YAY! I'm really pleased with this card, quite simple, and I think it'll be in my teaching next month! So without further ado here it is:   The "brief" was to create a card using these colours, although I haven't used all of them (and I've substituted Blushing Bride for Flirty Flamingo)  I'm still quite chuffed with it!   You should be able to click on the icecream photo to check out what others have been doing over on the INKspiration Facebook site. You might be wondering what I've used?  Well the ink colours are Sweet Sugarplum, Peekaboo Peach, and Flirty Flamingo,  then I've taken one of the gorgeous new Lace Doilies , and used it as a mask with the 3 different colours, just daubing them over it, then moving the doily and doing the same again, till the background is covered.  Then I've taken the lovely Sale

Global Design Project GDP#69 Challenge

Image
Hi Everyone, I thought I'd have a go at the GDP challenge again this week, which is a colour challenge I saw someone's handbag when I was at work the other day, and the button just made me want to have a "go at it!, then I remembered about the handbag cards I used to make when I first started  with Stampin' Up! we used to use various punches, and folded over the top, and they made really cute little handbags. After checking out my available punches I decided to go bigger......and judging my the reaction from my ladies at my Wednesday evening class it was worth it! The button is actually made from Silver Foil cardstock , with TipTop Taupe underneath, and a Delightful Dijon cross from the Festive Flower builder punch .  The Handbag card itself is made using the largest Lots of Labels framelit. Umm this could end up being a Class project, or a video.......... Thanks for reading this, and do check out the other Global Design Project

January 2017 CreateAbles Team Meeting

Image
Hi Everyone, Well this morning was our monthly team meeting as it's January a lot of folks were away, so in the end there was 3 of us! - and I remembered to take some photos - Yay! We did a spot of training on the Stampin' Up! levels first, and checked out the reports on the website, hopefully it made more sense now to Val and Marg :) Then I did a little "Show and Tell" on how to use your thinlits and framelits to emboss instead of cut, (you'll see a video on using thinlits here: video on embossing with thinlits ) I used a framelit too to create this cute card:   Then we moved on to the Make and Takes first up using the new Balloon Adventure Bundle If you have one the catalogues it's all on page 5 (if you'd like one let me know!) I've also used the Party Animal Designer Series Paper and the Emerald Envy Taffeta Ribbon and the Party Animal Embellishments (they're so cool!) Oh except for the Candle Border Punch !which is on page