Posts

Something Saturday - Inchie equivalent card for those with an A4 Brain!

Image
Hi there Creators, Well today I thought I'd have a go at an "inchie" card, only mine (unsurprisingly for me) aren't inchies! The idea behind it is that you have inch squares, which get attached to a background paper (which has been scored up before hand so you have lines to attach your inchies to, and embossed with an embossing folder, which then deletes the score lines. However, as you have to cut your base card down to create an inchie card, I decided to do things "my way" hence "equivalent for an A4 brain" Here are the 2 Inchie cards I received the first one from Simone my up-line as a swap at the Stampin' Up!event. She's used the beautiful vibrant Flowering Zinnias designer series paper and the second from Lee-Allan one of my down-line (which uses some paper that now I need to buy 🤣) check it out for yourself:  Natures Sweetness Designer Series Paper then I got onto creating one - my size using retired Designer Papers (you can never

Eureka Stamper Day 4

Image
Hi Everyone Day 4's challenge was to find your oldest Current Stamp set and create something with it. My oldest current stamp set is Lovely as a Tree . While I was thinking of my oldest, still current stuff, I realised that some of my punches I have had practically from day 1 too, my 1 1/4" circle punch and 1" circle punch , so thought I'd use those too :) (hence the circles lol)  I have brayered the background with the sponge brayers , and added some dazzling diamonds stampin' glitter over the top.  And my 2nd oldest still currrent stamp set is Teeny Tiny Sentiments, so that got a show too! The circles are actually inset but not really sure you can tell that, so I probably didn't need to go to the lengths I did to create the card lol (oh well.....) you live and learn! I hope this inspires you to create. God Bless love Heather xox

EurekaStamper challenge day 3

Image
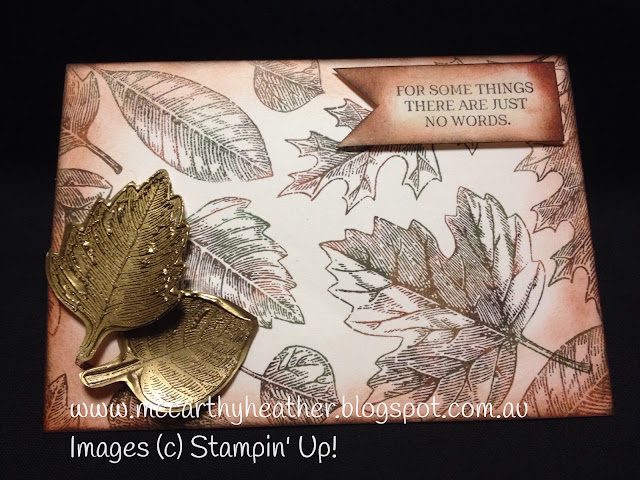
Hi Everyone, Yay made it to day 3!  The challenge today was to take 1 stamp set and use ALL of the stamps in it in 1 project/card. I really wasn't sure how to incorporate a heap of sayings into 1 card, so I took the easy option and chose Vintage Leaves Stamp set , which doesn't have any sayings lol So I also borrowed a saying from Rose Wonder Stamp set .  I really couldn't work out what to say on this card, was thinking of it being a "sympathy" card, but I think this saying works nicely. The leaves in the background are inked up first with Soft Suede ink , then I've used sponge daubers to add Garden Green , Early Espresso , and Cajun Craze . The 2 leaves in the left bottom corner are done, by layering up gold heat embossing powder on a piece of card, so you press the versamark into the card, dust over the embossing powder and repeat, around 5-6 layers thick, then quickly pressing a stamp into it (then it's cut out), nice thing I did discover is th

Eureka Stamper Challenge Day 2

Image
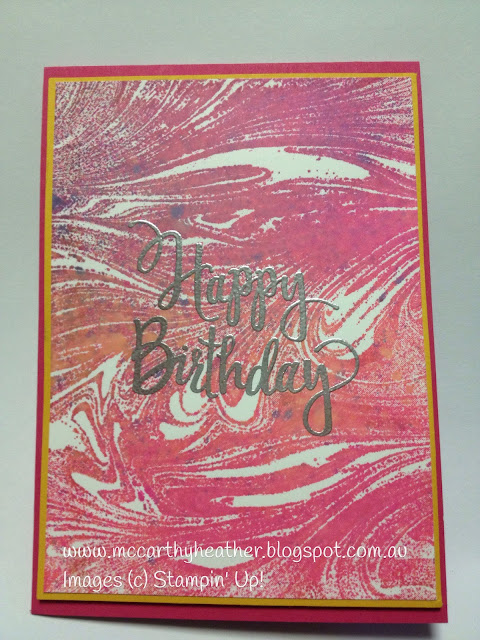
Hi Everyone, oops this was yesterday's challenge, to find the largest stamp we own and create something with it! As I have a few background stamps I thought I'd ink up one I haven't used much Marbled Background Stamp. I wanted to create a multi-coloured effect, but the idea of using Stampin' Write Markers on such a large stamp wasn't so appealing, so I tried out the "Baby Wipe" Technique, but wasn't too impressed with the way it inked up. So my next option was spritzing...... and this is how it came out: I did feel this was kind of pink, which is great if you're a big "Pink" fan, but I'm generally not lol. So then I made up another one using more green and blues This is more my colours, but of course once I had it made I then thought I maybe preferred the Pink one! generally I'm pretty happy with the way it worked. To make them I have had the stamp sitting in my bin, and I sprayed colour onto it (drops of re-inker, m

EurekaStamper challenge Day 1

Image
Hi Everyone, Simone, the team leader of EurekaStampers (Stampin' Up Team) issued a challenge on our Facebook group a day or two ago, to create something everyday for the first week of October. Today was to use a stamp set that we haven't inked up before (or not much). I bought Graveyard Gate , for 2 reasons, the first is that it bundles with the gorgeous Detailed Gate Thinlits Die, and the second was for this card (which I finally got around to making tonight).  I also quite like the "You're Invited" in it too. However I'm sure you're keen to see the card, so I'll stop waffling :) How well do the gravestones work as Chess Pieces? (not that I actually know anyone who plays chess) I showed Tom (husband for those uninitiated), and he suggested the saying that I will admit to printing out on my printer. Figured while I was here, I should also show you the Detailed Gate Thinlits too, I made this card up  a few weeks ago, for a lad who was turning

Cards for class in October

Image
Hi Everyone, As next month is not far off, thought I'd share with you the cards for these 3 classes - Sat 7th 10am in Maryborough:  Wednesday 11th - 10am Kangaroo Flat and 7.30pm Laanecoorie. As Christmas is not far away (gulp!) We have 2 Christmas projects. I'm starting with my favourite card for October!  This uses the gorgeous "Painted Harvest" flower as a wreath, and I just love it!  also uses the Hardwood Stamp in the background, and one of the sayings from Snowflake Sentiments . The other Christmas "project" as oppose to a card is this: I thought it would be a nice change to make up a little gift box, this stocking is a little pillow box, I have used the matching stamp set that comes in a bundle with the dies, called: Tags & Trimmings Bundle .  Card #3 been meaning to use this stamp set Floral Phrases again for a while now, and with the Designer Series Paper that looks so similar, I thought why not make my own Designer Series Paper with

Trim Your Stocking (PillowBox)

Image
Hi Everyone, thought I'd show you these fabulous dies today! they are called Tags & Trimmings , and come as a bundle with the stamp set, or you can purchase the dies on their own Trim your Stocking Thinlit dies , or even just the stamp set on it's own: Tags and Trimmings Stamp set . Aren't they cool?  they make up a pillow box with a difference!  I've gone with 2 colours, Old Olive and Real Red for mine with a bit of Silver Glimmer for the Snowflake: They are really very simple to put together, when you run the dies through the bigshot, it cuts and scores the pieces in the right places, so all you do is fold, and glue the edges together, and you have this really cute little pillow box, I think it would make an amazing advent calendar too with them all hanging in a line, and the numbers put on the front of them! This is what the back looks like (because I'd want to know what it looks like lol!): When you make them up you tuck the long flap for the ba

Global Design Project 103 (GDP103)

Image
Hi Everyone, I've been meaning to join in with the Global Design Project for ages!  So this time I've finally made a card appropriate for it!  The brief this time is a Theme Challenge "It's all about him".  Create something for a male!   With Father's day just having passed, and I forgot to send a card to my Step Dad in England (I did manage to send him a gift voucher, so not completely forgotten!)  I thought this would be ideal to spur me into a card for him! (fairly sure that I'm safe posting it on here, as he doesn't get online - lol) I've seen a lot of cards that have been using Eclipse Technique, so thought I'd give it a little go (admittedly I don't have the current letter dies, but I do have some that retired a while ago.) So here it is: I'm not sure that I've cracked the technique, and to be honest I couldn't see the letters initially, hence they ended up being coloured in!  I've used the "Gu